Remote laboratory development
Table of Contents
Introduction
This section covers the development of new remote laboratories using WebLab-Deusto. As detailed in Technical description, WebLab-Deusto provides a set of libraries so experiment developers can create their own remote laboratories.
There are two major approaches for using WebLab-Deusto:
- Managed laboratories
- Unmanaged laboratories
Which are described below.
Note
This section explains the provided APIs and tools for development. However, you need to read the following section to register the new laboratory and use it. So you probably need to go from one document to the other during the development cycle.
Note
If you are familiar with Python, you could go to http://developers.labsland.com/weblablib/ which is a Python library suitable for web developers using Python and Flask.
Managed laboratories
Managed laboratories are those laboratories developed with the API of WebLab-Deusto. They basically have two parts:
- A client, developed using one of the libraries provided by WebLab-Deusto (see below).
- A server, developed using one of the provided server libraries or using XML-RPC directly (see below).
This way, the client will run on the web browser and will basically display the user interface. Whenever the user interface requires accessing the equipment, it will use the provided API to submit a command and retrieve a response. For example, a typical application might perform an action when the user presses a button. This button will submit a message (command) using the API, and WebLab-Deusto will call a particular method in the server side with that particular message.
Therefore, managed laboratories count with the following advantages:
- Experiment developer does not manage any type of communications. The client API has a method for submitting a command, which the WebLab-Deusto client will propagate as securely as the system has been configured (e.g., supporting HTTPS) to the server, which once in the campus side, the server will submit the command to the particular equipment (regardless where it is deployed in the internal topology of the campus side network). All commands submitted through WebLab-Deusto will go through pure HTTP, crossing firewalls and proxies.
- All the information is stored in the database by default, so it is possible to perform learning analytics. By default, administrators and instructors can track what exact commands were submitted by the student. This process however does not add a relevant latency, since instead of storing each command whenever is sent, it adds it to a memory queue (which is a fast operation), and other thread is continuosly retrieving information from the queue and storing it in the database in a batch basis.
WebLab-Deusto supports and provides libraries for multiple programming languages.
Unmanaged laboratories

However, not everybody in the remote laboratory community is comfortable with developing a remote laboratory from scratch by programming. For this reason, WebLab-Deusto also supports unmanaged laboratories, which are those where the communication is not sent through WebLab-Deusto, but directly to the final server.
A typical unmanaged environment works as follows: #. The user selects a laboratory in WebLab-Deusto #. When the user attempts to use a laboratory, WebLab-Deusto contacts the laboratory. Some secret is exchanged between both WebLab-Deusto and the laboratory, and WebLab-Deusto provides the user with a URL which contains a secret so the laboratory can identify the user. #. From that point, the user is redirected to that URL and he interacts directly with the laboratory.
This way, WebLab-Deusto still manages the reservation process, authentication (i.e., who is the user), authorization (i.e., in what groups are the user), scheduling (i.e., the queue of users) or user tracking (but only when did the user enter, not what was submitted by the user). However, the final communications are not managed by WebLab-Deusto.
The main advantages of unmanaged laboratories are:
- You can use any web framework in any web framework you already know. There is no restriction on how the communications have to be managed.
- It supports further protocols not supported by WebLab-Deusto. For example, you might use WebSockets, which is not natively supported by WebLab-Deusto. But in an unmanaged laboratory, you can use them. Or if you use Virtual Machines, you can use SSH/VNC/Remote Desktop or whatever protocol you consider necessary for your laboratory.
- You can use libraries such as http://developers.labsland.com/weblablib/
Which one should I use?
It depends on your background. WebLab-Deusto supports both approaches because none of them is suitable for all publics:
- If you are familiar with developing code in Java, .NET, Python or so on, but have little experience with web development, it might be easier for you to develop a managed laboratory. If you’re not familiar with HTML + JavaScript, you might find tutorials on the Internet. Also, if you already know JavaScript and want to have the laboratory as something isolated in your network (so you do not need to deal with unauthenticated users or requests, with efficient approaches to know if the user has finished the session or not, etc.), then the managed approach is better for you. In this case, jump to Managed laboratories.
- If you are familiar with developing complete web applications (e.g., in web frameworks such as Flask, Django or other technologies such as Node.js, PHP, ASP.NET or so), or you want to use special advances features (WebSockets, etc.), you might prefer to deploy the remote laboratory using one of these technologies and be in charge of the complete stack (e.g., managing who has access, checking when the user disconnected, etc.), so using the unmanaged approach might be more suitable for you. In this case, jump to Unmanaged laboratories.
In any case, both approaches are compatible in the same WebLab-Deusto server, so you might manage laboratories developed in each technology.
So the next step is to start with any of the two approaches:
Managed laboratories
This section describes how to develop experiments using the managed model.
Introduction
As previously defined, in the managed laboratories, all the communications are managed by WebLab-Deusto. This basically means that, as seen on the following figure, the client code will call a set of methods such as:
// In the client side (JavaScript in this case)
weblab.sendCommand("press button1")
    .done(function (response) {
        console.log(response);
    })
    .fail(function (error) {
        console.log(error);
    });
And WebLab-Deusto guarantees that this string will be forwarded to the proper experiment server. In the experiment server, there will be a method such as:
//  (example in Java)
public String sendCommand(String command) throws WebLabException {
    // Manage the command and return the results
    if (command.startsWith("press ")) {
        String what = command.substring("press ".length);
        pressButton(what);
        return getStatus();
    } else {
        return "unknown";
    }
}
So as to do this, WebLab-Deusto provides APIs for the client, which wrap the communications submitting the commands to the server side using HTTP (and HTTPS if available), adding the required metadata (such as the session identifier). This is step 1 in the following figure. Once in the Core server (check the technical description if lost), it checks if that the session is still available and with an experiment assigned. If so, it submits the command to the Laboratory server in charge of the assigned experiment (there might be different laboratory servers) and stores the command in the database. This process is faster than it may sound, since it uses memory structures and internal queues so there is only a single thread using the database for adding the commands submitted. This is step 2 in the figure. Once in the Laboratory server, it checks to which Experiment server the command should be submitted, and submits it (this is step 3). If the Experiment Server was developed with one of the libraries for servers, then this gets the message in the programming language used and passes it to the Experiment server code.
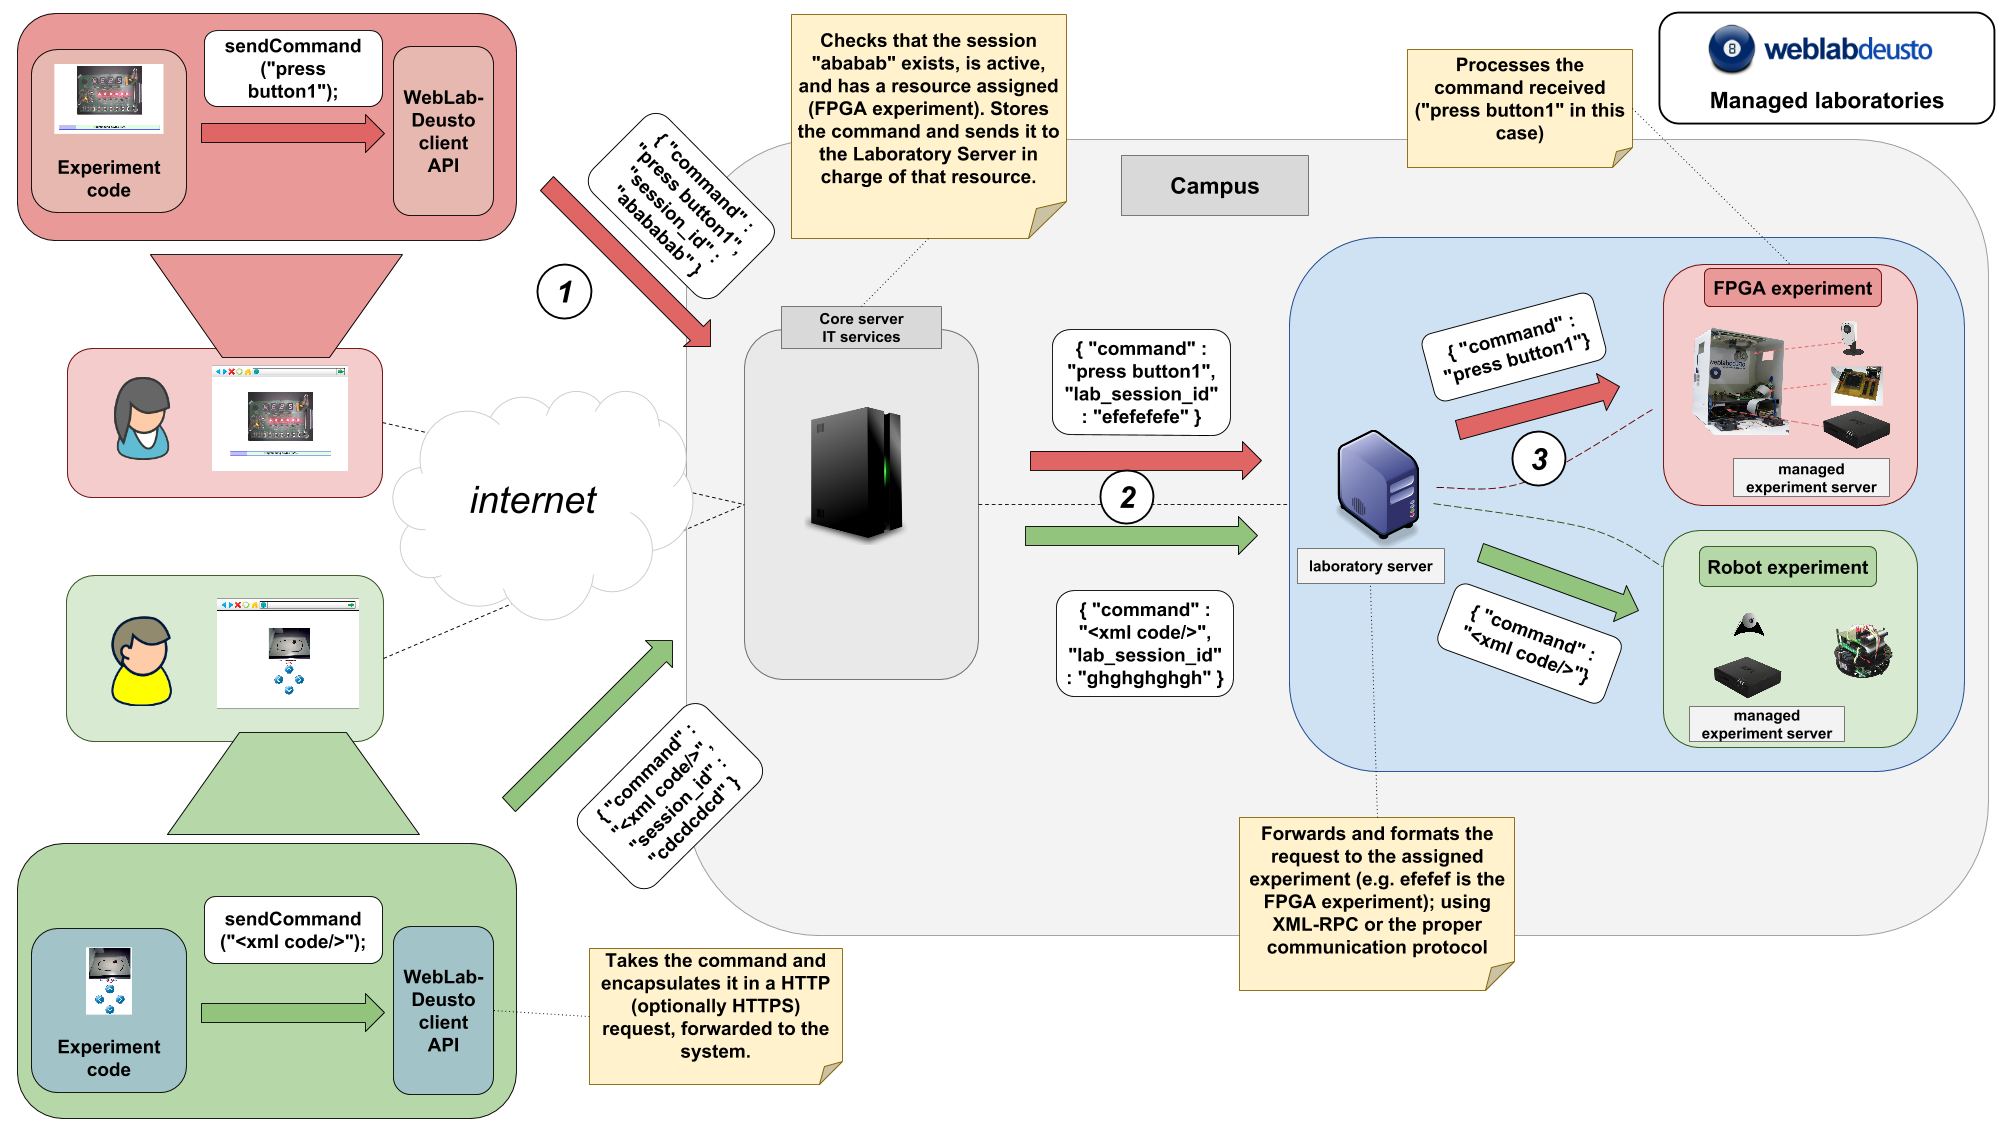
Command sent through the managed model. See the diagram in full size here.
This way, it is entirely up to the experiment developer to choose the proper
programming environment for its experiments. Furthermore, developers will select
the format of the contents submitted as commands. WebLab-Deusto does not impose
any restriction on this side, so developers may send a simple string such as
press button1 that will later parse, or they may use an XML or JSON format.
For this reason, in the case of the managed model, developers do not need to handle:
- Scheduling (the core server manages it)
- Communications (the libraries manage it)
- User tracking (every command exchanged is already stored in the database)
- Complex deployments (e.g., load balancing: it is configured at WebLab-Deusto level)
So the next step is to develop the client and the server components in the technologies you select. Feel free to jump to:
Server side
There are two ways to develop a remote laboratory using the WebLab-Deusto API in the managed model:
- Using Python (which is the programming language used by the rest of the WebLab-Deusto system) as a native laboratory (therefore managing even the configuration through WebLab-Deusto).
- Running an external process which acts as a XML-RPC server. We provide libraries for doing this automatically, described below.
In this case, there is no prefered way to develop the laboratories, whatever is easier for the laboratory developer.
All the libraries can be found in the repository, in the experiments/managed/libs/server directory.
Before starting, there is a concept of API version or level for the Experiment server API. Basically, we started with a very simple API which contained the following methods:
void startExperiment();
void dispose();
String sendCommand(String);
String sendFile(String content, String fileInfo);
Changing this API breaks compatibility with existing laboratories. For this
reason, we implemented a method called get_api, which returns the current
API. And at the moment of this writing, there are 3 APIs:
1, which is the one presented above.2, which is the one used in the majority of our laboratories, but not in all the libraries at this moment.2_concurrent, which right now is only provided in Python, while it should be easy to change the underlying XML-RPC services in each library to support it.
In the API v2, the methods we support are the following. We use Java syntax so it is clearer for any reader.
/**
* Receives two JSON documents. The first one (clientInitialData) is provided
* by the experiment client. The second one is provided by the core server,
* so it includes secure data that can be trusted. This second one might
* receive:
*
* - request.locale: language used by the client
* - request.username: login of the student
* - request.full_name: full name of the student (at this point, it's still
*      the username)
* - request.experiment_id.category_name: category of the experiment
* - request.experiment_id.experiment_name: experiment name
* - priority.queue.slot.length: time in seconds for the particular user
* - priority.queue.slot.start: since when counting this time
* - priority.queue.slot.initialization_in_accounting: whether the
*      initialization is counted or not in that time
*
* More parameters will be added in future versions.
*
* The startExperiment returns a JSON document too. It can be simply "{}".
* But it may contain the following information:
*
* - initial_configuration: a String that will be sent to the client in its
*      initialization. It may contain for example webcam URLs or similar of
*      the particular server.
* - batch: a boolean value stating if the current experiment is batch (and
*      therefore the experiment will be stopped just after calling this
*      method).
*
* So, examples of return values are:
*
*  - {}   (normal return)
*  - { "initial_configuration": "{\"webcam_url\": \"http://.../\"}" }
*  - { "initial_configuration": "(result)", "batch": true }
*
*/
String startExperiment(String clientInitialData, String serverInitialData);

/**
* returning "1", "2", "2_concurrent" and more in the future.
*/
String getApi();

/**
* Report WebLab-Deusto if the current user should be kicked out or not.
* In some laboratories, if certain circumstance happens, the user should not
* be using the laboratory more time. This method provides a mechanism for
* developers to activate this. To this end, this method will be called
* periodically. If such feature is not required, the laboratory should just
* return 0 (stating "don't call me again"). If the lab should be contacted
* often (e.g., every 30 seconds), the laboratory should return that time in
* seconds. So if it returns 5, it will be contacted in 5 seconds
* approximately, and if then it returns 10, it will be contacted in 10
* seconds approximately. Finally, if the user should be kicked out, -1
* should be returned.
*/
int shouldFinish();

/**
* Send a command to the laboratory. You can encode whatever message here:
* either a JSON/XML or a simple string. WebLab-Deusto will not process this,
* it will just store it. Whatever is returned will be also sent to the
* client.
*/
String sendCommand(String message);

/**
* Send a file to the laboratory.
*/
String sendFile(File f, String info);

/**
* Tell the laboratory to clean the resources. Whenever the laboratory
* returns from this method, the laboratory will be assigned to someone else.
* If the laboratory might take long in cleaning resources, it should return
* a JSON stating that. It may also provide some information for the client
* to be displayed after finishing. To do this, it should return a JSON with
* some contents:
*
* - finished: true/false (if finished)
* - data: data to be returned to the client
* - ask_again: true/false (if not finished and want to be called again until
*      cleaning resources is finished.
*
* By default, just return "{}" (an empty JSON message).
*/
String dispose();
The Laboratory server can define which is the API of a laboratory. If it is not
stated by the Laboratory server, the system attempts to request the API version.
If it fails to provide it, it will assume that it is version 1 (where there
was no such concept, and therefore, no explicit method detailing it). From that
point, it will know which version the Experiment server is running and it will
call the methods in one way or other (e.g., providing arguments to the
startExperiment or not, using more methods, etc.).
In the concurrent version of the API, the same exact API is provided but it receives an additional argument at the beginning identifying the user session. This way, you can make a laboratory that supports 30 concurrent students accessing, and you can still identify who is who by the session identifier provided. So the methods become the following (the internals are the same as in the previous code):
/**
* Same as before, but it is told to receive a new user with sessionId.
*/
String startExperiment(String sessionId, String clientInitialData, String serverInitialData);

/**
* returning "2_concurrent" and more in the future.
*/
String getApi();

/**
* Same as before but referring to a particular user.
*/
int shouldFinish(String sessionId);

/**
* Same as before but referring to a particular user
*/
String sendCommand(String sessionId, String message);

/**
* Same as before but referring to a particular user
*/
String sendFile(String sessionId, File f, String info);

/**
* Same as before but referring to a particular user
*/
String dispose(String sessionId);
So as to make the development process easier, we provide libraries for different languages. However, some of them are in different versions (e.g., version 1, or version 2 or version 2_concurrent). If you want to support a different version, feel free to develop the library yourself and contribute it to our github (Contribute), or simply contact us to develop it (Contact). All the libraries can be found in the repository, in the experiments/managed/libs/server directory.
The following are available:
WebLab-Deusto server (Python)
There are two ways to develop the laboratory in Python. One is using all the WebLab-Deusto toolkit, and another using a simple script. The second one would be recommended for constrained devices (e.g., Raspberry Pi), while the first one could be more convenient for regular deployments. This section covers the first one. If you’re interested on the second one, jump to Python.
In the case of Python, no external library is required, other than WebLab-Deusto itself. A dummy example would be the following:
import json

from weblab.experiment.experiment import Experiment
import weblab.experiment.level as ExperimentApiLevel

class DummyExperiment(Experiment):

    def __init__(self, coord_address, locator, cfg_manager, *args, **kwargs):
        super(DummyExperiment,self).__init__(*args, **kwargs)

        # Keep an instance of the configuration manager
        self._cfg_manager = cfg_manager

        # Retrieve a configuration variable from the configuration file:
        self._cfg_manager.get_value("property_name", "default_value")

    def do_start_experiment(self, client_initial_data, server_initial_data):
        """A new student is granted access to the laboratory (scheduled,
        authenticated, etc.)"""

        # Data provided by the client
        print "Client initial data:", json.loads(client_initial_data)
        # Data provided by the server (username, time slot...)
        print "Server initial data:", json.loads(server_initial_data)

        # Default response
        return "{}"

        # If you want to provide some initial data (URLs to cameras or so)
        # return json.dumps({ "initial_configuration" : "this will be batch", "batch" : False })

        # In case of batch laboratories, use the following:
        # return json.dumps({ "initial_configuration" : "this will be batch", "batch" : True })

    def do_get_api(self):
        # The current Laboratory API is the version 2. Whenever we add new
        # methods or change the API, it will not affect you if you are
        # stating that the API that the rest of the system must use with
        # this experiment is v2.
        return ExperimentApiLevel.level_2

    def do_dispose(self):
        """ The user exited (or the time slot finished). Clean resources. """

        print "User left"

        return "{}"

    def do_send_file_to_device(self, file_content, file_info):
        """ A file, encoded in BASE64, has been sent. Do something with it """

        return "A response that the client will receive"

    def do_send_command_to_device(self, command):
        """ A command has been submitted. Do something with it and reply. """

        print "Command received:", command

        return "Got your command"

    def do_should_finish(self):
        """
        Should the experiment finish? If the experiment server should be able to
        say "I've finished", it will be asked every few time; if the experiment
        is completely interactive (so it's up to the user and the permissions of
        the user to say when the session should finish), it will never be asked.

        Therefore, this method will return a numeric result, being:
          - result > 0: it hasn't finished but ask within result seconds.
          - result == 0: completely interactive, don't ask again
          - result < 0: it has finished.
        """
        return 0
From this point, you can now deploy the experiment, as explained in the following section steps 1 to 4, or to jump to the client development (Client side).
However, it is worth mentioning that there is other API called the concurrent
API, which enables that the Experiment server manages multiple concurrent users
at the same time. For example, imagine that you want that a fixed number (e.g.,
10) students talk each other while using the laboratory. You can change this in
the deployment, as it is later explained in
Concurrency. But then, you would not be able to
differentiate who is accessing, or send different messages to each student. For
this reason, the concurrent API provides a unique identifier (which is a random
number, and is not maintained across sessions) called session_id. This
session_id is passed through all the methods, as seen below:
from weblab.experiment.concurrent_experiment import ConcurrentExperiment
import weblab.experiment.level as ExperimentApiLevel

class DummyConcurrentExperiment(ConcurrentExperiment):

    def __init__(self, coord_address, locator, cfg_manager, *args, **kwargs):
        super(DummyConcurrentExperiment,self).__init__(*args, **kwargs)

        # Keep an instance of the configuration manager
        self._cfg_manager = cfg_manager

        # Retrieve a configuration variable from the configuration file:
        self._cfg_manager.get_value("property_name", "default_value")

    def do_start_experiment(self, session_id, client_initial_data, server_initial_data):
        # Store in a local dictionary that there is a new user defined as
        # session_id

        return "{}"

    def do_get_api(self):
        return ExperimentApiLevel.level_2_concurrent

    def do_dispose(self, session_id):
        # Remove that particular user from the active users
        return "{}"

    def do_send_file_to_device(self, session_id, file_content, file_info):
        # That user (identified by session_id) is sending a file

        return "A response that the client will receive"

    def do_send_command_to_device(self, session_id, command):
        # That user (identified by session_id) is sending a command

        print "Command received:", command

        return "Got your command"

    def do_should_finish(self, session_id):
        # Should that user be kicked out?
        return 0
Now yes, you can now deploy the experiment, as explained in the following section steps 1 to 4, or to jump to the client development (Client side).
Java
The Java library can be found in the experiments/managed/libs/server/java library. It is an Eclipse project, so you should be able to import it if you are using this IDE. Otherwise, you can use ant to compile it, by running:
$ ant build
$ ant run
The structure of the source code is the following:
+ src
  + es/deusto/weblab/experimentservers
    + exceptions
      - (defined exceptions)
    - ExperimentServer.java
    - Launcher.java
    - (Other auxiliar classes)
  + com/example/weblab
    - DummyExperimentServerMain.java
    - DummyExperimentServer.java
There, the important classes are those available in the package es.deusto.
The ones in the com.example can be removed and replaced by the proper
package of your application. They are there as a working example of what the
interface is.
The two important classes are ExperimentServer and Launcher. The former
is a class which defines all the optional methods which can be implemented by
the experiment developer (e.g., a method for receiving commands). The latter is a
class that will start a XML-RPC server taking an instance of the class generated
by the experiment developer.
The first thing you must implement is a class which inherits from
ExperimentServer. An example of this is the DummyExperimentServer class,
which supports multiple methods such as:
// A new user comes in
public String startExperiment(String clientInitialData, String serverInitialData) throws WebLabException {
    System.out.println("I'm at startExperiment");
    System.out.println("The client provided me this data: " + clientInitialData);
    System.out.println("The server provided me this data: " + serverInitialData);
    return "{}";
}

// Typical server initial data:
// [java] The server provided me this data:
//        {
//          "request.locale": "es",
//          "request.experiment_id.experiment_name": "dummy",
//          "request.experiment_id.category_name": "Dummy experiments",
//          "priority.queue.slot.initialization_in_accounting": true,
//          "priority.queue.slot.start": "2013-03-27 00:36:08.397675",
//          "priority.queue.slot.length": "200",
//          "request.username": "admin"
//        }

// A user leaves (or is kicked out)
public String dispose() {
    System.out.println("I'm at dispose");
    return "ok";
}

public String sendFile(File file, String fileInfo)  throws WebLabException {
    System.out.println("I'm at send_program: " + file.getAbsolutePath() + "; fileInfo: " + fileInfo);
    return "ok";
}

public String sendCommand(String command)  throws WebLabException {
    System.out.println("I'm at send_command: " + command);
    return "ok";
}
Those methods should parse the command send by the client and do the required actions (such as interact with certain equipment and return some response).
Once you have implemented this class, you can use the Launcher as:
public class DummyExperimentServerMain {
    public static void main(String [] args) throws Exception{
        int port = 10039;
        IExperimentServer experimentServer = new DummyExperimentServer();
        Launcher launcher = new Launcher(port, experimentServer);
        launcher.start();
    }
}
This way, you willhave the experiment running on port 10039 in this case.
Once you have the server running, you will need to register it in WebLab-Deusto.
From this point, you can now deploy the experiment, as explained in the following section steps 1 to 4, or to jump to the client development (Client side).
.NET
The .NET library is available here (so you have it in your WebLab-Deusto installation in experiments/managed/libs/server/dotnet):
At the time of this writing, it supports API v1. You can fill the DummyExperimentServer.cs example that uses the library:
using System;
using System.IO;

class SampleExperimentServer : WebLabDeusto.ExperimentServer {
        public string SendFile(byte [] file, string fileInfo){
            int length = file.Length;
            Console.WriteLine("File received: {0}", length);
            return "File received " + length;
        }

        public string SendCommand(string command){
            Console.WriteLine("Command received: {0}", command);
            return "Command received: " + command;
        }

        public void StartExperiment(){
            Console.WriteLine("Experiment started");
        }

        public void Dispose(){
            Console.WriteLine("Experiment disposed");
        }
}

class Tester{
    public static void Main(){
        WebLabDeusto.Runner runner = new WebLabDeusto.Runner(
                                            new SampleExperimentServer(),
                                            5678,
                                            "weblab"
                                    );
        runner.Start();
        Console.WriteLine("Press to shutdown");
        Console.ReadLine();

    }
}
From this point, you can now deploy the experiment, as explained in the following section steps 1 to 4, or to jump to the client development (Client side).
C
The C library is available here (so you have it in your WebLab-Deusto installation in experiments/managed/libs/server/c):
At the time of this writing, it supports API v2. You can fill the dummy_experiment_server.c example that uses the library:
#include "weblabdeusto_experiment_server.h"

char * start_experiment(){
    return "{'initial_configuration' : {}, 'batch' : false}";
}

char * send_file(char * encoded_file, char * fileinfo){
    return "ok";
}

char * send_command(char * command){
    return "ok";
}

char * dispose(){
    return "ok";
}

int main(int const argc, const char ** const argv) {

    struct ExperimentServer handlers;
    handlers.start_experiment  = start_experiment;
    handlers.send_command      = send_command;
    handlers.send_file         = send_file;
    handlers.dispose           = dispose;

    /* For optional methods, you can use the default
       implementation by pointing to default_<handler-name> */
    handlers.is_up_and_running = default_is_up_and_running;
    handlers.should_finish = default_should_finish;

    launch(12345, handlers);

    return 0;
}
From this point, you can now deploy the experiment, as explained in the following section steps 1 to 4, or to jump to the client development (Client side).
C++
The C++ library is available here (so you have it in your WebLab-Deusto installation in experiments/managed/libs/server/cpp):
At the time of this writing, it supports API v1. You can fill the dummy_experiment_server.cpp example that uses the library:
#include "weblabdeusto_experiment_server.hpp"

#include <iostream>


class DummyExperimentServer : public ExperimentServer
{
public:

    virtual std::string onStartExperiment()
    {
        return "{'initial_configuration' : {}, 'batch' : false}";
    }

    virtual std::string onSendFile(std::string const & encoded_file, std::string const & fileinfo)
    {
        return "ok";
    }

    virtual std::string onSendCommand(std::string const & command)
    {
        return "ok";
    }

    virtual std::string onDispose()
    {
        return "ok";
    }
};


int main(int argc, char const * argv[])
{
    DummyExperimentServer testServer;
    testServer.launch(12345, "rpc_log.txt");
}
From this point, you can now deploy the experiment, as explained in the following section steps 1 to 4, or to jump to the client development (Client side).
Node.js
The Node.js library is available here (so you have it in your WebLab-Deusto installation in experiments/managed/libs/server/nodejs):
At the time of this writing, it supports API v2. You can fill the dummyexperimentserver.js example that uses the library:
experimentserver = require("./node.weblab.experimentserver");

DummyExperimentServer = new function() {

    this.test_me = function(message) {
        console.log("On test_me");
        return message;
    }

    // Is the experiment up and running?
    // The scheduling system will ensure that the experiment will not be
    // assigned to other student while this method is called. The result
    // is an array of integer + String, where the first argument is:
    //   - result >= 0: "the experiment is OK; please check again
    //                 within $result seconds"
    //   - result == 0: the experiment is OK and I can't perform a proper
    //                 estimation
    //   - result == -1: "the experiment is broken"
    // And the second (String) argument is the message detailing while
    // it failed.
    this.is_up_and_running = function() {
        console.log("On is_up_and_running");
        return [600, ""];
    }

    this.start_experiment = function(client_initial_data, server_initial_data) {
        // Start experiment can return a JSON string specifying the initial configuration.
        // The "config" object can contain anything. It will be delivered as-is to the client.
        var config = {};
        var initial_config = { "initial_configuration" : config, "batch" : false };
        return JSON.stringify(initial_config);
    }

    this.send_file = function (content, file_info) {
        console.log("On send_file");
        return "ok";
    }

    this.send_command = function (command_string) {
        console.log("On send_command");
        return "ok";
    }

    // Returns a numeric result, defined as follows:
    // result > 0: it hasn't finished but ask within result seconds.
    // result == 0: completely interactive, don't ask again
    // result < 0: it has finished.
    this.should_finish = function() {
        return 0;
    }

    // May optionally return data as a string, which will often be json-encoded.
    this.dispose = function () {
        console.log("On dispose");
        return "ok";
    }
}


experimentserver.launch(12345, DummyExperimentServer);
From this point, you can now deploy the experiment, as explained in the following section steps 1 to 4, or to jump to the client development (Client side).
LabVIEW
Note
This is the LabVIEW managed library. It does not support using Remote panels or so on. It only supports that you serialize the messages and write your own client in JavaScript using it.
The LabVIEW library is available here (so you have it in your WebLab-Deusto installation in experiments/managed/libs/server/labview):
At the time of this writing, it supports API v1. You can fill the DummyExperimentServer.vi example that uses the library.
From this point, you can now deploy the experiment, as explained in the following section steps 1 to 4, or to jump to the client development (Client side).
Python
There are two ways to develop the laboratory in Python. One is using all the WebLab-Deusto toolkit, and another using a simple script. The second one would be recommended for constrained devices (e.g., Raspberry Pi), while the first one could be more convenient for regular deployments. This section covers the second one. If you’re interested on the first one, jump to WebLab-Deusto server (Python).
The Python library can be found in the experiments/managed/libs/server/python. It does not rely on any external library, since Python comes with an XML-RPC server included. You will find two modules:
weblab_server.py, which includes theExperimentServerand theLauncher.sample.py, which includes an example of how to use theExperimentServercode, and how to run it with theLauncher.
Basically, you have to create a class which inherits from ExperimentServer
and implements a subset of the following methods (none of these are required
since they are already implemented in the parent class):
from weblab_server import ExperimentServer, Launcher

class DummyExperimentServer(ExperimentServer):

    def start_experiment(self, client_initial_data, server_initial_data):
        print "start_experiment", client_initial_data, server_initial_data
        return "{}"

    def get_api(self):
        return "2"

    def send_file(self, content, file_info):
        print "send_file", file_info
        return "ok"

    def send_command(self, command_string):
        print "send_command", command_string
        return "ok"

    def dispose(self):
        print "dispose"
        return "{}"

    def should_finish(self):
        return 0
Then, you only need to create a Launcher with a port, and start it:
launcher = Launcher(12345, DummyExperimentServer())
launcher.start()
From this point, you can now deploy the experiment, as explained in the following section steps 1 to 4, or to jump to the client development (Client side).
Client side
The client code is focused on two tasks:
- Providing the user interface
- Submitting commands to the Experiment server and managing the responses
While WebLab-Deusto supports some web libraries, it is highly recommended to use the JavaScript library (as opposed to Flash or Java applets). Those laboratories developed on top of it will be available for mobile devices, and the number of conflicts in different platforms will be highly decreased, since they will not need any plug-in installed.
In the following sections describe how to use each of the provided APIs. Jump to the technology you are more comfortable with:
JavaScript
The recommended programming language for managed laboratories is JavaScript:
- It is easy. You simply develop an HTML file without any restriction. You include a JavaScript that WebLab provides to interface with the server.
- Does not have any dependency, other than a JavaScript script file and jQuery.
- Can easily make use of any kind of JavaScript library or framework.
- Possible to develop and test the experiments offline, without deploying a WebLab first. You can just open the HTML file in a browser.
What to develop
In order to create a new experiment, essentially you need:
- An experiment server
- An experiment client
This section is dedicated to the latter (an experiment client). An experiment client provides the user interface and client-side logic that your particular experiment requires. It communicates with WebLab and the experiment server through a very simple API.
When you create a WebLab-Deusto environment, it creates a pub directory. Whatever you put on this directory is available in http://localhost/weblab/web/pub/ . You can put HTML/JS/CSS files there. The most basic version of your first JavaScript lab will look like this:
<html>
   <head>
     <script src="https://code.jquery.com/jquery-1.11.3.min.js"></script>
     <script src="../static/weblabjs/weblab.v1.js"></script>
   </head>
   <body>
     <p>Hello world</p>
   </body>
</html>
Make sure that the weblab.v1.js file is properly configured. On a typical environment, it is available in http://localhost/weblab/web/static/weblabjs/weblab.v1.js, so one file called http://localhost/weblab/web/pub/mylab.html will refer to it as ../static/weblabjs/weblab.v1.js, but if you create the file in a different directory (e.g., in a directory mylab in the pub directory), then you need more ../.
This HTML that you have just created is meant to be your experiment’s interface. It will appear within WebLab-Deusto as an iframe. If we continue with the aforementioned example, you might want to add, for instance, a webcam feed to your HTML, and maybe some JavaScript button. Because it is just standard HTML, you can use any library or framework you wish to make your work easier.
Once you draw buttons or things, you only need to interact with the expeirment server, by sending and receiving commands. This is done through the JavaScript API, which will be explained next.
JavaScript API
The WebLab API is relatively simple. The basic API provides these base functions, which is all you really need:
- Sending a command.
- Sending a file.
- Receiving an experiment-starts notification.
- Receiving an experiment-ends notification.
- Forcing the experiment to end early.
For JavaScript, this API can be found in the following place /weblab/web/static/weblabjs/weblab.v1.js
The API follows:
    //! Sends a command to the experiment server.
//!
//! @param text Text of the command.
//! @returns a jQuery.Deferred object. You might use it to register callbacks, if desired.
//! Takes a single string as argument.
//!
weblab.sendCommand(text)
    .done(function(message) {
        // ...
    })
    .fail(function(error) {
        // ...
    })

    //! Sends a file to the experiment server.
//!
//! @param file An <input type="file"> element (the result of a document.getElementById or $("#fileinput"))
//! @param fileInfo A string describing the file (e.g., a file name or whatever).
//! @returns a jQuery.Deferred object. You might use it to register callbacks, if desired.
//! Takes a single string as argument.
//!
weblab.sendFile(file, fileInfo)
    .done(function(message) {
        // ...
    })
    .fail(function(error) {
        // ...
    })


//! Sets the callback that will be invoked when the experiment finishes. Generally,
//! an experiment finishes when it runs out of allocated time, but it may also
//! be finished explicitly by the user or the experiment code, or by errors and
//! and disconnections.
//!
weblab.onFinish(function() {
    // Do something when the user finishes
});

//! Sets the startInteractionCallback. This is the callback that will be invoked
//! after the Weblab experiment is successfully reserved, and the user can start
//! interacting with the experiment.
weblab.onStart(function (time, initialConfig) {
    // Work with the initialConfig (provided by your experiment server) and the
    // remaining time (you're responsible of keep track of it once received)
});
Using the API is easy. Once the script has been included, you can simply call:
weblab.sendCommand( "LIGHTBULB ON")
        .done(function(response) {
                console.log("Light turned on successfully");
        })
.fail(function(response) {
                console.error("Light failed to turn on");
        });
Note that as you can see above, there are some functions that start with “dbg”. Those are for development purposes. Sometimes, for instance, it is convenient to be able to run your HTML interface stand-alone. In order for the experiment to behave in a way that more closely resembles in its intended way, you can use these to simulate command responses from the server and the like.
Note
If you want to start the experiment from your JavaScript code, you may call weblab.startReservation();
After reading this, keep either reading in this document about tools (Tools) or summary (Summary), or jump to the deployment section (Remote laboratory deployment; in particular JavaScript if you’ve done the previous steps in that document) or to the sharing section (Remote laboratory sharing).
Java applets
You can develop the client side using Java Applets. They will not work in tablets (iPad, Android) neither in mobile phones, and many web browsers nowadays do not support Java applets. For this reason, it is recommended to avoid it and rely on JavaScript or Google Web Toolkit (see below).
However, if you are going to reuse code or you need to use Java Applets for other reasons, WebLab-Deusto supports it. If you go to experiments/managed/libs/client, you will find the Java applets source code. It is an Eclipse project, so you should be able to import it if you are using this IDE. Otherwise, you can use ant to compile it, by running:
$ ant package
The package hierarchy is the following:
+ es.deusto.weblab.client.experiment.plugins
  + es.deusto.weblab.javadummy
    + commands
      - PulseCommand
    - JavaDummyApplet
  + java
    - WebLabApplet
    - ICommandCallback
    - ResponseCommand
    - ConfigurationManager
    - BoardController
    - Command
The java package is the library itself, used by WebLab-Deusto. The
es.deusto.weblab.javadummy package is just an example of a user interface
built using this library. You may remove it and use your own package, even
outside (e.g., edu.myuniversity.mylab). However, you must include the
java package.
The first step is to make a class which inherits from WebLabApplet (view
code). In the
example, this class is JavaDummyApplet (view applet code).
This new class is the one which will be instanciated by WebLab-Deusto. It will
be instanciated whenever the user selects the laboratory, before
reserving it. Then, there are three methods that should be implemented by this
class:
public void startInteraction() {
    // When this method is called, student has access to
    // the remote equipment (he has been assigned). You
    // can show a cool user interface for your remote
    // laboratory and call the sendCommand methods (later
    // explained).
}

public void setTime(int time) {
    // This method is called to inform you how many seconds
    // the user will be using this laboratory. You should
    // print it somewhere and maintain a custom counter.
}

public void end() {
    // When this method is called, the user has stated that
    // he is not using the laboratory anymore, or the system
    // has kicked him out (e.g., because his slot finished).
}
From this point, the client knows when the user interfaces should be loaded. So
as to interact with the Experiment server, the WebLabApplet provides a
method which gives access to the BoardController. The BoardController
provides a set of methods for submitting commands.
// From the class which inherits from JavaDummyApplet:
MyCommandCallback callback = new MyCommandCallback();

// Send a message to the Experiment server, and provide a callback
// which will be called when the method comes back.
this.getBoardController().sendCommand("turn switch on", callback);
The callback itself can be defined as follows:
// Somewhere else
public class MyCommandCallback inherits ICommandCallback {

    public void onSuccess(ResponseCommand response) {
        String responseText = response.getCommandString();
        // Do something with the message returned from the
        // Experiment server.
    }

    public void onFailure(String message) {
        // Something failed in the server side or in the
        // communications. Do something with the error.
    }
}
Additionally, the WebLabApplet class provides other methods, such as:
// Call this if you want to terminate the current session
this.getBoardController().onClean();

// Retrieve String properties from the configuration.js file
this.getConfigurationManager().getProperty("my.property", "default value");

// Retrieve int properties from the configuration.js file
this.getConfigurationManager().getIntProperty("my.property");
After reading this, keep either reading in this document about tools (Tools) or summary (Summary), or jump to the deployment section (Remote laboratory deployment; in particular Java applets if you’ve done the previous steps in that document) or to the sharing section (Remote laboratory sharing).
Flash applets
We provide a .fla project in experiments/managed/libs/client/flash to see a
simple sample of !WebLab accessed from Adobe Flash, as well as a .as file with
all the glue code that the experiment developer might use. You can see it in
github.
In order to create a new experiment using WeblabFlash,
weblab.util.WeblabFlash must be imported.
Done this, it is possible to access the singleton instance of WeblabFlash
through its static method getInstance().
//! Retrieves a reference to the only instance of WeblabFlash.
//!
public static function getInstance() : WeblabFlash {
    // ...
}
After getting a reference to this instance the programmer should register the
weblab callbacks. This is done through the registerCallbacks method. The
callback functions to call whenever events take place are passed to
registerCallbacks as parameters. If being notified of a certain event is not
required, it is possible to pass null for it instead. Events are, in order:
onSetTime, onStartInteraction, onEnd, onSecondEllapsed. This
last one is null by default and hence may not be passed at all.
//! Registers the JS callbacks setTime, startInteraction and end, so that
//! the appropiate user-specified delegate is automatically called when appropiate.
//! Optionally registers a seconds timer.
//!
//! @param setTime Function called to set the time.
//! @param startInteraction Function called to start interacting with the user.
//! @param end Function called when the experiment ends.
//! @param onSecondEllapsed Function called every second.
public function registerCallbacks(setTime : Function, startInteraction : Function, end : Function, onSecondEllapsed : Function = null) : void{
   //...
}
Anyway, the developer can ask for the state at any moment. An experiment may be found in one of three different states:
WeblabFlash.STATE_WAITING: When weblab is yet to call startInteraction.WeblabFlash.STATE_INTERACTING: When startInteraction has been called and therefore the experiment has started, and is not done yet.WeblabFlash.STATE_FINISHED: When weblab has calledonEnd()or whenonClean()has been called locally.
Current state may be obtained through the getcurrentState() method.
The method sendCommand is used to send commands to the server. It takes a string with the command as first parameter plus two callback functions. First of those will be called in case the command succeeds and the other one in case it fails. Both callbacks are passed a message string when called.
//! Sends a command to the server. Its response will be received asynchroneously through
//! two alternative callbacks.
//!
//! @param command_str The command string.
//! @param onSuccess Function to call if the command succeeds. Should take the response string
//! as a parameter.
//! @param onError Function to call if the command fails. Should take the response string
//! as a paramter.
public function sendCommand(command_str : String, onSuccess : Function, onError : Function) {
   //...
}
The time of an experiment is limited. WeblabFlash internally keeps a timer. This timer is
initialized to the value passed by weblab through its setTime() call and
starts decreasing once interaction starts. When zero is reached, onClean()
is automatically called and the experiment is considered to be finished.
onClean() may also be called explicitally before the timer reaches zero.
Moreover, weblab may call onEnd() at any time to finish the experiment.
Whenever this happens, the programmer is responsible to clean all resources in
use (such as timers).
In order to retrieve the global configuration values, stored in the configuration.xml file in the client side, the developer may call these methods:
//! Retrieves a property as a string.
//!
//! @param prop The name of the property.
//! @param def The default value to return if the property is not found.
public function getPropertyDef( prop : String, def : String):String {
    // ...
}

//! Retrieves a property as a string.
//!
//! @param prop The name of the property.
public function getProperty( prop : String ):String {
    // ...
}

//! Retrieves an integer property.
//!
//! @param prop The name of the property.
//! @param def The default value to return if the property is not found.
public function getIntPropertyDef( prop : String, def : int ):int {
    // ...
}

//! Retrieves an integer property.
//!
//! @param prop The name of the property.
public function getIntProperty( prop : String ):int {
    // ...
}
After reading this, keep either reading in this document about tools (Tools) or summary (Summary), or jump to the deployment section (Remote laboratory deployment; in particular Flash if you’ve done the previous steps in that document) or to the sharing section (Remote laboratory sharing).
Google Web Toolkit
Google Web Toolkit (GWT) used to be the technology used by WebLab-Deusto in all the remote laboratories. Nowadays, it is still used in certain legacy laboratories and systems.
How to develop the lab
The source code is in client/src. The main package is
es.deusto.weblab.client, and inside this, all the laboatories are in the
experiments package (see here).
You can check any, but the binary one is one of the simplest ones. As you can
see there,
you have to create a class which inherits from IExperimentCreatorFactory.
We’ll go to this one later. Then you see a package called ui. It contains
both the class inheriting from ExperimentBase and the different user
interfaces.
First, let’s see the class inheriting from ExperimentBase. In this case, it
is called BinaryExperiment. The ExperimentBase
class is the one from which all the remote laboratories inherit. It contains
many methods, most of them optinally implemented by the experiment class. The
methods are the following:
/**
 * User selected this experiment. It can start showing the UI. It can
 * load the VM used (Adobe Flash, Java VM, Silverlight/Moonlight, etc.),
 * or define requirements of the (i.e. require 2 files, etc.). It should
 * also show options to gather information that will be sent to the
 * initialization method of the experiment server, that later will be
 * retrieved through the {@link #getInitialData()} method.
 */
public void initialize(){}

/**
 * A user, who performed the reservation outside the regular client (in
 * a LMS or a federated environment) is going to start using this
 * experiment. Basically it is like the {@link #initialize()} method,
 * except for that it should be very fast, and take into account that no
 * configuration can be provided (since the reservation has already been
 * done).
 */
public void initializeReserved(){
    initialize();
}

/**
 * Retrieves information sent to the experiment when reserving the
 * experiment. It might have been collected in the UI of the
 * {@link #initialize()} method.
 */
public JSONValue getInitialData(){
    return null;
}

/**
 * User is in a queue. Thetype filter text typical behavior will be to hide the UI shown
 * in the {@link #initialize()} method.
 */
public void queued(){}

/**
 * User grabs the control of the experiment (in the server side, the
 * experiment is already reserved for the user).
 *
 * @param time Seconds remaining. This time is the maximum permission time.
 * @param initialConfiguration Data sent by the experiment server in the
 * initialization method.
 */
public void start(int time, String initialConfiguration){}

/**
 * User experiment session finished. The experiment should clean
 * its resources, or notify the user that it has finished. It may still
 * wait for the {@link #postEnd(String)} method to be called so as to
 * receive the information sent by the experiment when disposing
 * resources.
 */
public void end(){}
Therefore, it is up to the Experiment client to do something when these methods
are called. Most typically, developers will implement the start method and
the end method. Additionally, all the classes inheriting from
ExperimentBase also inherit the following attributes:
protected final IBoardBaseController boardController;
protected final IConfigurationRetriever configurationRetriever;
protected static final IWebLabI18N i18n = GWT.create(IWebLabI18N.class);
The first one allows developers to interact with the Experiment Server, as documented here, but the most relevant are the following:
////////////////////////////////////
//
// General information
//

/**
 * Is the user accessing through facebook?
 */
public boolean isFacebook();

/**
 * What is the session id of the user? It is useful when using other type of communications, such
 * as iframes in the LabVIEW experiment.
 */
public SessionID getSessionId();

////////////////////////////////////
//
// Sending commands
//

/**
 * Send a string command, don't care about the result
 */
public void sendCommand(String command);

/**
 * Send a string command, notify me with the result
 */
public void sendCommand(String command, IResponseCommandCallback callback);


////////////////////////////////////
//
// Cleaning
//

/**
 * Clean the experiment widgets and move to the list of experiments
 */
public void clean();

/**
 * Finish the experiment.
 */
public void finish();
So basically, what you do when implementing an experiment is to inherit from
ExperimentBase, override the start method to be notified when the
laboratory has been assigned, and then start showing the user interface and
interacting with the server through commands. In the end method, you usually
clean up the remaining resources (e.g., stop camera streams, cancel timers,
etc.).
However, there are some common operations, such as putting a panel in the
screen, or cleaning up the resources. For this reason, there is a utility class
which inherits from ExperimentBase called
UIExperimentBase,
which provides the following extra operations:
protected void putWidget(Widget widget);

protected void addDisposableWidgets(IWlDisposableWidget widget);
So you don’t need to implement the end method, and simply use these methods
to add the resources to be cleaned. In the binary experiment, you can see that
BinaryExperiment (see code)
inherits from this class. In that class, you may see that it simply calls to the
putWidget method, providing the panels implemented in that laboratory.
For instance, you can see the user interface in XML,
and the attached Java code
which manages the event handlers and calls the sendCommand method in the
processSwitch method to interact with the laboratory.
Finally, going back to the class which inherits from
IExperimentCreatorFactory, it will have two methods, and you can copy and
paste code as most of them are very similar:
getCodeName, which returns a unique code for that laboratory, and will later be used in the deployment.createExperimentCreator, which creates anExperimentCreatorclass where you define the support in mobile phones (so later in mobile phones the user interface will show a different color), and where internally it will create the user interface. Note that it usesGWT.runAsyncto define that this code will not be compiled in the same JavaScript and it will be loaded only once the user has clicked on this laboratory. TheExperimentCreatorhas other method calledcreateMobile, used if you want to pass an alternative user interface for mobile devices, as done in the logic laboratory.
@Override
public void createWeb(final IBoardBaseController boardController, final IExperimentLoadedCallback callback) {
    GWT.runAsync(new RunAsyncCallback() {
        @Override
        public void onSuccess() {
            callback.onExperimentLoaded(new BinaryExperiment(
                    configurationRetriever,
                    boardController
                ));
        }

        @Override
        public void onFailure(Throwable e){
            callback.onFailure(e);
        }
    });
}
After reading this, keep either reading in this document about tools (Tools) or summary (Summary), or jump to the deployment section (Remote laboratory deployment; in particular Configuring the client in a managed laboratory) or to the sharing section (Remote laboratory sharing).
Tools
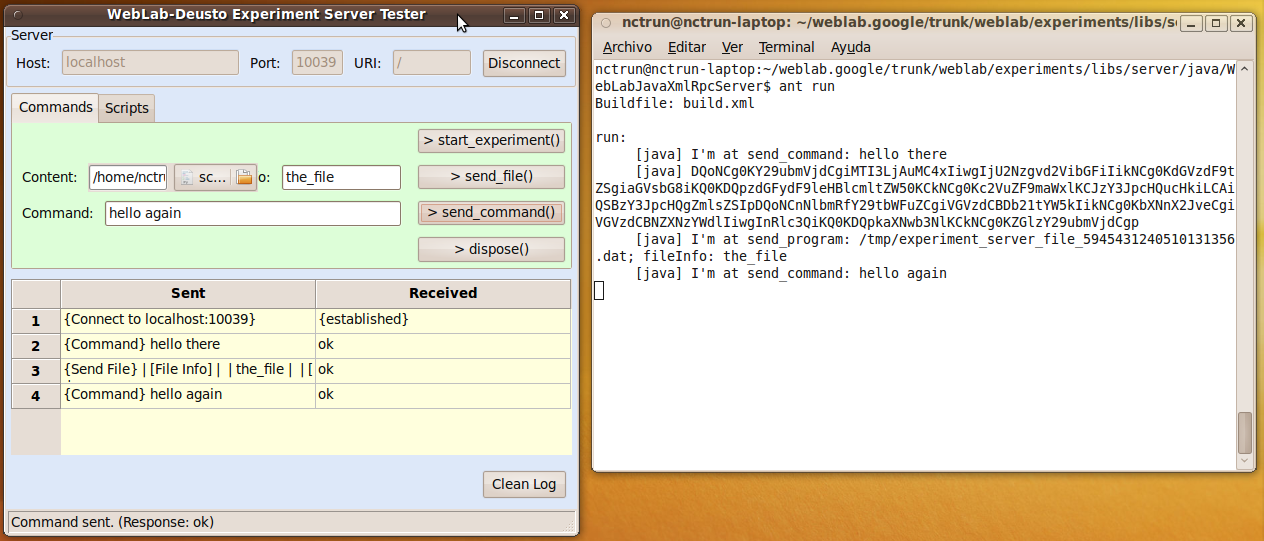
The Experiment Server Tester helps you in the process of writing the server code, by being able to test it easily with a graphic tool, and even create your own scripts to verify that it works as expected. Refer to that documentation for using it.
Unmanaged laboratories
The unmanaged approach is just a different model for developing remote laboratories. At the time of this writing, there are mainly three types of unmanaged laboratories:
- Using weblablib (recommended)
- HTTP unmanaged laboratories (recommended)
- LabVIEW Remote Panels (experimental)
- Virtual machines (limited)
Using weblablib
weblablib is a Python library which enables you to develop unmanaged laboratories easily if you have certain Python knowledge.
So as to put a simple example:
# Install using "pip install weblablib"
weblab = WebLab(app)

@weblab.initial_url
def initial_url():
    return url_for("index")

@weblab.on_dispose
def stop():
    print("Cleaning code...")

@app.route("/")
@requires_active
def index():
    return "Hello {}".format(weblab_user.username)
HTTP unmanaged laboratories
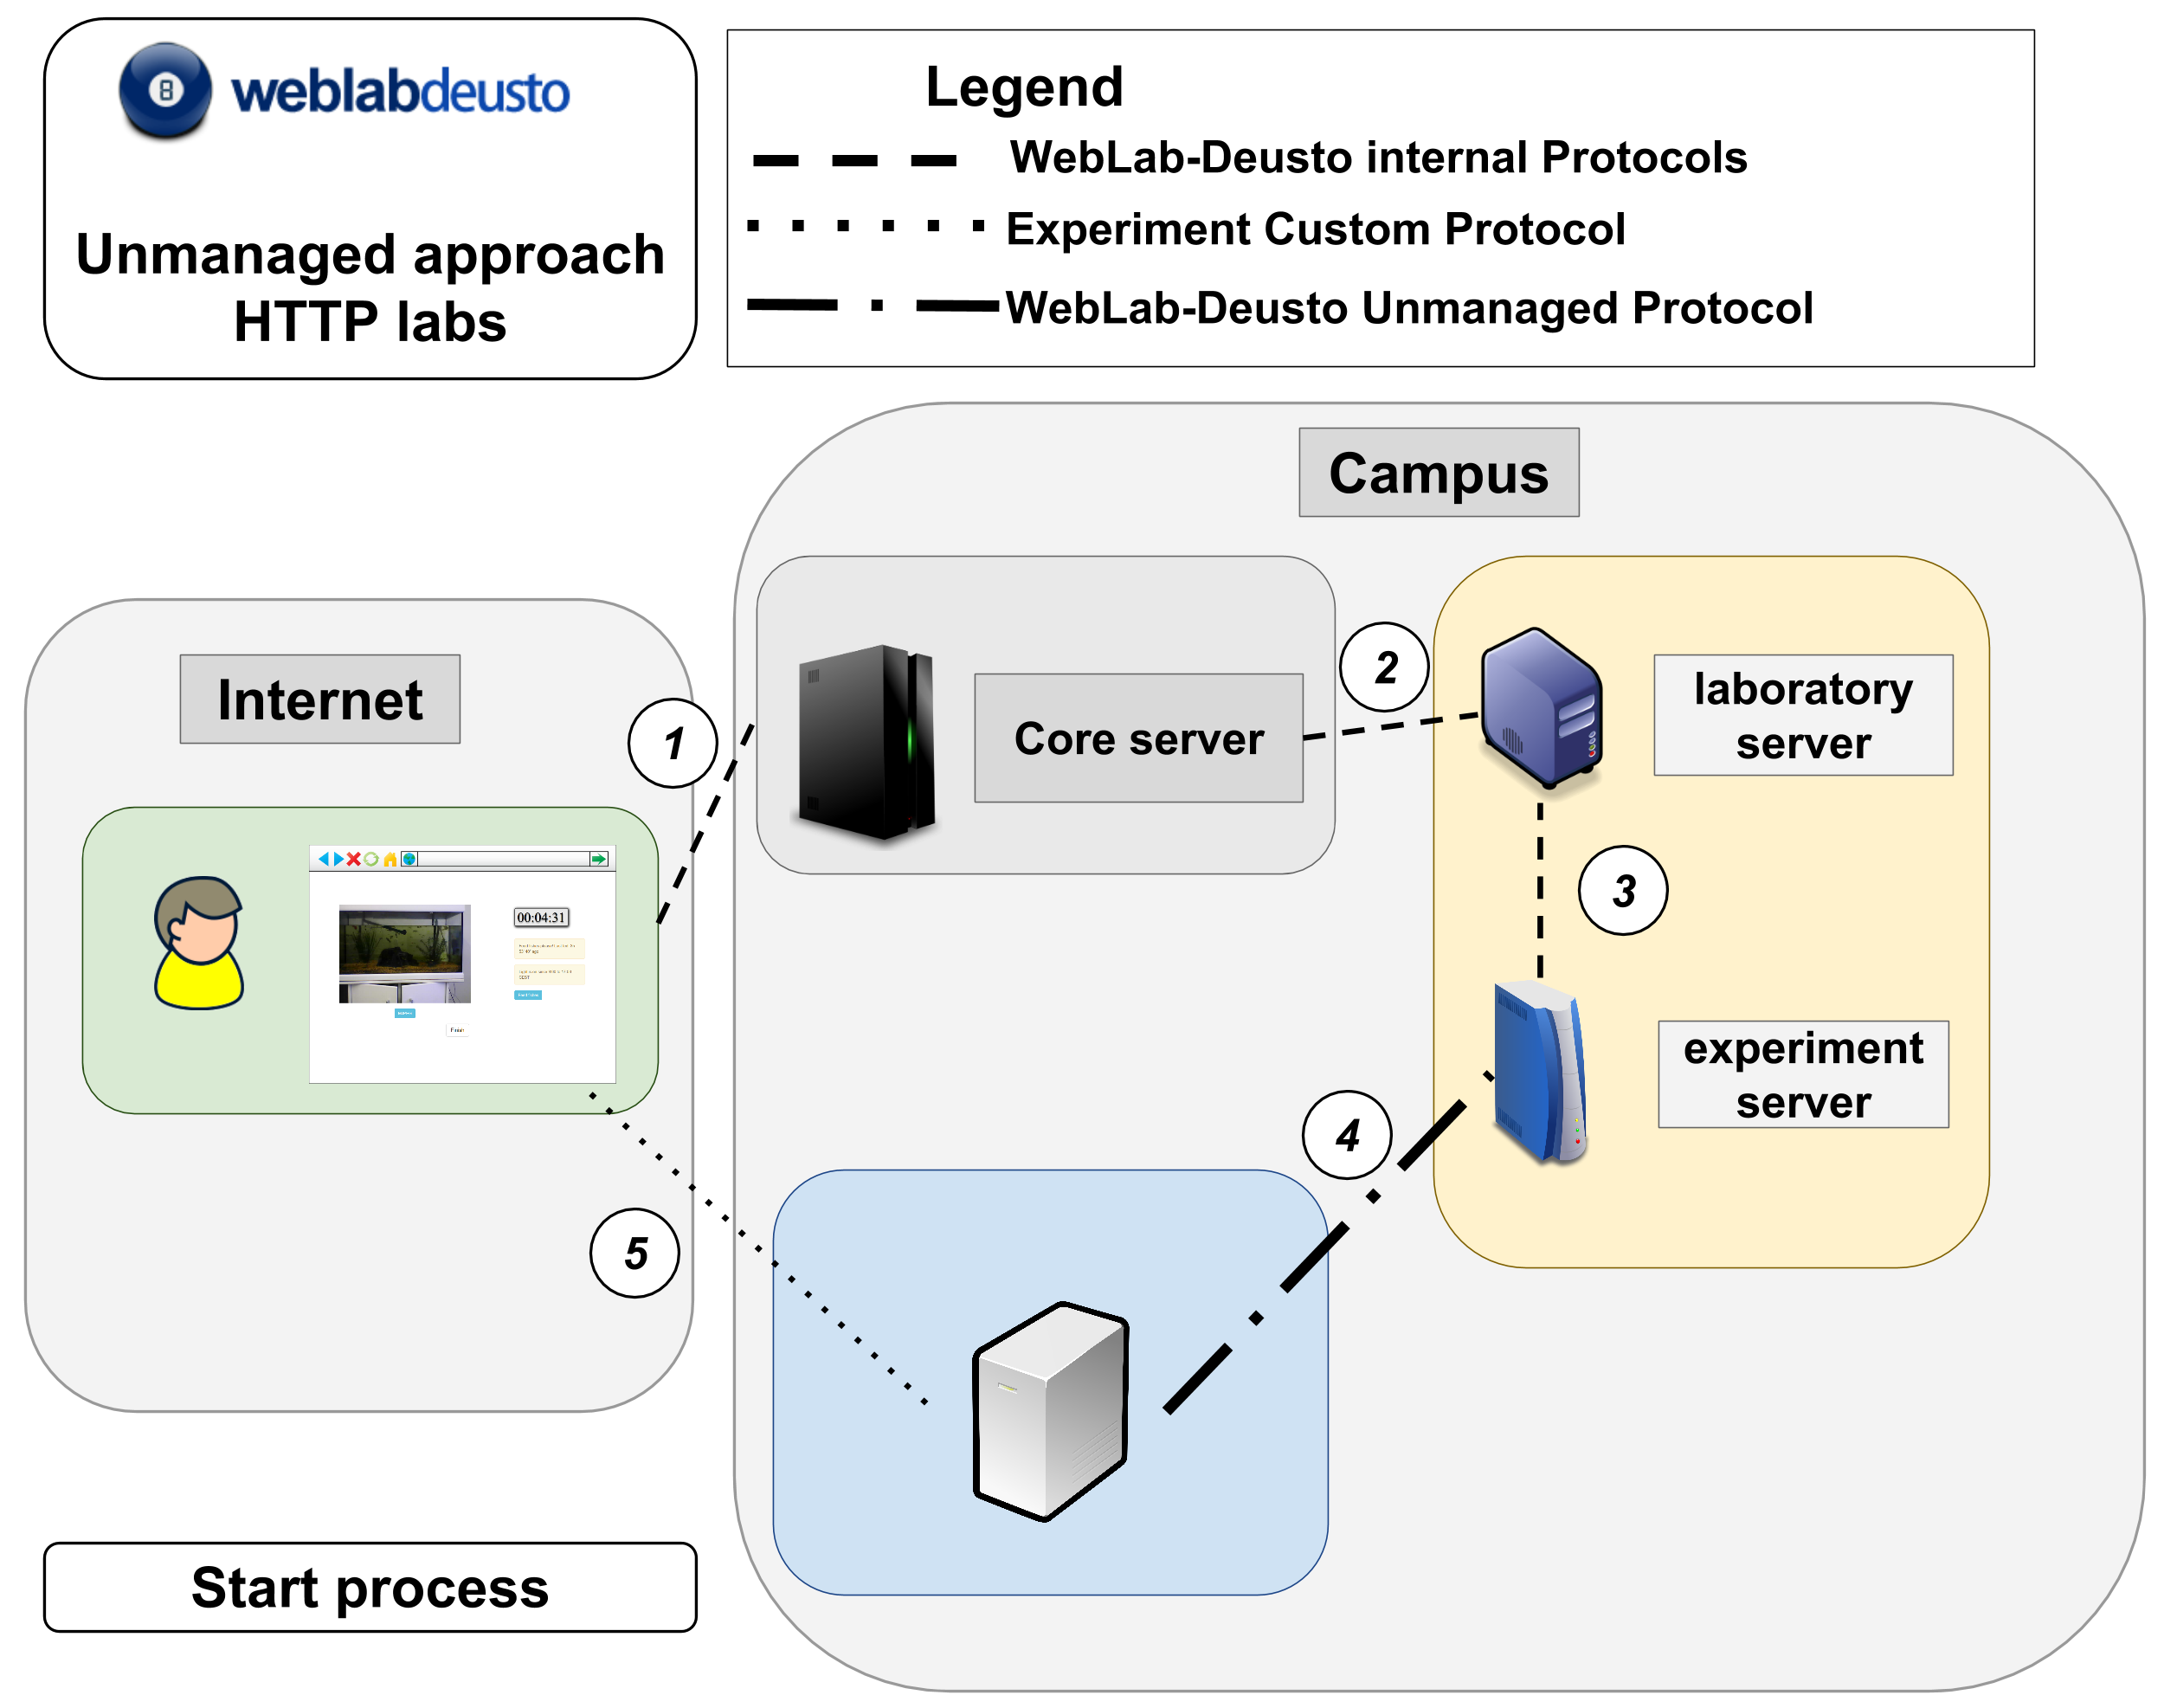
The HTTP unmanaged laboratories target that you can develop laboratories in your preferred web technology. It is by far the most flexible approach, and the most powerful, but also the one that requires developers to be in charge of more tasks.
The basis is that developers implement a interface (detaled in Interface specification) that WebLab-Deusto will use as a client to contact your server for five tasks:
- Notifying that a new user comes. Your server does not need to control the queue of users or user authentication: WebLab-Deusto is still charge of that, so it will notify you only whenever a valid user has a valid reservation and must be able to access. WebLab-Deusto will tell you for how long, what’s the username, and some more data. You will have to generate a URL that should include a private session or token that you generate so that anyone going to that website will be able to use the laboratory.
- Requesting if the user is still there. A user might be assigned 10 minutes, but he might leave after 30 seconds. If this happens, the laboratory might be assigned to that user still for 9 minutes more, potentially with people in the queue. You are responsible of checking whether the user has left or not.
- Notifying that a user must finish. When WebLab-Deusto establishes it (because the time is over, an administrator kicked the user or similar), the laboratory must be able to make sure that the user is not valid anymore. You are responsible of making sure that the user can’t do anything else after this happens, and that he is redirected to a URL provided by WebLab-Deusto in the beginning.
- Providing the API level. The HTTP unmanaged laboratories API has different versions. Knowing what version is running on your server lets WebLab-Deusto contact using more or less parameters. So, as long as you report what API version you’re running, you will be fine (and WebLab-Deusto will use that API version to contact you, instead of a newer version with more arguments).
- Providing a test service. The HTTP unmanaged laboratories rely on a set of credentials to verify that it is WebLab-Deusto the one contacting your server to the main methods described above. So as to be able to automatically check problems in advance, you must provide a test method that will help us tell the administrator what is going wrong.
So, your server will be serving two different web applications: one for WebLab-Deusto (which you can even limit by IP address or listen on a different port if you prefer), and one for the final users.
Interface specification
This section explains in detail each of the five functions explained above. You might see also examples in the section examples.
All the functions called from WebLab-Deusto provide a shared secret, which is essentially a username and password in HTTP Basic format. As explained in Unmanaged server, there are two configuration variables (http_experiment_username and http_experiment_password) that must be configured by the administrator. These two variables should never be sent to the user. But all the methods described below include the regular HTTP header such as:
Authorization: Basic d2VibGFiOnBhc3N3b3Jk
For “weblab” and password “password” (which is “weblab:password” in base64). You are responsible of checking this in all the methods to ensure that nobody else from the Internet (if this API is publicly exposed) can access this information.
Additionally, there are two ways to call the functions: as a REST service, or as a set of files with extensions. The default version uses a regular REST service where the URLs will be something like the following:
GET /weblab/sessions/api
GET /weblab/sessions/test
POST /weblab/sessions/  (with contents in JSON)
GET /weblab/sessions/ace76a23-5ccc-45eb-a03c-54dd67b016a5/status
POST /weblab/sessions/ace76a23-5ccc-45eb-a03c-54dd67b016a5 (with contents in JSON)
If you are using a routing engine like you do in most modern web frameworks,
this should be easy to manage. However, it might be easier for you to work with some
.php or .jsp or .asp files if you prefer. In that case, we provide
another version of the API which looks like:
GET /weblab/sessions/api.php
GET /weblab/sessions/test.php
POST /weblab/sessions/new.php
GET /weblab/sessions/status.php?session_id=ace76a23-5ccc-45eb-a03c-54dd67b016a5
POST /weblab/sessions/action.php?session_id=ace76a23-5ccc-45eb-a03c-54dd67b016a5
So as to activate this feature, you have to provide a
http_experiment_extension configuration variable to .php or .asp or
.jsp or something else. Whatever you put will be appended to
/weblab/sessions/api or to
/weblab/sessions/new.
Finally, we rely in JSON for the communications, so basically when we call
/weblab/sessions/ with a POST to perform a new request, we submit a JSON
message by default. However, sometimes this is difficult for some developers in
some web frameworks. If this is your case, and you prefer that we submit you the
data like in a regular form, you may change the
http_experiment_request_format configuration variable so it is set to
form. If you prefer a different format (such as XML or whatever), feel free
to contact us (Contact) and we can add it.
Function 1: Get API version
This method lets WebLab-Deusto to know what is the set of methods that is
available and in what format. Basically in the future we might add new features
to this API, which would make this API incompatible. So as to keep backwards
compatibility, we provide this method. As long as you provide your version here,
we will be able to guarantee you that you will be safe. The API version of the
current documentation is 1.
In this particular function, it will be the laboratory server the one contacting your server in a single step 1:

This is the only method where Authorization is not required:
GET /weblab/sessions/api HTTP/1.0
[...]
The expected response is:
HTTP/1.0 200 OK
Content-type: application/json
[...]

{
    "api_version": "1",
}
If the http_experiment_extension is set, for example, to .php, the request will be:
GET /weblab/sessions/api HTTP/1.0
[...]
And the response will be the same.
Note
Take into account that the version is a string (and not an int), as it happens in the managed API.
Function 2: Test connection
This method checks whether the connection is valid or not, according to the provided parameters (e.g., if the username and password are correct). As in the previous case, it is started directly by the Laboratory server:

In this case, the Authorization header will be provided, and you are
responsible of checking it:
GET /weblab/sessions/test HTTP/1.0
Authorization: Basic d2VibGFiOnBhc3N3b3Jk
[...]
The expected response is the following if correct:
HTTP/1.0 200 OK
Content-type: application/json
[...]

{
    "valid": true,
}
Or the following if not correct:
HTTP/1.0 200 OK
Content-type: application/json
[...]

{
    "valid": false,
    "error_messages": ["Invalid credentials"]
}
If the http_experiment_extension is set, for example, to .php, the request will be:
GET /weblab/sessions/test.php HTTP/1.0
Authorization: Basic d2VibGFiOnBhc3N3b3Jk
[...]
And the response will be the same.
Note
The error_messages is a list, just in case there are multiple reasons
why the connection is failing. And it is a list of human-readable messages
to show the administrator when something goes wrong.
Function 3: Start
As mentioned, this method notifies the server to let a new user access the laboratory. In the following diagram:
The steps described in the diagram are the following:
- The user will contact WebLab-Deusto requesting a reservation. If there was somebody already using the system, the WebLab-Deusto client will be contacting the server and showing that the user is in a queue.
- Whenever the user can access the laboratory, WebLab-Deusto will initialize the session contacting the Laboratory server.
- The Laboratory server will then contact the Experiment Server, which is provided by WebLab-Deusto in this case. It is a wrapper that wraps the requests to WebLab-Deusto to your server using the HTTP interface.
- The Experiment server will contact your server calling the start function, as defined below. You are expected to provide a URL and let that student access with that URL, as well as a session identifier so the Experiment Server can contact your server for that session.
- All the layers will return that URL to the user, so the user will automatically be redirected to that URL. In this step, the user will go to that URL directly.
So, in this method, an HTTP request is done to your server (step 4). The request is the following:
POST /weblab/sessions/ HTTP/1.0
Content-Type: application/json
Authorization: Basic d2VibGFiOnBhc3N3b3Jk
[...]

{
    "back": "http://.../",
    "client_initial_data": {
    },
    "server_initial_data": {
        "request.locale": "es",
        "request.username": "porduna",
        "request.full_name": "porduna",
        "request.experiment_id.category_name": "Aquatic experiments",
        "request.experiment_id.experiment_name": "aquariumg",
        "priority.queue.slot.length": 148
    }
}
The parameters are:
* back: indicating the URL to which the user is expected to be redirected
after. So, whenever the user session is finished, you should redirect the user to that URL.
client_initial_data: a JSON-serialized document with the information sent by the user interface.server_initial_data: a JSON-serialized document with the information sent by the WebLab-Deusto server. It includes:request.locale: language used by the clientrequest.username: login of the studentrequest.full_name: full name of the student (at this point, it’s still- the username)
request.experiment_id.category_name: category of the experimentrequest.experiment_id.experiment_name: experiment namepriority.queue.slot.length: time in seconds for the particular userpriority.queue.slot.start: since when counting this timepriority.queue.slot.initialization_in_accounting: whether the- initialization is counted or not in that time
If the http_experiment_extension is set, for example, to .php, and the http_experiment_request_format is set to form the request will be:
POST /weblab/sessions/new.php HTTP/1.0
Content-Type: multipart/form-data
Authorization: Basic d2VibGFiOnBhc3N3b3Jk
[...]

client_initial_data=%7B%7D&server_initial_data=%7B%22request.experiment_id.experiment_name%22%3A+%22aquariumg%22%2C+%22request.experiment_id.category_name%22%3A+%22Aquatic+experiments%22%2C+%22priority.queue.slot.length%22%3A+148%2C+%22request.username%22%3A+%22porduna%22%2C+%22request.full_name%22%3A+%22porduna%22%2C+%22request.locale%22%3A+%22es%22%7D&back=http%3A%2F%2F...%2F
Which essentially is the quoted version of:
back: the URL in string formatclient_initial_data: the dictionary above in JSON format (encoded). So in PHP for example you may access by usingjson_decode($_POST['client_initial_data'], true)server_initial_data: the dictionary above in JSON format (encoded). So in PHP for example you may access by usingjson_decode($_POST['server_initial_data'], true)
The expected response is the following:
HTTP/1.0 200 OK
Content-Type: application/json
[...]

{
    "session_id": "ace76a23-5ccc-45eb-a03c-54dd67b016a5",
    "url": "http://myserver.com/lab/?token=ace76a23-5ccc-45eb-a03c-54dd67b016a5
}
The returned url is where the user will be redirected to. The session_id
will be used by the rest of the methods to identify this user. For example, for
notifying you that this user should be kicked out, WebLab-Deusto will use that
session_id.
Note
When creating such URL, you can use something like:
However, ideally you should pass it with the # so as to avoid the token to be logged in all the proxies and similar, and ideally it should be removed just after. For example, if you provide this link:
And internally when accessing, the client in JavaScript takes the
location.hash, uses that token and changes the location.hash, it
would remove certain security problems. Ideally, you should also use HTTPS
instead of HTTP.
Function 4: Status
So as to know that if the user is still using the laboratory or not, WebLab-Deusto will periodically call this function. As described in the diagram:

- The WebLab-Deusto core server will call the Laboratory Server to see if the laboratory is still in use or not.
- The Laboratory server will ask the Experiment server.
- The Experiment server will ask your server to verify this.
Therefore, the user is not involved at any point. It is your responsability to use a proper mechanism to know if you user is still using the laboratory. You can simply write a JavaScript code that calls a dummy service every 20 seconds and if it has not been called in 40 seconds, then you report that he’s not using the laboratory anymore.
The HTTP method in particular is:
GET /weblab/sessions/ace76a23-5ccc-45eb-a03c-54dd67b016a5/status HTTP/1.0
Authorization: Basic d2VibGFiOnBhc3N3b3Jk
[...]
Where ace76a23-5ccc-45eb-a03c-54dd67b016a5 is the session_id provided in
the start method.
If the http_experiment_extension is set, for example, to .php, the request will be:
GET /weblab/sessions/status.php?session_id=ace76a23-5ccc-45eb-a03c-54dd67b016a5 HTTP/1.0
Authorization: Basic d2VibGFiOnBhc3N3b3Jk
[...]
The expected response is:
HTTP/1.0 200 OK
Content-type: application/json
[...]

{
    "should_finish": 10,
}
The value of should_finish is an integer. It represents the following:
- If it is -1, it means that the user must be kicked out.
- If it is 0, it means that WebLab-Deusto should not contact the server again for this session and wait until the time expires.
- If it is over 0, it means that WebLab-Deusto should contact again after that number of seconds. For example, it may return 10 so it calls again in 10 seconds. If the second time it returns 30, then the third call will call it 30 seconds later.
Note
You may use JavaScript to be notified that the user has closed the window. This is a good approach so you know as soon as possible that the user has left. However, don’t rely uniquely on this approach, since if the user’s computer shuts down, suspends, gets disconnected, that event will not be sent. So relying on two mechanisms (e.g., storing what was the last action while sending periodically an event + JavaScript) makes the overall system more efficient.
Function 5: Stop
Finally, WebLab-Deusto will call the stop function whenever the user should be kicked out. As seen on the diagram:

This is usually triggered by the Core Server. The steps are the following:
- The WebLab-Deusto Core server notifies the Laboratory server that it should finish.
- The Laboratory Server notifies this to the Experiment server.
- The Experiment Server notifies this to your server.
- Whenever the user performs a new request to your server, you must notify him
that the session is over. He should be redirected whenever you consider to
the
backURL provided in the start function.
The HTTP request is the following:
POST /weblab/sessions/ace76a23-5ccc-45eb-a03c-54dd67b016a5 HTTP/1.0
Content-Type: multipart/form-data
Authorization: Basic d2VibGFiOnBhc3N3b3Jk
[...]

{
    "action": "delete",
}
If the http_experiment_extension is set, for example, to .php, and the http_experiment_request_format is set to form the request will be:
POST /weblab/sessions/action.php?session_id=ace76a23-5ccc-45eb-a03c-54dd67b016a5 HTTP/1.0
Content-Type: application/json
Authorization: Basic d2VibGFiOnBhc3N3b3Jk
[...]

action=delete
The expected HTTP response is the following. The simplest example would be:
HTTP/1.0 200 OK
Content-Type: application/json
[...]

{}
Another example would be:
HTTP/1.0 200 OK
Content-Type: application/json
[...]

{
    "finished": false,
    "ask_again": 10.0,
}
And, 10 seconds later:
HTTP/1.0 200 OK
Content-Type: application/json
[...]

{
    "finished": true,
    "data": "Result=10"
}
It may contain the following values:
finished: in case it has not finished. By default,trueis assumed. But if the resource disposal takes time, returnfalseand the method will be called again, and returntruewhenever it is successfully cleaned.data: in case some data should be returned to the experiment client or logged.ask_again: iffinishedisfalse, you can provide a float that it’s a number of seconds to be waited to be called again. If you return"ask_again": 30.5, it will call again in approximately 30.5 seconds.
Examples
We provide the following examples:
- Flask (with a library) (which uses weblablib, so it is more reliable)
- Flask (simple) (which shows how to implement a simplified version)
- PHP (multiple files) (which uses multiple files and regular forms)
- PHP (single file) (which uses a single file and the standard form)
Flask (with a library)
Go to http://developers.labsland.com/weblablib/ to see how to use and install weblablib. Then, check Deployment.
Flask (simple)
In the following URL you have a simplified version on how an unmanaged remote lab could be implemented from scratch. The target of this code is only to be shown as an example (so you could implement something similar with your framework). If you want to use Flask, we encourage you to use the library explained above. The code itself is available at:
Here we will only cover some parts of it. In the following snippet, we keep in two dictionaries in memory what are the current active sessions and expired sessions. You shouldn’t do this, but rely on a session mechanism, Redis, SQL or similar. While using memory, make sure that you don’t run the server in multiple processes (otherwise it will fail):
###############################
#
# Store in DATA dictionaries
# representing users.
#
DATA = {
}

##################################
#
# Store in EXPIRED_DATA, expired
# addresses pointing to their
# previous URLs
#
EXPIRED_DATA = {
}
In the laboratory code, we require the user to provide us a session_id. With it, we check in the dictionaries above and see whether the user exists (if it is in DATA), existed (if it is in EXPIRED_DATA, and will be redirected to a different URL), or never existed.
#####################################
#
# Main method. Authorized users
# come here directly, with a secret
# which is their identifier. This
# should be stored in a Redis or
# SQL database.
#
@app.route('/lab/<session_id>/')
def index(session_id):
    data = DATA.get(session_id, None)
    if data is None:
        back_url = EXPIRED_DATA.get(session_id, None)
        if back_url is None:
            return "Session identifier not found"
        else:
            return redirect(back_url)


    data['last_poll'] = datetime.datetime.now()
    return """<html>
    <head>
        <meta http-equiv="refresh" content="10">
    </head>
    <body>
        Hi %(username)s. You still have %(seconds)s seconds
    </body>
    </head>
    """ % dict(username=data['username'], seconds=(data['max_date'] - datetime.datetime.now()).seconds)
We check using HTTP Basic to see if the user is valid or not by providing this auxiliar function:
def check_http_credentials(testing=False):
    auth = request.authorization
    if auth:
        username = auth.username
        password = auth.password
    else:
        username = password = "No credentials"

    weblab_username = app.config['WEBLAB_USERNAME']
    weblab_password = app.config['WEBLAB_PASSWORD']
    if username != weblab_username or password != weblab_password:
        if testing:
            return Response(json.dumps(dict(valid=False, error_messages=["Invalid credentials"])), status=401, headers = {'WWW-Authenticate':'Basic realm="Login Required"', 'Content-Type': 'application/json'})

        print("In theory this is weblab. However, it provided as credentials: {} : {}".format(username, password))
        return Response(response=("You don't seem to be a WebLab-Instance"), status=401, headers = {'WWW-Authenticate':'Basic realm="Login Required"'})

    return None
Then, we provide the basic api and test functions:
@app.route("/foo/weblab/sessions/api")
def api_version():
    return jsonify(api_version="1")

@app.route("/foo/weblab/sessions/test")
def test():
    response = check_http_credentials(testing=True)
    if response is not None:
        return response
    return jsonify(valid=True)
And the start function, that stores data in DATA as new users come, and provide the link to the laboratory code:
@app.route("/foo/weblab/sessions/", methods=['POST'])
def start_experiment():
    response = check_http_credentials()
    if response is not None:
        return response

    # Parse it: it is a JSON file containing two fields:
    request_data = request.get_json(force=True)

    client_initial_data = request_data['client_initial_data']
    server_initial_data = request_data['server_initial_data']

    print server_initial_data

    # Parse the initial date + assigned time to know the maximum time
    start_date_str = server_initial_data['priority.queue.slot.start']
    start_date_str, microseconds = start_date_str.split('.')
    start_date = datetime.datetime.strptime(start_date_str, "%Y-%m-%d %H:%M:%S") + datetime.timedelta(microseconds = int(microseconds))
    max_date = start_date + datetime.timedelta(seconds = float(server_initial_data['priority.queue.slot.length']))

    # Create a global session
    session_id = str(random.randint(0, 10e8)) # Not especially secure 0:-)
    DATA[session_id] = {
        'username'  : server_initial_data['request.username'],
        'max_date'  : max_date,
        'last_poll' : datetime.datetime.now(),
        'back'      : request_data['back']
    }

    link = url_for('index', session_id=session_id, _external = True)
    print "Assigned session_id: %s" % session_id
    print "See:",link
    return jsonify(url=link, session_id=session_id)
In the status function we tell WebLab what is the status taking into account the information from the sessions:
@app.route('/foo/weblab/sessions/<session_id>/status')
def status(session_id):
    response = check_http_credentials()
    if response is not None:
        return response

    data = DATA.get(session_id, None)
    if data is not None:
        print "Did not poll in", datetime.datetime.now() - data['last_poll'], "seconds"
        print "User %s still has %s seconds" % (data['username'], (data['max_date'] - datetime.datetime.now()).seconds)
        if (datetime.datetime.now() - data['last_poll']).seconds > 30:
            print "Kick out the user, please"
            return jsonify(should_finish=-1)

    print "Ask in 10 seconds..."
    #
    # If the user is considered expired here, we can return -1 instead of 10.
    # The WebLab-Deusto scheduler will mark it as finished and will reassign
    # other user.
    #
    return jsonify(should_finish=10)
And in the last one we end the session and move it to EXPIRED_DATA:
@app.route('/foo/weblab/sessions/<session_id>', methods=['POST'])
def dispose_experiment(session_id):
    response = check_http_credentials()
    if response is not None:
        return response

    request_data = request.get_json(force=True)
    if 'action' in request_data and request_data['action'] == 'delete':
        if session_id in DATA:
            data = DATA.pop(session_id, None)
            if data is not None:
                EXPIRED_DATA[session_id] = data['back']
            return jsonify(message='Deleted')
        return jsonify(message='Not found')
    return jsonify(message='Unknown action')
Note
EXPIRED_DATA will never be cleaned until you restart that server.
So as to test it, you might start deploying it and checking how it works. Jump to Deployment.
PHP (multiple files)
In:
You have the PHP code sample for the unmanaged laboratories. You should copy all that code to /var/www/html/phplabs. Then, you should create the database, as:
$ mysql -uroot -p
mysql> CREATE DATABASE phplab DEFAULT CHARSET 'utf8';
Query OK, 1 row affected (0.00 sec)
mysql> GRANT ALL ON phplab.* TO 'phplab'@'localhost' IDENTIFIED BY 'phplab';
Query OK, 0 rows affected (0.00 sec)
mysql> FLUSH PRIVILEGES;
Query OK, 0 rows affected (0.00 sec)

$ mysql -uphplab -p phplab < initial.sql
Once created, you can use the following configuration (more info on Remote laboratory deployment):
http_experiment_url: http://localhost/phplab/multifile
http_experiment_username: admin
http_experiment_password: password
http_experiment_request_format: form
http_experiment_extension: .php
So it will not submit JSON messages but regular form messages, to files called new.php, action.php, etc. as shown in the code.
PHP (single file)
In:
You have the PHP code sample for the unmanaged laboratories. You should copy all that code to /var/www/html/phplabs. Then, you should create the database, as:
$ mysql -uroot -p
mysql> CREATE DATABASE phplab DEFAULT CHARSET 'utf8';
Query OK, 1 row affected (0.00 sec)
mysql> GRANT ALL ON phplab.* TO 'phplab'@'localhost' IDENTIFIED BY 'phplab';
Query OK, 0 rows affected (0.00 sec)
mysql> FLUSH PRIVILEGES;
Query OK, 0 rows affected (0.00 sec)

$ mysql -uphplab -p phplab < initial.sql
Once created, you can use the following configuration (more info on Remote laboratory deployment):
http_experiment_url: http://localhost/phplab/weblab.php
http_experiment_username: admin
http_experiment_password: password
Internally, you can see how weblab.php implements the defined calls, and how the user will be redirected to index.php.
Deployment
So as to see how to deploy this type of lab, go to Remote laboratory deployment.
LabVIEW Remote Panels
Note
This approach is experimental. Don’t hesitate to Contact for further and updated information.
The disadvantage is that it has all the disadvantages of the LabVIEW remote panels: it does not work in most web browsers, requires several ports to be open, etc. However, it is the easiest approach to implement a new remote laboratory for LabVIEW developers nowadays.
If you want to try this approach, take the .vi files from:
And in the the deployment section
(Remote laboratory deployment; in particular
Unmanaged server), use the same steps, except for using
experiments.labview_remote_panels.LabviewRemotePanels instead of
experiments.http_experiment.HttpExperiment. The following options should be
also added in that segment:
electronics:
  class: experiments.labview_remote_panels.LabviewRemotePanels
  type: experiment
  config:
     labview_host: 127.0.0.1
     labview_port: 20000
     labview_url: http://mylabviewserver.myinstitution.edu:8080/index.html
     labview_shared_secret: 31e6b0b6-757d-4331-b731-27aeb8f8f04d
Additionally, you can set debugging information by adding:
electronics:
  class: experiments.labview_remote_panels.LabviewRemotePanels
  type: experiment
  config:
     labview_host: 127.0.0.1
     labview_port: 20000
     labview_url: http://mylabviewserver.myinstitution.edu:8080/index.html
     labview_shared_secret: 31e6b0b6-757d-4331-b731-27aeb8f8f04d
     labview_debug_message: true
     labview_debug_command: true
The meaning of the values is:
labview_host: the IP address of the LabVIEW server. It can be in a different machine, so you must put what’s the IP address.labview_port: the port of the WebLab-Deusto LabVIEW server. In the.viyou will see that you can configure it. Note that it’s not the port of the Remote Panel (i.e., the public port that users will use), but only the one that accepts connections from WebLab-Deusto.labview_shared_secret: a secret that you will also configure in the.vifile. The key is that it will tell LabVIEW that the message comes from WebLab-Deusto (and not from somewhere else).labview_url: the URL of the remote panel. The LabVIEW remote panel must be publicly available.
Whenever a user comes to WebLab-Deusto, a session identifier will randomly be
generated and sent to the LabVIEW server. Then, it will be shown to the user in
the client, with a button to go to the labview_url. Once there, the LabVIEW
code (your code) will have make sure that the user is valid if he provides such
code. From that moment, the user will use the Remote Panel as usual, and
different triggers in the .vi code will tell you that you should tell the
user to finish (e.g., when a different user comes).

Virtual machines
Note
The support for remote laboratories based on virtual machines is limited. While it works, the flexibility provided by virtual machines is in general not enough for most remote laboratories.
Summary
With this section, you have learnt to develop a new remote laboratory using WebLab-Deusto. Now it’s time to deploy it, going to the following section.