Remote laboratory deployment
Table of Contents
Introduction
In the previous section we have covered how to create new remote laboratories using the WebLab-Deusto APIs. After it, you have a working (yet draft or very initial) code that you want to use. However, we have not covered how to use them in an existing deployment of WebLab-Deusto. This section covers this task. This way, here we will see how to register the already developed clients and servers.
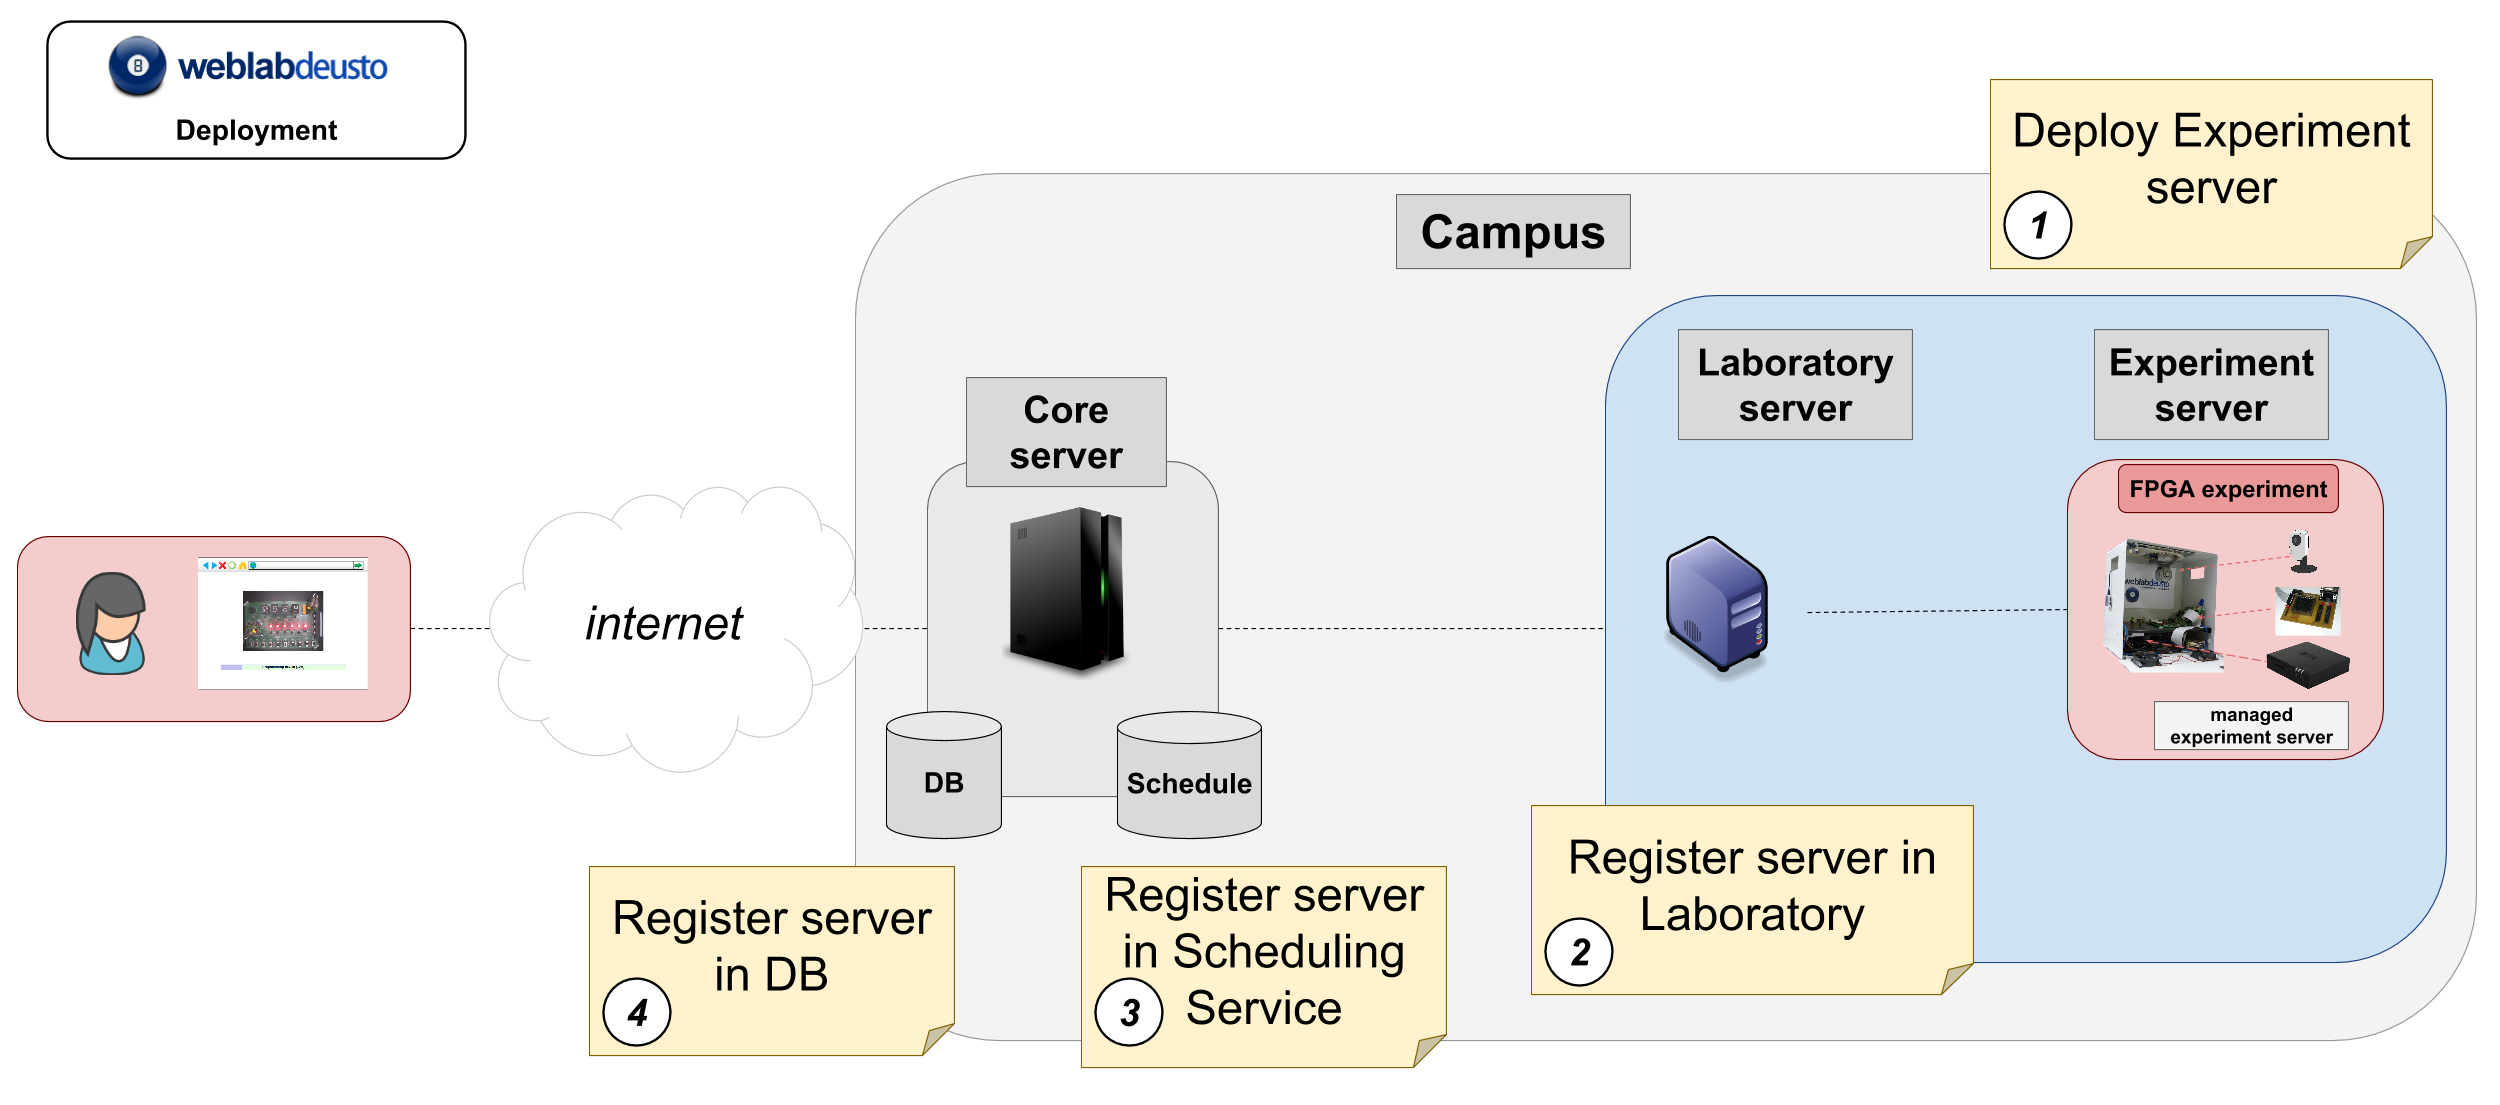
Steps to deploy a remote laboratory in WebLab-Deusto.
This process is compounded of the following steps:
- Step 1: Deploying the Experiment server
- Step 2: Registering the experiment server in a Laboratory server
- Step 3: Registering a scheduling system for the experiment
- Step 4: Add the experiment server to the database and grant permissions
After these steps, your laboratory should be working.
Step 1: Deploying the Experiment server
As previously explained, there are two major ways to develop a WebLab-Deusto Experiment server:
- Managed, which includes Experiment servers developed in Python, as well as
experiments developed in other platforms (e.g., Java, .NET, LabVIEW, C,
C++…)
- If the Experiment server was developed in Python, then it might use any of the protocols of WebLab-Deusto. This part is explained below in WebLab-Deusto Python server.
- However, if other platform was used (e.g., Java, .NET, C, C++), then the XML-RPC approach must be taken. This is explained below in Non-Python managed servers (XML-RPC based).
- Unmanaged, such as external HTTP applications.
This section assumes that you have previously read the following two sections:
Managed server
This section describes how to deploy a laboratory using the managed approach.
- If the Experiment server was developed in Python, then it might use any of the protocols of WebLab-Deusto. This part is explained below in WebLab-Deusto Python server.
- However, if other platform was used (e.g., Java, .NET, C, C++), then the XML-RPC approach must be taken. This is explained below in Non-Python managed servers (XML-RPC based).
WebLab-Deusto Python server
As explained in Directory hierarchy, WebLab-Deusto uses a directory hierarchy for configuring how the communications among different nodes is managed. In the case of WebLab-Deusto Python servers, you may run them inside the same process as the Laboratory server, being able to use the configuration subsystem and being easier to manage.
So as to do this, let us assume that there is a simple system as the one created by:
$ weblab-admin create sample --http-server-port=12345
And that you have developed an experiment using the Python API as explained in WebLab-Deusto server (Python). Your experiment can be something as simple as:
import json

from weblab.experiment.experiment import Experiment
import weblab.experiment.level as ExperimentApiLevel

class ElectronicsLab(Experiment):
     def __init__(self, coord_address, locator, config, *args, **kwargs):
         super(ElectronicsLab,self).__init__(*args, **kwargs)
         self.config = config

     def do_start_experiment(self, client_initial_data, server_initial_data):
         print("Start experiment")
         print("Client initial data:", json.loads(client_initial_data))
         print("Server initial data:", json.loads(server_initial_data))
         print("Camera:", self.config.get('my_camera_url'))
         return json.dumps({ "initial_configuration" : "cam='cam1'"})

     def do_get_api(self):
         return ExperimentApiLevel.level_2

     def do_dispose(self):
         print("User left")
         return "{}"

     def do_send_command_to_device(self, command):
         print("Command: ", command)
         return "Got your command"

     def do_should_finish(self):
         print("Checking if the user should exit. If returned 0, will not ask again. If return 1, WebLab will kick him out")
         return 5
Let us also assume that this code is in a file called myexperiments.py, and that is in a directory called /home/tom/experiments.
Then, first, we will need to make sure that WebLab-Deusto can access that file.
To this end, we would add that directory to the PYTHONPATH.
In Windows we can run the following each time before running weblab-admin start:
(weblab) C:\Users\Tom> set PYTHONPATH=C:\Users\Tom\experiments
In Linux / Mac OS X we can run the following:
(weblab) tom@tom-laptop:~$ export PYTHONPATH=/home/tom/experiments:$PYTHONPATH
To verify that this is correct, you should be able to do the following:
$ python
[...]
>>> import myexperiments
>>>
If no ImportError occurs, it means that everything required (e.g., your code and WebLab-Deusto code) is available.
Warning
The PYTHONPATH path must be absolute (e.g., /home/tom/experiments) and not
relative (e.g., ../experiments). When running weblab-admin start, the
current working directory is changed and could lead to wrong results.
In this case, the Python class identifier of your Python laboratory would be myexperiments.ElectronicsLab (since it’s the class ElectronicsLab of the module myexperiments.py). If you had a more complex hierarchy (for example: a Python package called myinstitution and inside several modules like myexperiments.py), then the Python class identifier would be myinstitution.myexperiments.ElectronicsLab.
The next step is to modify the configuration.yml file generated by weblab-admin create sample. Originally, it looks like the following:
hosts:
  core_host:
    runner: run.py
    config_file: core_host_config.py
    processes:
      core_process1:
        components:
          core:
            config:
              core_facade_port: 10000
              core_facade_server_route: route1
            type: core
      laboratory1:
        components:
          experiment1:
            class: experiments.dummy.DummyExperiment
            config:
              dummy_verbose: true
            type: experiment
          laboratory1:
            config_file: lab1_config.py
            protocols:
              port: 10001
            type: laboratory
Which looks like the following:
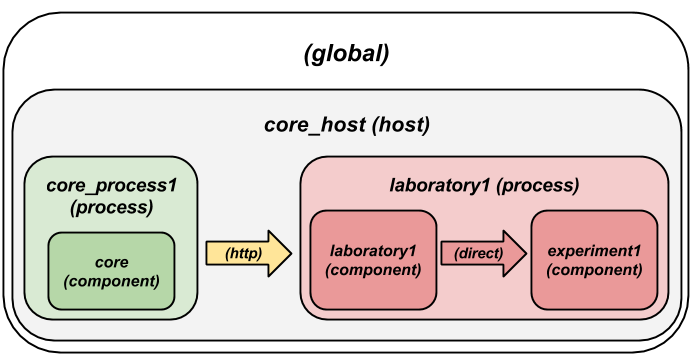
sample as created by default
But we want to add a new laboratory called electronics so it becomes the following:
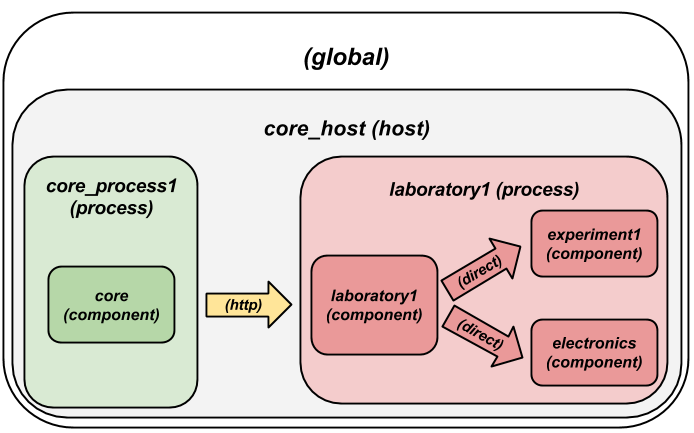
sample after the modification
So as to have this new component which is an experiment running your code, you have to add it inside the components of laboratory1, as follows:
hosts:
  core_host:
    runner: run.py
    config_file: core_host_config.py
    processes:
      core_process1:
        components:
          core:
            config:
              core_facade_port: 10000
              core_facade_server_route: route1
            type: core
      laboratory1:
        components:
          experiment1:
            class: experiments.dummy.DummyExperiment
            config:
              dummy_verbose: true
            type: experiment
          electronics:
            class: myexperiments.ElectronicsLab
            type: experiment
          laboratory1:
            config_file: lab1_config.py
            protocols:
              port: 10001
            type: laboratory
If you want to add configuration variables, then you can either add them to the component or to any of the upper layers (to the host, process or globally), and either add them in a configuration file or inline as follows:
hosts:
  core_host:
    runner: run.py
    config_file: core_host_config.py
    processes:
      core_process1:
        components:
          core:
            config:
              core_facade_port: 10000
              core_facade_server_route: route1
            type: core
      laboratory1:
        components:
          experiment1:
            class: experiments.dummy.DummyExperiment
            config:
              dummy_verbose: true
            type: experiment
          electronics:
            class: myexperiments.ElectronicsLab
            config:
              my_camera_url: http://cams.weblab.deusto.es/webcam/electronics.jpg
            type: experiment
          laboratory1:
            config_file: lab1_config.py
            protocols:
              port: 10001
            type: laboratory
From the Python code, you may access that variable.
From this point, the internal WebLab-Deusto address of your Experiment server is
electronics:laboratory1@core_host. You might see it later when seeing which
device was accessed by students, or in logs.
However, refer to Directory hierarchy for further details for more complex deployments.
Warning
Avoid naming conflicts with your laboratory name. For instance,
myexperiments.ElectronicsLab relies on the fact that there is no other
myexperiments directory in the PYTHONPATH. If you use other names,
such as experiments.ElectronicsLab, voodoo.ElectronicsLab or
weblab.ElectronicsLab, you will enter in naming conflicts with existing
modules of WebLab-Deusto or of libraries used by WebLab-Deusto.
To verify that the configuration is fine, start the server:
$ weblab-admin start sample
 * Running on http://0.0.0.0:12345/ (Press CTRL+C to quit)
Press <enter> or send a sigterm or a sigint to finish
If no error is reported in a few seconds, you can press enter to stop it and continue. If the following error appears:
$ weblab-admin start sample
 * Running on http://0.0.0.0:12345/ (Press CTRL+C to quit)
Press <enter> or send a sigterm or a sigint to finish
[...]
voodoo.gen.exc.LoadingError: Error loading component: 'myexperiments.ElectronicsLab' for server electronics:laboratory1@core_host: No module named myexperiments
It means that the myexperiments.py file does not seem to be available. Verify that running in the same terminal reports no error:
$ python
[...]
>>> import myexperiments
>>> print(myexperiments.ElectronicsLab)
<class 'myexperiments.ElectronicsLab'>
>>>
If it reports an ImportError, verify that you configured the PYTHONPATH
according to what it was defined earlier in this subsection.
After you start WebLab-Deusto with no error, you can now jump to the Step 2: Registering the experiment server in a Laboratory server.
Non-Python managed servers (XML-RPC based)
As explained in Directory hierarchy, WebLab-Deusto uses a directory hierarchy for configuring how the communications among different nodes is managed. In the case of experiments using XML-RPC, it is required to lie the system, by stating that there is an experiment server listening through XML-RPC in a particular port, with a particular configuration that will never be run.
The easiest way to see an example of this configuration is running the following:
$ weblab-admin create sample --xmlrpc-experiment --xmlrpc-experiment-port=10039 --http-server-port=12345
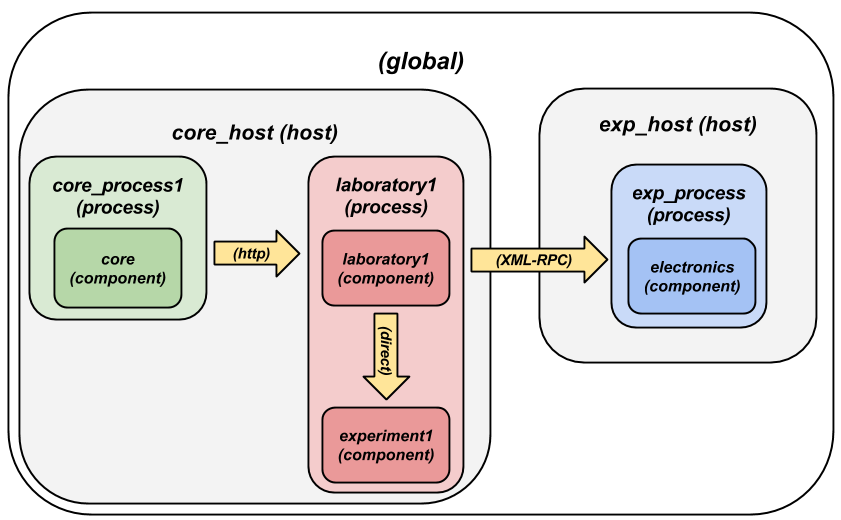
This will generate a particular configuration, with two hosts at
WebLab-Deusto level: one called core_host, and the other exp_host.
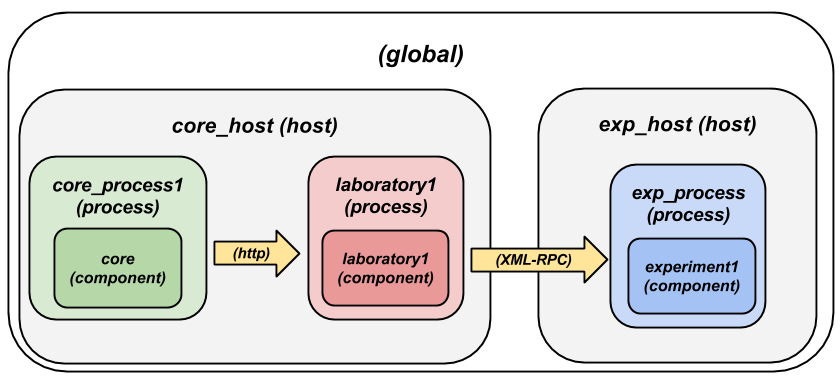
Default settings when creating an XMLRPC lab.
The generated configuration is the following:
hosts:
  core_host:
    runner: run.py
    config_file: core_host_config.py
    processes:
      core_process1:
        components:
          core:
            config:
              core_facade_port: 10000
              core_facade_server_route: route1
            type: core
      laboratory1:
        components:
          laboratory1:
            config_file: lab1_config.py
            protocols:
              port: 10001
            type: laboratory
  exp_host:
    runner: run-xmlrpc.py
    host: 127.0.0.1
    processes:
      exp_process:
        components:
          experiment1:
            class: experiments.dummy.DummyExperiment
            protocols:
              port: 10039
              supports: xmlrpc
            type: experiment
So as to run the first one, you should run:
$ weblab-admin start sample --host core_host
You may also run:
$ weblab-admin start sample --host exp_host
In other console at the same time. That way, there would be a Python Experiment
server listening on port 10039. However, this is not what we want here. What
we want here is to be able to run other laboratories, such as a Java or .NET
Experiment server. So if we don’t execute this last command, and instead we run
our Java (or .NET, C++, C…) application listening in that port, everything
will work.
For this reason, using the weblab-admin command with those arguments is the
simplest way to get a laboratory running. If you only want to test the system
with your new developed remote laboratory, you can simply use the
--xmlrpc-experiment flags, in the configuration.yml change experiment1 for electronics and jump to the Step 2: Registering the experiment server in a Laboratory server.
However, the typical action is to use the Directory hierarchy documentation to establish at WebLab-Deusto level that there will be an Experiment server listening in a particular port.
So, let’s start from scratch. Let’s imagine that we create other example, such as:
$ weblab-admin create sample --http-server-port=12345
This will generate the following schema:
sample as created by default
And the following configuration:
hosts:
  core_host:
    runner: run.py
    config_file: core_host_config.py
    processes:
      core_process1:
        components:
          core:
            config:
              core_facade_port: 10000
              core_facade_server_route: route1
            type: core
      laboratory1:
        components:
          experiment1:
            class: experiments.dummy.DummyExperiment
            config:
              dummy_verbose: true
            type: experiment
          laboratory1:
            config_file: lab1_config.py
            protocols:
              port: 10001
            type: laboratory
We want to add an external Experiment server in a different host. So as to do this, we will append at the end the following:
hosts:
  core_host:
    runner: run.py
    config_file: core_host_config.py
    processes:
      core_process1:
        components:
          core:
            config:
              core_facade_port: 10000
              core_facade_server_route: route1
            type: core
      laboratory1:
        components:
          experiment1:
            class: experiments.dummy.DummyExperiment
            config:
              dummy_verbose: true
            type: experiment
          laboratory1:
            config_file: lab1_config.py
            protocols:
              port: 10001
            type: laboratory
  exp_host:
    runner: run-xmlrpc.py
    host: 127.0.0.1
    processes:
      exp_process:
        components:
          electronics:
            class: experiments.dummy.DummyExperiment
            protocols:
              port: 10039
              supports: xmlrpc
            type: experiment
Note
exp_host is another host, so must have the same indentation (number of spaces before) as core_host:
Actually, the values of runner and class in this case are not relevant, since they will not be used. With these changes, the structure will be the following:
sample modified to support a new electronics laboratory.
Doing this, the Experiment server will have been registered. You can test that running the following will start without errors the core host:
$ weblab-admin start sample --host core_host
However, you must make sure that you start the Experiment server (developed in other technology: .NET, C++…) every time you start the WebLab-Deusto servers (preferably, just before than just after).
Warning
By default, WebLab-Deusto will attempt to perform XML-RPC requests to
http://127.0.0.1:10039/.
However, certain libraries (such as the one of .NET) does not support this
scheme, and it requires that WebLab-Deusto calls
http://127.0.0.1:10039/weblab. For this reason, in .NET and LabVIEW, you
need to configure the system adding path to the component configuration:
protocols:
  port: 10039
  supports: xmlrpc
  path: /weblab
In the following sections, you will address the Experiment server as
electronics:exp_process@exp_host.
You can now jump to the Step 2: Registering the experiment server in a Laboratory server.
Unmanaged server
The unmanaged laboratories internally are a managed laboratory where the managed server maps the calls to the unmanaged server. Therefore, the steps are just a subset of the steps of the previous section. For the sake of simplicity, we repeat here that subset, focused on an unmanaged server.
The first step is to modify the configuration.yml file generated by weblab-admin create sample. Originally, it looks like the following:
hosts:
  core_host:
    runner: run.py
    config_file: core_host_config.py
    processes:
      core_process1:
        components:
          core:
            config:
              core_facade_port: 10000
              core_facade_server_route: route1
            type: core
      laboratory1:
        components:
          experiment1:
            class: experiments.dummy.DummyExperiment
            config:
              dummy_verbose: true
            type: experiment
          laboratory1:
            config_file: lab1_config.py
            protocols:
              port: 10001
            type: laboratory
Which looks like the following:
sample as created by default
But we want to add a new laboratory called electronics so it becomes the following:
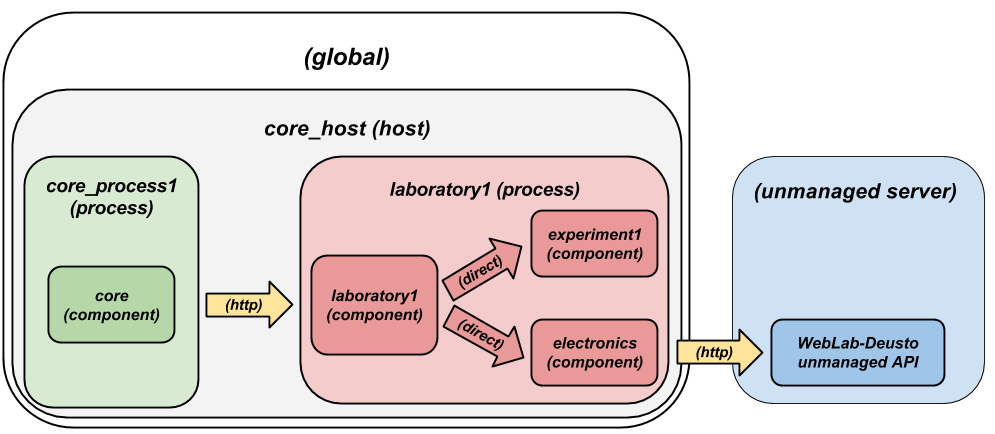
sample after the modification
So as to have this new component which is an experiment running your code, you have to add it inside the components of laboratory1, as follows:
hosts:
  core_host:
    runner: run.py
    config_file: core_host_config.py
    processes:
      core_process1:
        components:
          core:
            config:
              core_facade_port: 10000
              core_facade_server_route: route1
            type: core
      laboratory1:
        components:
          experiment1:
            class: experiments.dummy.DummyExperiment
            config:
              dummy_verbose: true
            type: experiment
          laboratory1:
            config_file: lab1_config.py
            protocols:
              port: 10001
            type: laboratory
          electronics:
            class: experiments.http_experiment.HttpExperiment
            config:
              http_experiment_url: http://server.myinstitution.edu/experiment1/
              http_experiment_username: weblab
              http_experiment_password: bdca31bd-b5d4-4f2f-995a-e6cd9d0a1b2d
            type: experiment
Note
Please take into account that electronics must be indented as laboratory1 (same number of spaces before), as shown in the example.
The name of experiments.http_experiment.HttpExperiment is fixed. The configuration variables are the ones you provide so as to let the unmanaged laboratory know that it’s WebLab-Deusto accessing. Make sure that in the code you develop you take this into account and check these credentials.
You can now jump to the Step 2: Registering the experiment server in a Laboratory server.
Step 2: Registering the experiment server in a Laboratory server
In the following figure, we have already finished step 1, which is the most complex. The rest of the steps are independent of the technology used, and they are only focusing on registering the laboratory in the different layers. In this subsection, we’re in the step 2: registering the server in the Laboratory server.
We’re in step 3.
Each Experiment Server must be registered in a single Laboratory server. One Laboratory Server can manage multiple Experiment servers. So as to register a Experiment server, we have to go to the Laboratory server configuration file. In the near future, this configuration will disappear and everything will be configured in the database. When you create a WebLab-Deusto instance doing:
$ weblab-admin create sample
This file by default is called lab1_config.py, and by default it contains the following:
laboratory_assigned_experiments = {
        'exp1:dummy@Dummy experiments' : {
                'coord_address' : 'experiment1:laboratory1@core_host',
                'checkers' : ()
            },
    }
This means that the current Laboratory Server has one Experiment Server assigned.
exp1:dummy@Dummy experimentsis the identifier for this resource at the Laboratory Server. Typicallydummyis the name as it will be in the database andDummy experimentsis the category name as it will be in the database.exp1is not published anywhere, but will be used by the Core server in the following step.experiment1:laboratory1@core_hostis the identifier at WebLab-Deusto level of the experiment. It establishes that it is the componentexperiment1of the processlaboratory1of the hostcore_host.
You can find in Multiple core servers more elaborated examples.
So as to add the new experiment, you must add a new entry in that Python dictionary.
For example, if you have added an electronics laboratory, and in
the previous step you have located them in the laboratory1 instance in the
core_host, you should edit this file to add the following:
laboratory_assigned_experiments = {
        'exp1:dummy@Dummy experiments' : {
                'coord_address' : 'experiment1:laboratory1@core_host',
                'checkers' : ()
            },
        'exp1:electronics@Electronics experiments' : {
                'coord_address' : 'electronics:laboratory1@core_host',
                'checkers' : (),
                'api'      : '2',
            },
    }
If your laboratory is an unmanaged laboratory, then the client redirect
could cause problems since when the user is redirected, WebLab-Deusto might
assume that the user is not anymore logged in and the laboratory should be
re-scheduled to other user. So as to avoid this, if your experiment is
unmanaged, add also the manages_polling variable:
laboratory_assigned_experiments = {
        'exp1:dummy@Dummy experiments' : {
                'coord_address' : 'experiment1:laboratory1@core_host',
                'checkers' : (),
                'manages_polling': True,
            },
    }
If you have used XML-RPC, the experiment server is somewhere else outside the
core_host, but you only need to put in coord_address the identifier.
For example, if you created a new laboratory using Java, you will need to add
something like:
laboratory_assigned_experiments = {
        'exp1:dummy@Dummy experiments' : {
                'coord_address' : 'experiment1:laboratory1@core_host',
                'checkers' : ()
            },
        'exp1:electronics@Electronics experiments' : {
                'coord_address' : 'electronics:exp_process@exp_host',
                'checkers' : (),
                'api'      : '2'
            },
    }
The api variable indicates that the API version is 2. If in the future
we change the Experiment server API, the system will still call your Experiment
server using the API available at this time. If you are using an old library,
you might state api to 1 and it will work.
One of the duties of the Laboratory server is to check frequently whether the Experiment server is alive or not. This may happen due to a set of reasons, such as:
- The laboratory uses a camera which is broken
- The connection failed
- The Experiment server was not started or failed
By default, every few seconds the system checks if the communication with the Experiment server works. If it is broken, it will notify the administrator (if the mailing variables are configured) and will remove it from the queue. If it comes back, it marks it as fixed again.
However, you may customize the checkers that are applied. The default
checkers are defined in weblab.lab.status_handler (code).
At the time of this writing, there are two:
HostIsUpAndRunningHandler, which opens a TCP/IP connection to a particular host and port. If the connection fails, it marks the experiment as broken.WebcamIsUpAndRunningHandler, which downloads an image from a URL and checks that the image is a JPEG or PNG.
So as to use them, you have to add them to the checkers variable in the
Laboratory server configuration. For example, if you have a FPGA laboratory with
a camera and a microcontroller that does something, you may have the following:
'exp1:ud-fpga@FPGA experiments' : {
    'coord_address' : 'fpga:process1@box_fpga1',
    'checkers' : (
                    ('WebcamIsUpAndRunningHandler', ("https://www.weblab.deusto.es/webcam/proxied.py/fpga1",)),
                    ('HostIsUpAndRunningHandler', ("192.168.0.70", 10532)),
                ),
    'api'      : '2',
},
In this case, the system will check from time to time that URL to find out an image, and will connect to that port in that IP address, as well as the default checking (calling a method in the Experiment server to see that it is running).
You can develop your own checkers in Python, inheriting the
AbstractLightweightIsUpAndRunningHandler class and adding the class to the
global HANDLERS variable of that module.
Additionally, if you have laboratories that you don’t want to check, you may use the following optional variable in the Laboratory server. It will simply skip this process.
laboratory_exclude_checking = [
    'exp1:electronics@Electronics experiments',
    'exp1:physics@Physics experiments',
]
After this, you can jump to Step 3: Registering a scheduling system for the experiment.
Step 3: Registering a scheduling system for the experiment
Now we move to the Core server. The Core server manages, among other features, the scheduling of the experiments. At the moment of this writing, there are different scheduling options (federation, iLabs compatibility, and priority queues). We do not support booking using a calendar at this moment.
All the configuration of the Core server related to scheduling is by default in
the core_host_config.py file. It is placed there so if you have multiple
Core servers in different instances (which is highly recommended), you have the configuration in a single location. In this file,
you will find information about the database, the scheduling backend, etc.
The most important information for registering a remote laboratory is the following:
core_scheduling_systems = {
        'dummy'            : ('PRIORITY_QUEUE', {}),
        'robot_external'   : weblabdeusto_federation_demo,
}
Here, it is defined the different schedulers available for each remote
laboratory type. WebLab-Deusto supports load balancing, so it assumes that
you may have multiple copies of a remote laboratory. In that sense, we will
say that one experiment type might have multiple experiment instances.
This variable (core_scheduling_systems) defines which scheduling system
applies to a particular experiment type. Say that you have one of five copies
of a experiment identified by electronics (of category Electronics
experiments). Then you will add a single experiment type to this variable.
If you only have one, it’s the same procedure (adding a single experiment
type). The name used is only used inside this file, and it has no relation
with previous names.
core_scheduling_systems = {
'dummy_queue' : ('PRIORITY_QUEUE', {}),
'robot_external' : weblabdeusto_federation_demo,
'electronics_queue' : ('PRIORITY_QUEUE', {}),
}
However, we still have to map the experiment instances to this experiment type. So as to do this, you will see that there is another variable in the Core server which by default it has:
core_coordinator_laboratory_servers = {
'laboratory1:laboratory1@core_host' : {
'exp1|dummy|Dummy experiments' : 'dummy1@dummy_queue',
},
}
This variable defines which Laboratory servers are associated, which
experiment instances are associated to each of them, and how they are related
to the scheduling system. For instance, with this default value, it is stating
that there is a Laboratory server located at core_host, then in
laboratory1 and then in laboratory1. This Laboratory server manages a
single experiment server, identified by exp1 of the experiment type
dummy of category Dummy experiments. This experiment instance
represents a slot called dummy1 of the scheduler identified by dummy_queue.
So, when a user attempts to use an experiment of dummy (category
Dummy experiments), the system is going to look for how many are available.
It will see that there is only one slot (dummy1) in the queue (dummy_queue)
that is of that type. So if it is available, it will call that Laboratory server
asking for exp1 of that experiment type. But if there was no slot
available (e.g., some other student is using it), it will simply wait for that
slot to be available.
Therefore, if you have added a single Experiment server of electronics to the existing Laboratory server, you can safely add:
core_coordinator_laboratory_servers = {
'laboratory1:laboratory1@core_host' : {
'exp1|dummy|Dummy experiments' : 'dummy1@dummy_queue',
'exp1|electronics|Electronics experiments' : 'electronics1@electronics_queue',
},
}
In the near future, all this will be in the database and therefore it will not be dealt with file-based configurations. However, in the meanwhile it’s very important to understand what names are mapped among the different files.
The name exp1|electronics|Electronics experiments is mapped to the name
exp1:electronics@Electronics experiments that we used in the previous section in
the Laboratory Server. However, the separators are changed from : or @
to |. The name exp1 is only used in those two files. However, the other
two components are the experiment name (electronics) and category name
(Electronics experiments) in the database.
The name electronics1 is not used anywhere else, so feel free to use any
other name (e.g., slot1, etc.).
With this information, you are ready to jump to Step 4: Add the experiment server to the database and grant permissions. However, here we document other special scenarios, such as balancing the load of users among different copies of the laboratories, or supporting more than one user in a single laboratory at the same time.
Load balancing
If you have two copies of the same type of laboratory, you can add:
core_coordinator_laboratory_servers = {
'laboratory1:laboratory1@core_host' : {
'exp1|dummy|Dummy experiments' : 'dummy1@dummy_queue',
'exp1|electronics|Electronics experiments' : 'electronics1@electronics_queue',
'exp2|electronics|Electronics experiments' : 'electronics2@electronics_queue',
},
}
This means that if two students come it asking for an electronics
laboratory, one will go to one of the copies and the other to the other. The
process is random. A third user would wait for one of these two students to
leave.
If you have two different experiments (one of electronics and one of physics), then you should add:
core_coordinator_laboratory_servers = {
'laboratory1:laboratory1@core_host' : {
'exp1|dummy|Dummy experiments' : 'dummy1@dummy',
'exp1|electronics|Electronics experiments' : 'electronics1@electronics_queue',
'exp1|physics|Physics experiments' : 'physics1@physics_queue',
},
}
Sharing resources among laboratories
This system is designed to be flexible. For instance, it supports to have more
than one Experiment server associated to the same physical equipment. For
example, in WebLab-Deusto we have the CPLDs and the FPGAs, with one Experiment
server that allows users to submit their own programs. However, we also have
other Experiment servers called demo, which are publicly available and
anyone can use them. These Experiment servers do not allow users to submit their
own program, though: they use their own default program for demonstration
purposes. Additionally, we have two CPLDs, so the load of users is balanced
between these two copies, and a single FPGA. The configuration is the following:
core_coordinator_laboratory_servers = {
'laboratory1:laboratory1@core_host' : {
# Normal experiments:
'exp1|ud-pld|PLD experiments' : 'pld1@pld_queue',
'exp2|ud-pld|PLD experiments' : 'pld2@pld_queue',
'exp1|ud-fpga|FPGA experiments' : 'fpga1@fpga_queue',
# Demo experiments: note that the scheduling side is the same
# so they are using the same physical equipment.
'exp1|ud-demo-pld|PLD experiments' : 'pld1@pld_queue',
'exp2|ud-demo-pld|PLD experiments' : 'pld2@pld_queue',
'exp1|ud-demo-fpga|FPGA experiments' : 'fpga1@fpga_queue',
},
}
In this case, if three students reserve ud-pld@PLD experiments, two of them
will go to the two copies, but the third one will be in the queue. If somebody
reserves a ud-demo-pld@PLD experiments, he will also be in the queue, even
if the laboratory and the code that he will execute is different. The reason is
that it is using the same exact device, so it makes sense decoupling the
scheduling subsystem of the experiment servers and clients.
Concurrency
Finally, one feature of this system is that it enables that you provide more
than one time slot to a single resource. For example, you may establish at Core
server that there are 10 different copies of the laboratory, even if there
is a single one:
core_coordinator_laboratory_servers = {
'laboratory1:laboratory1@core_host' : {
'exp1|dummy|Dummy experiments' : 'dummy1@dummy_queue',
'exp1|electronics|Electronics experiments' : 'electronics1@electronics_queue',
'exp2|electronics|Electronics experiments' : 'electronics2@electronics_queue',
'exp3|electronics|Electronics experiments' : 'electronics3@electronics_queue',
'exp4|electronics|Electronics experiments' : 'electronics4@electronics_queue',
'exp5|electronics|Electronics experiments' : 'electronics5@electronics_queue',
},
}
Then, in the Laboratory server you must create those registries, but they can point to the same laboratory:
laboratory_assigned_experiments = {
'exp1:dummy@Dummy experiments' : {
'coord_address' : 'experiment1:laboratory1@core_host',
'checkers' : ()
},
'exp1:electronics-lesson-1@Electronics experiments' : {
'coord_address' : 'electronics:exp_process@exp_host',
'checkers' : (),
'api' : '2'
},
'exp2:electronics-lesson-1@Electronics experiments' : {
'coord_address' : 'electronics:exp_process@exp_host',
'checkers' : (),
'api' : '2'
},
'exp3:electronics-lesson-1@Electronics experiments' : {
'coord_address' : 'electronics:exp_process@exp_host',
'checkers' : (),
'api' : '2'
},
'exp4:electronics-lesson-1@Electronics experiments' : {
'coord_address' : 'electronics:exp_process@exp_host',
'checkers' : (),
'api' : '2'
},
'exp5:electronics-lesson-1@Electronics experiments' : {
'coord_address' : 'electronics:exp_process@exp_host',
'checkers' : (),
'api' : '2'
},
}
This way, five students will be able to enter to the laboratory at the same time, and they will be able to interact each other. The main problem is that by default, the server API does not support knowing which student is submitting each request, since the methods are essentially something like:
String sendCommand(String command);
However, there is other API, called the Concurrent API (see
WebLab-Deusto server (Python)), not supported at the
moment by most of the libraries but yes by the Python experiments, which
supports this. It which basically adds a lab_session_id string to the
beginning of each parameter. That way, the method for sending commands, for
instance, is as follows:
String sendCommand(String labSessionId, String command);
Using this, the Experiment developer can identify who is accessing in the
laboratory and reply different messages to each user. So as to configure this,
the Laboratory server must use the following api:
laboratory_assigned_experiments = {
'exp1:dummy@Dummy experiments' : {
'coord_address' : 'experiment1:laboratory1@core_host',
'checkers' : ()
},
'exp1:electronics-lesson-1@Electronics experiments' : {
'coord_address' : 'electronics:exp_process@exp_host',
'checkers' : (),
'api' : '2_concurrent'
},
'exp2:electronics-lesson-1@Electronics experiments' : {
'coord_address' : 'electronics:exp_process@exp_host',
'checkers' : (),
'api' : '2_concurrent'
},
'exp3:electronics-lesson-1@Electronics experiments' : {
'coord_address' : 'electronics:exp_process@exp_host',
'checkers' : (),
'api' : '2_concurrent'
},
'exp4:electronics-lesson-1@Electronics experiments' : {
'coord_address' : 'electronics:exp_process@exp_host',
'checkers' : (),
'api' : '2_concurrent'
},
'exp5:electronics-lesson-1@Electronics experiments' : {
'coord_address' : 'electronics:exp_process@exp_host',
'checkers' : (),
'api' : '2_concurrent'
},
}
Step 4: Add the experiment server to the database and grant permissions
At this point, we have the Experiment server running, the Laboratory has registered the Experiment server and the Core server has registered that this experiment has an associated scheduling scheme (queue) and knows in which Laboratory server it is located.
Now we need to make it accessible for the users. The first thing is to register the remote laboratory in the database. So, start the WebLab-Deusto instance:
$ weblab-admin start sample
Go to the administrator panel by clicking on the top right corner the following icon:

You will see this:
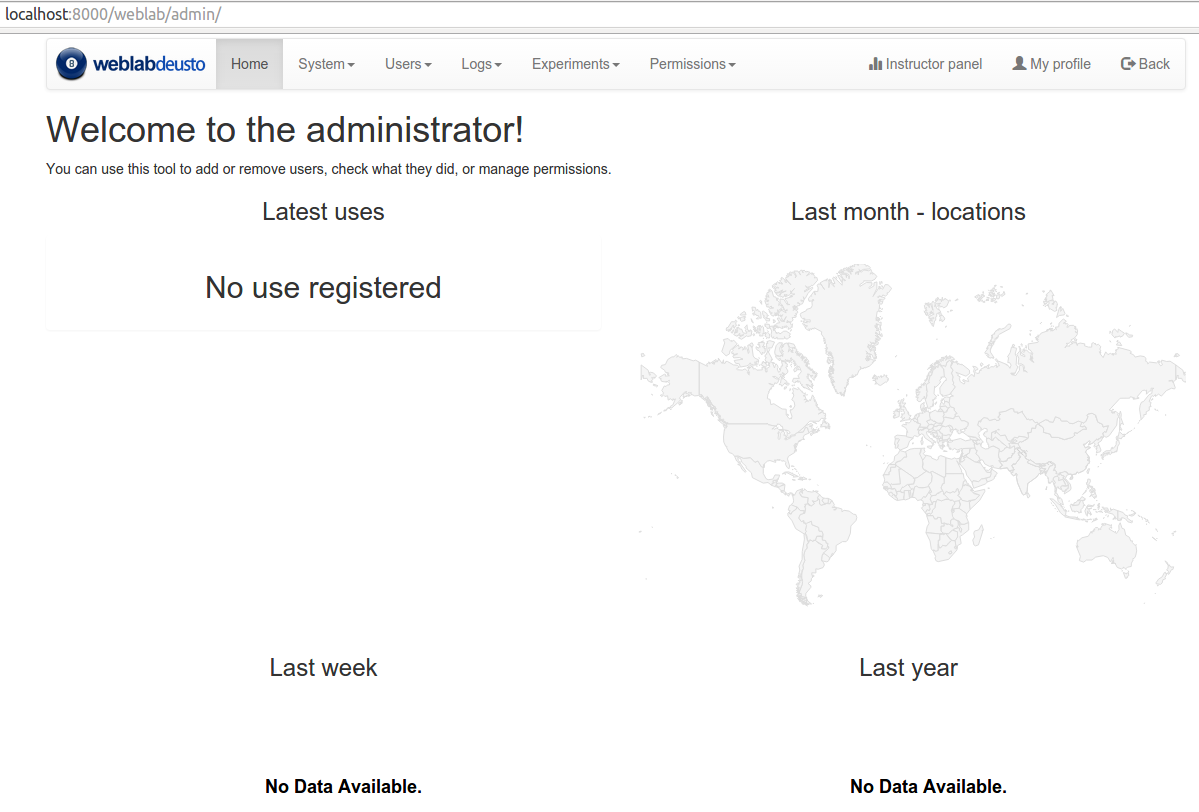
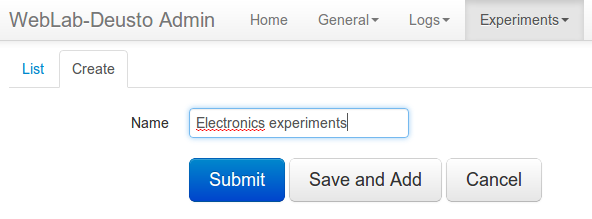
On it, go to Experiments, then on Categories, and then on Create.
You will be able to add a new category (if it did not exist), such as
Electronics experiments, and click on Submit:
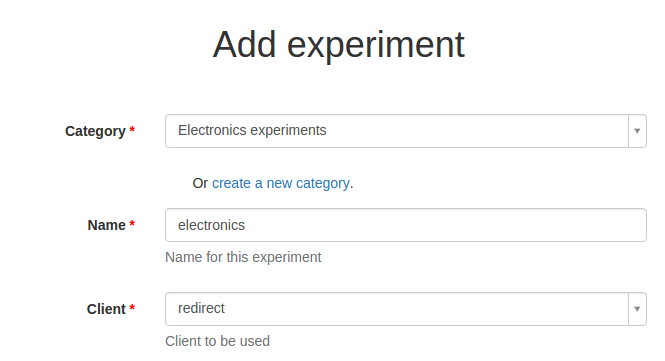
Then, go back to Experiments, then Experiments, and then on Create.
You will be able to add a new experiment, such as electronics, using the
category just created. The Start and End dates refer to the usage data. At this
moment, no more action is taken on these data, but you should define since when
the experiment is available and until when. For now, make sure that the client
is js:
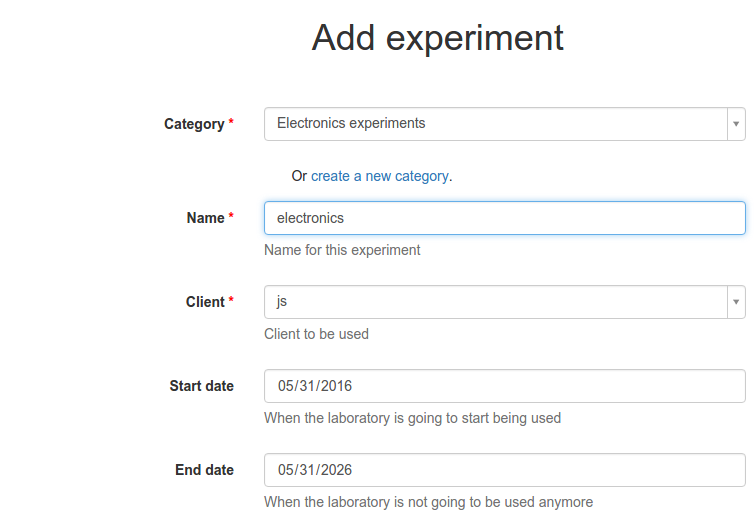
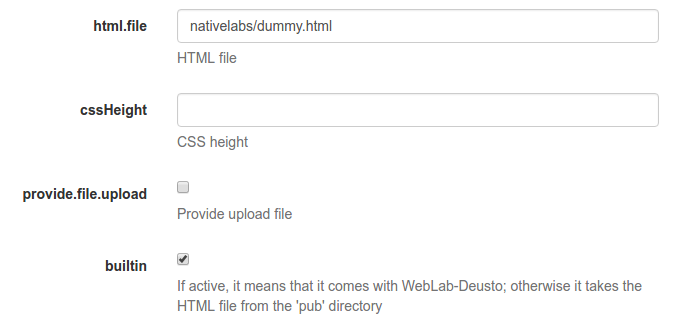
And also make sure that later you select builtin and in html.file you
type nativelabs/dummy.html:
Then click on Save. At this moment, the laboratory has been added to the
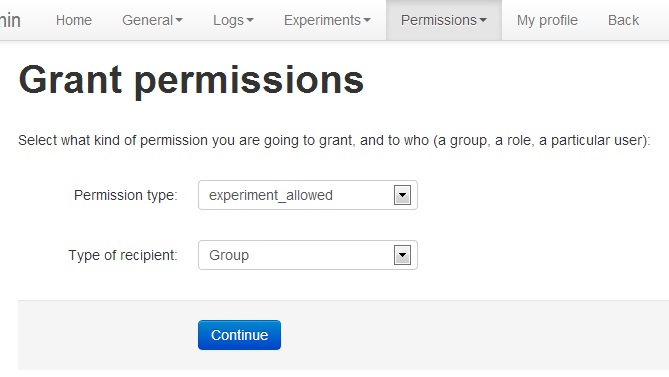
database. Now you can guarantee the permissions on users. So as to do this,
click on Permissions, Create. Select that you want to grant permission
to a Group, of permission type experiment_allowed.
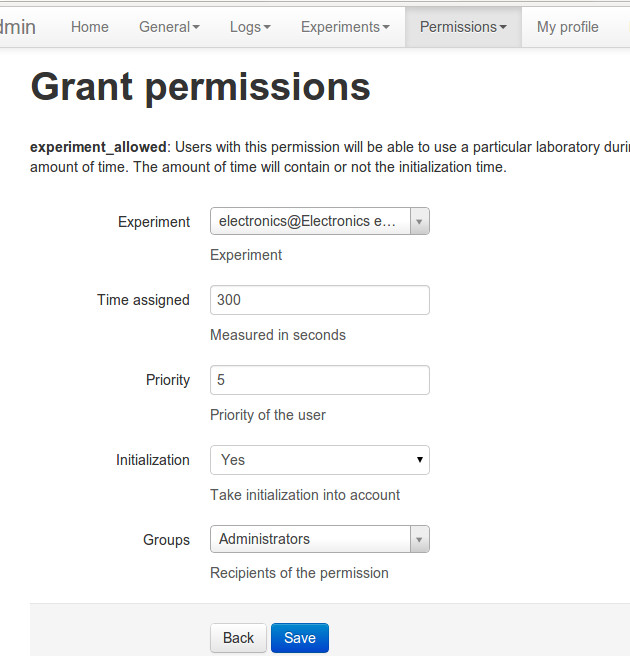
And then you will be able to grant permissions on the developed laboratory to a particular group (such as Administrators):
From this point, you will be able to use this experiment from the main user interface. If you see this:
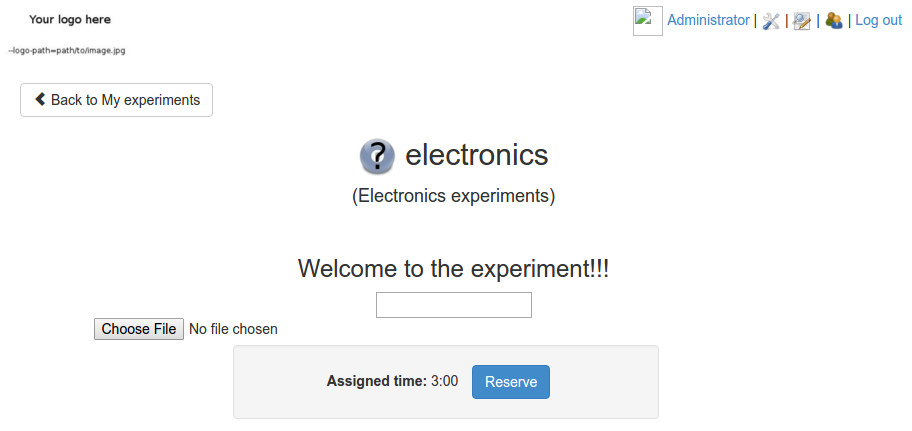
And once you click on reserve you’re sending commands to the experiment and receiving them back, everything is fine.
However, you should create your own client, and you have to configure it in the
page where you added the lab. You can edit it by going to Experiments and
clicking on the edit button next to the lab you have just created. However, the
particular configuration depends on the approach taken:
- If you are developing a managed laboratory (regardless if you are using Python or an XML-RPC experiment), jump to Configuring the client in a managed laboratory.
- If you are developing an unmanaged laboratory, jump to Configuring the client in an unmanaged laboratory.
Configuring the client in a managed laboratory
We strongly encourage you to develop clients in JavaScript. However, we also support Adobe Flash (while most mobile devices do not support it) and Java applets (while most web browsers do not support them nowadays). This section explains how to modify the configuration to support the three options:
JavaScript
By default, in the previous steps we selected that the client would be js,
which is fine if you are developing a JavaScript laboratory. However, we also
selected the builtin option and the nativelabs/dummy.html html file:
The builtin option (which by default is false) reports that the file
(nativelabs/dummy.html) is provided by WebLab-Deusto, so it finds it in its
local directories. However, when you create a WebLab-Deusto instance, there is a
directory called pub. Whatever you put in this directory will be publicly
available to the Internet on /weblab/web/pub/.
You can try to make a file called example.txt and put it in this directory.
Going to http://localhost:12345/weblab/web/pub/example.txt or
http://localhost/weblab/web/pub/example.txt (depending on if you’re using
Apache or the development server) should show you the file. Furthermore, in the
Administration Panel, in System -> Public directory you can also modify
the files (while this feature is only fully functional when using Apache).
Whenever you disable the builtin option, WebLab-Deusto will search for the
file in this directory (unless in html.file you put something that starts by
http:// or https://, in which case the absolute url will be used; for
example if you put the files in a different server).
So, for starting, the best option is to copy the dummy.html example to this
directory. So you might go to
dummy.html in github
and click on the Raw button to access the raw file, and download to the
pub directory.
Once downloaded, they will be in /weblab/web/pub/dummy.html. However, the
internal includes to other JavaScript files will not work. In particular, the
following code is not correct:
<script type="text/javascript" src="../js/jquery.min.js"></script>
<script type="text/javascript" src="../weblabjs/weblab.v1.js"></script>
Since those two directories (../js/jquery.min.js) do not exist anymore. So
either you change it by an absolute URL:
<script type="text/javascript" src="/weblab/static/js/jquery.min.js"></script>
<script type="text/javascript" src="/weblab/static/weblabjs/weblab.v1.js"></script>
or you replace it by a proper relative path:
<script type="text/javascript" src="../static/js/jquery.min.js"></script>
<script type="text/javascript" src="../static/weblabjs/weblab.v1.js"></script>
Note
This is assuming that you are locating dummy.html in the pub
directory directly. If you move it to a directory inside pub (e.g.,
electronics/dummy.html), don’t forget to modify the paths accordingly
(e.g., ../../static...) or use absolute ones.
Once you have changed those paths, you can safely edit the experiment in the
Administration Panel. To do so, deactivate the builtin option and change the
html.file to dummy.html:

Now you can change the dummy.html or create other HTML from scratch and
follow these steps to add it to the pub directory and use it in other
laboratories. You can now go to the Summary.
Java applets
Nowadays most web browsers do not support Java applets. For this reason, we highly recommend not using Java applets for the development of remote laboratories. However, if you have a limited and controlled audience and an existing remote laboratory in Java, you can still use WebLab-Deusto.
First, you must compile the GWT client, as explained in Compilation of the legacy client labs with GWT.
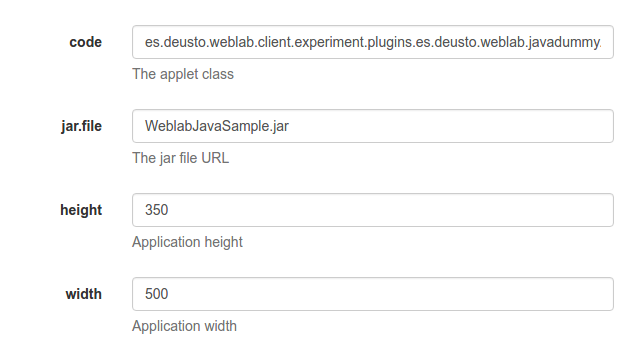
Then, you have to select the java client from the client list when editing
an experiment. However, so as to load the laboratory, additional parameters must be configured,
such as where is the JAR file, what class inside the JAR file must be loaded,
and the size of the applet. An example of this configuration would be:
Those JAR files should be located in the public directory (see here),
which will require you to re-compile and re-run the setup script.
Flash
Nowadays most mobile web browsers do not support Flash, and the Flash support is decreasing in regular web browsers. For this reason, we highly recommend not using Flash apps for the development of remote laboratories. However, if you have a limited and controlled audience and an existing remote laboratory in Flash, you can still use WebLab-Deusto.
First, you must compile the GWT client, as explained in Compilation of the legacy client labs with GWT.
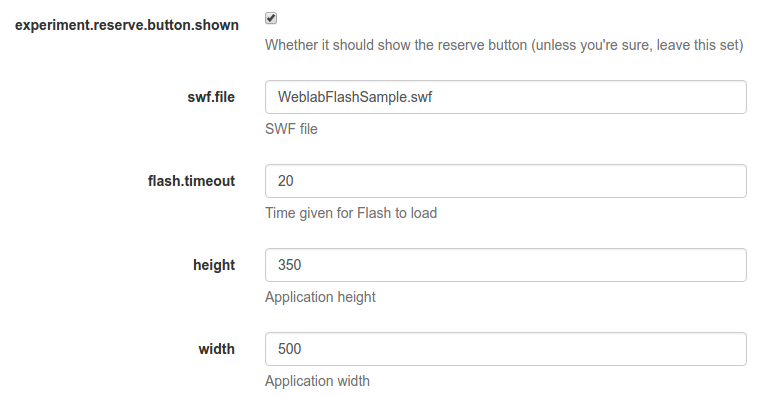
In the case of Flash applications, the client from the list must be flash. However, so as
to load a particular laboratory, some additional parameters must be configured,
such as where is the SWF file, the size of the application, or the maximum time
that WebLab-Deusto will wait to check if the Flash applet has been connected
-e.g., 20 seconds-, since sometimes the user uses a flash blocking application
or a wrong version of Adobe Flash. An example of this configuration would be:
Those SWF files should be located in the public directory (see here),
which will require you to re-compile and re-run the setup script.
Configuring the client in an unmanaged laboratory
In the case of the unamanged laboratories the process is very simple. When editing the experiment in the administration panel as detailed above, simply select the redirect client:
Configure the experiment as redirect.
This way, whenever the user can access the laboratory, it will be redirected to it automatically. You don’t need to deal with any client-side code.
Summary
Congratulations! WebLab-Deusto requires four actions to add a new experiment, explained in this section and on this figure:
Steps to deploy a remote laboratory in WebLab-Deusto.
These four actions are registering the new Experiment server, modifying the configuration of the Laboratory server and the Core server and adding the experiment to the database using the Admin panel.
After doing this, you may start sharing your laboratories with other WebLab-Deusto deployments, as stated in the following section.