Directory hierarchy
Table of Contents
Introduction
WebLab-Deusto uses a directory hierarchy which is also used for managing configuration. Basically, if you create a simple WebLab-Deusto instance:
$ weblab-admin create sample
You will see that it generates a set of files and directories:
+ sample
  + client
    + images
      - logo.jpg
      - logo-mobile.jpg
  - configuration.yml
  - core_host_config.py
  + db
  - debugging.py
  + files_stored
  + httpd
    - apache_weblab_generic.conf
    - simple_server_config.conf
  - lab1_config.py
  + logs
    + config
      - (...)
    - (...)
  + pub
      (empty)
  - run.py
Basic files and directories
The following files and directories are simple:
client: contains the logo images. You can replace the images there directly.db: contains the databases, if stored in disk. When using SQLite, this will be the case and several*.dbfiles will be stored. When using MySQL, this directory will be empty.debugging.py: contains information about which ports are mapped to which functionalities. It is used by the commandweblab-admin monitor samplecommand, as well as by the Bot so as to know to what it must be connected.files_stored: if storing files in a laboratory (such as the FPGA, CPLD or PIC laboratories), by default files will be located in this directory. Please note that so as to store files, you have to configure thecore_store_students_programstoTruein thecore_host_config.pyfile.httpd: contains configuration files for HTTP servers. By default, WebLab-Deusto comes with a built-in low performance HTTP server for testing. However, it is recommended to use the Apache HTTP server. This directory contains the configuration for both. In the future, we might generate configuration for other HTTP servers, such as nginx.logs: contains the log files generated by the application. It also contains theconfigdirectory, which contains the configuration on how much WebLab-Deusto should store.pub: contains public files or directories. They are available in http://localhost:8000/weblab/web/pub/ . You can always change them here, or in the Administration panel (in System: Public directory). If you are developing a new laboratory in JavaScript for example, you can put it there.run.py: the script that will launch this WebLab-Deusto instance.
Note that we have skipped a set of files (configuration.yml, core_host_config.py, lab1_config.py) in purpose. They are explained in the whole following section.
Configuration hierarchy
WebLab-Deusto uses a configuration hierarchy. This hiearchy is based on three major concepts:
- Host: refers to a physical computer.
- Process: refers to a process running in a host*.
- Component: refers to a functionality running in an process*.
Note
If you come from a previous WebLab-Deusto installation, you might be wondering that the terms do not fit. What it used to be machine is now called host, what it used to be instance is now called process, and what it used to be called server is now called component. The previous names were not explaining much what they were doing.
All the components described in Technical description are components using these categories. Each experiment server (e.g., a Robotics experiment) is a component.
Now, components can be grouped in a single process (at operating system level, this is indeed a single process) in a single host. However, they may also be distributed among different hosts (computers), each one containing multiple processes. For this reason, WebLab-Deusto provides a middleware that manages the communications, providing an addressing and registry system. For example, core servers are not implemented knowing where are the laboratory server. They ask the registry for a laboratory server, and they get the closest one, wherever it is and whatever the communication protocol is used.
This enables flexibility supporting multiple types of deployments. For instance, in a standalone system in a Single Board Computer (such as a Raspberry Pi), it is possible to deploy the whole thing in a single process. The communications among all the different components will not use HTTP or so, but simply a function call in Python. This optimization is provided by this middleware: if a Core server and a Laboratory server are in the same process, the communication will always be direct: when the Core server calls a method of the Laboratory server, internally it will be simply calling that method in the Laboratory server. However, if they are separated in a different network, it will use a network based protocol.
Basic structure example
Let’s see a couple of example prior to proceeding. By running (as before):
$ weblab-admin create sample
We can see how this is generated (skipping the basic files explained above):
(...)
- configuration.yml
- core_host_config.py
- lab1_config.py
 (...)
If we open the configuration.yml file, we find the following:
hosts:
  core_host:
    runner: run.py
    config_file: core_host_config.py
    processes:
      core_process1:
        components:
          core:
            config:
              core_facade_port: 10000
              core_facade_server_route: route1
            type: core
      laboratory1:
        components:
          experiment1:
            class: experiments.dummy.DummyExperiment
            config:
              dummy_verbose: true
            type: experiment
          laboratory1:
            config_file: lab1_config.py
            protocols:
              port: 10001
            type: laboratory
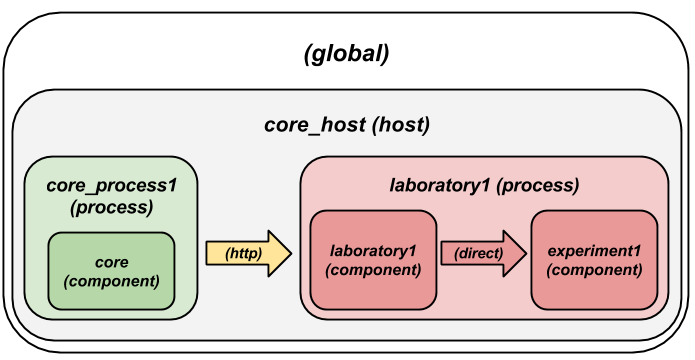
If you are not familiar with YAML, it is a very simple format where you can describe information quite condensed. In this case, you can see that there is a list of hosts, which is core_host, which has some properties (such as runner: run.py or config_file: core_host_config.py). It also has processes, and in this case, the list of processes contains two: core_process1 and laboratory1. The first one has a single component called core (which is a Core Server according to its type) and the second one contains two components experiment1 and laboratory1 (which is a Laboratory Server, according to its type).
In this case, the core server will communicate with the Laboratory Server through a network in localhost, using an HTTP message in this case, as shown in the following diagram, while the Laboratory server will contact the Experiment Server using a simple Python call (it is in the same process).
Single process example
So as to illustrate a more compact example, where all the servers are running in a single process, run the following:
$ weblab-admin create sample2 --inline-lab-server
While the files are kind of the same, you can notice that the configuration.yml changes considerably:
hosts:
  core_host:
    runner: run.py
    config_file: core_host_config.py
    processes:
      core_process1:
        components:
          core:
            config:
              core_facade_port: 10000
              core_facade_server_route: route1
            type: core
          experiment1:
            class: experiments.dummy.DummyExperiment
            config:
              dummy_verbose: true
            type: experiment
          laboratory1:
            config_file: lab1_config.py
            type: laboratory
As explained above, this hierarchy represents a single host (core_ohst1) running a single process (core_process1), running three components (experiment1, laboratory1 and core). Since they are all in the same process, all the communication between the different servers will use the so-called Direct protocol (calling directly the function without using any network), regardless the configured protocols. Therefore, the generated structure is as follows:

Propagating configuration
During the example above, we’ve seen that it was possible to add configuration files such as:
config_file: lab1_config.py
or configuration variables directly such as:
config:
  core_facade_port: 10000
  core_facade_server_route: route1
There is also third approach which is:
config_files: [ lab1_config.py, lab2_config.py ]
or, alternatively:
config_files:
   lab1_config.py
   lab2_config.py
Furthermore, the mechanisms can be combined, so the following is valid:
config_file: general_config.py
config:
   port: 12345
However, each mechanism can not be repeated (so you can’t have two config or two config_file for the same level). This is not a problem, though (in a single config you can put as many values as you want, and if you need more than one config_file, then you need a config_files).
These parameters can be put in any level of the hierarchy (global, host, process or component). When a component is running, it will have access to all those values which are accessible in its direct path to the root. In case of conflict (a variable defined in two levels), the one defined at a lowest level shadows the other for that component (e.g., if something is declared at a process level and at host level, the component under that process will obtain the value defined at process level).
So as to show this more clear, if we have this scenario:
(...)
config:
  var1: global
  var2: global
hosts:
  core_host:
    config:
      var2: host
      var3: host
    processes:
      core_process1:
        config:
          var3: process
          var4: process
        components:
          core:
            type: core
            config:
              var4: component
The core component will see that var1 is “global”, var2 is “host”, var3 is “process” and var4 is “component”.
The full list of configuration variables are listed in Configuration variables.
Multiple core servers
Let’s take a more complex example, involving more laboratories and more core servers. Here we assume that you have installed MySQL and the PyMySQL driver as suggested in Installation: further steps, and therefore we can run more than one core server. Running:
$ weblab-admin create sample3 --lab-copies=2 --dummy-copies=5 --cores=3 --db-engine=mysql --coordination-db-engine=mysql
With this command, we are creating a new deployment where there will be 5 copies of an experiment, 3 core and login servers and 2 laboratory servers. The use of MySQL both for database backend and for coordination is required, since otherwise it will be using SQLite, which does not support concurrent access by multiple processes.
The generated hierarchy is the following:
hosts:
  core_host:
    runner: run.py
    config_file: core_host_config.py
    processes:
      core_process1:
        components:
          core:
            config:
              core_facade_port: 10000
              core_facade_server_route: route1
            type: core
      core_process2:
        components:
          core:
            config:
              core_facade_port: 10001
              core_facade_server_route: route2
            type: core
      core_process3:
        components:
          core:
            config:
              core_facade_port: 10002
              core_facade_server_route: route3
            type: core
      laboratory1:
        components:
          experiment1:
            class: experiments.dummy.DummyExperiment
            config:
              dummy_verbose: true
            type: experiment
          experiment3:
            class: experiments.dummy.DummyExperiment
            config:
              dummy_verbose: true
            type: experiment
          experiment5:
            class: experiments.dummy.DummyExperiment
            config:
              dummy_verbose: true
            type: experiment
          laboratory1:
            config_file: lab1_config.py
            protocols:
              port: 10003
            type: laboratory
      laboratory2:
        components:
          experiment2:
            class: experiments.dummy.DummyExperiment
            config:
              dummy_verbose: true
            type: experiment
          experiment4:
            class: experiments.dummy.DummyExperiment
            config:
              dummy_verbose: true
            type: experiment
          laboratory2:
            config_file: lab2_config.py
            protocols:
              port: 10004
            type: laboratory
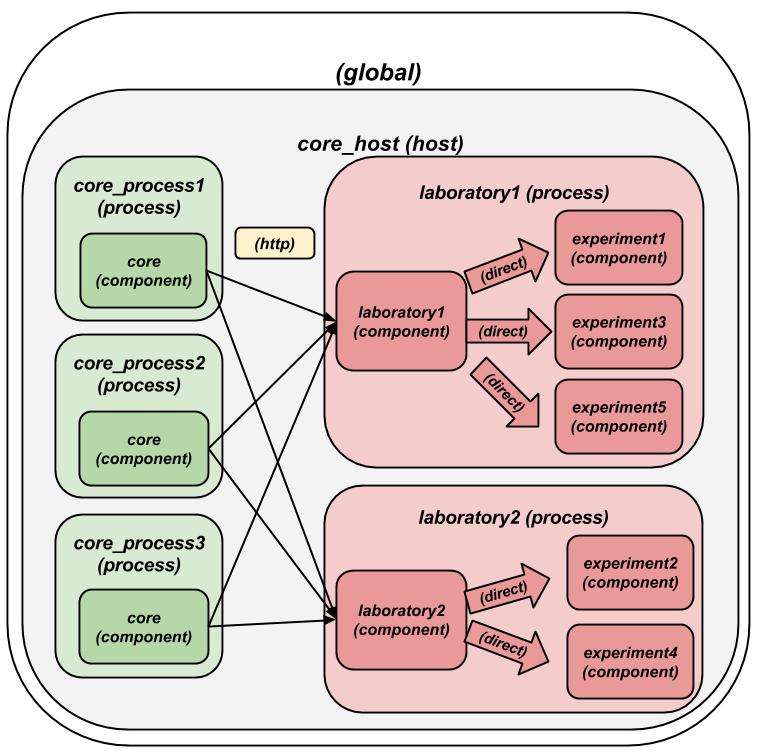
As requested, 3 Core servers have been created. Each pair has been created in a single process, so there are core_process1, core_process2 and core_process3. Each of them will have a core component. On the other hand, it was requested to create 5 copies of an experiment (and therefore, 5 Experiment servers) and only 2 Laboratory servers. Since an Experiment server can only be associated to a single Laboratory server, the number of Experiment servers have been divided among the available Laboratory servers. The communication between each Laboratory server and each Experiment server will be Direct, since they will be in the same process. However, the communication among the Core servers and the Laboratory servers will use the most suitable network protocol, which by default it will be a HTTP format.
This configuration is represented with the following figure:
Multiple machines
So as to generate more than one machine with the weblab-admin script, run the following:
$ weblab-admin create sample4 --xmlrpc-experiment
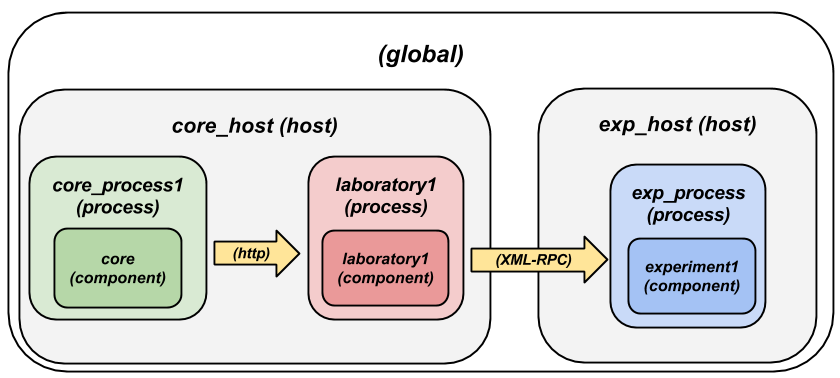
This command is intended for deploying laboratories that use XML-RPC (such as those laboratories developed in programming languages other than Python). This command generates the deployment detailed in the following figure:
If we look at the configuration.yml file, we can appreciate the following:
hosts:
  core_host:
    runner: run.py
    config_file: core_host_config.py
    processes:
      core_process1:
        components:
          core:
            config:
              core_facade_port: 10000
              core_facade_server_route: route1
            type: core
      laboratory1:
        components:
          laboratory1:
            config_file: lab1_config.py
            protocols:
              port: 10001
            type: laboratory
  exp_host:
    runner: run-xmlrpc.py
    host: 127.0.0.1
    processes:
      exp_process:
        components:
          experiment1:
            class: experiments.dummy.DummyExperiment
            protocols:
              port: 10002
              supports: xmlrpc
            type: experiment
There are two hosts: exp_host and core_host. The core_host contains the Laboratory server (in the laboratory1 process) and the Core server (in the core_process1 process). The exp_host has a single process which has a single component which is the experiment1. Since experiment1 states that it only supports: xmlrpc, then the Laboratory Server will use XML-RPC to contact it.
Notes on addressing
In the addressing system used, one component called experiment1 at the process laboratory1 at the host core_machine will be refered as:
experiment1:laboratory1@core_host
For this reason, in some parts of the configuration files you will notice that the core server defines:
core_coordinator_laboratory_servers = {
    'laboratory1:core_process1@core_host' : {
        'exp1|dummy|Dummy experiments'        : 'dummy1@dummy',
    },
}
Where it defines “there is a Laboratory server which is identified by laboratory1 in the core_process1 process, which is in the core_host host. Similarly, you will see that the Laboratory is configured as:
laboratory_assigned_experiments = {
        'exp1:dummy@Dummy experiments' : {
                'coord_address' : 'experiment1:core_process1@core_host',
                'checkers' : ()
            },
    }
Here, the configuration establishes that a particular experiment (at database level) is located in a particular address. You will notice that this address is using the format explained.
Security
If you are going to deploy one of the servers in a different network and you
want some basic security (e.g., the core server in a location and a
laboratory server in a different location), you’re encouraged to use one of
the two following options (or both):
- Configure your firewall so only your
coreserver can access (via IP) - Use the
authparameter in theprotocolssection
For example, if you put the following in your configuration.yml:
exp_host:
 runner: run-xmlrpc.py
 host: 127.0.0.1
 processes:
   exp_process:
     components:
       experiment1:
         class: experiments.dummy.DummyExperiment
         protocols:
           port: 10002
           auth: RANDOM-SHARED-KEY
         type: experiment
Then the clients will always provide that shared key (RANDOM-SHARED-KEY in
this case, put something random in your case) when contacting that server, and
the server will require that shared key so as to process requests.
Summary
The focus of this section is showing the basics of the configuration subsystem of WebLab-Deusto. You may use the type of setting that suits better your system, even modifying it by yourself instead of using the weblab-admin script (or modifying the results of this script). With this section, you should be able to customize these aspects of the deployments.