First steps
In this section, we will learn to create our first deployment of a WebLab-Deusto instance. This section assumes that you have successfully installed the system. It also assumes that you have activated the proper virtual environment in the current terminal, so running weblab-admin works:
$ weblab-admin --version
5.0
The deployment we are running here is very small and relies of very few technologies. It has successfully been deployed even in Raspberry Pi devices. But it also has several drawbacks: performance, lack of concurrent support for certain operations, etc. We will see how to implement more complex scenarios in other section, but for bootstrapping a WebLab-Deusto instance and learning the basic concepts, this is enough.
Creating a WebLab-Deusto instance
A single computer may have multiple instances of WebLab-Deusto. In production, there will be typically a single one, but for testing it may be useful to play with different ones. Each instance will manage its own permissions, its own users, its own queues, etc.
So as to create a new WebLab-Deusto instance, run the following:
$ weblab-admin create example --http-server-port=8000
Congratulations!
WebLab-Deusto system created
[...]
Enjoy!

$
From this point, in that directory (example), a full WebLab-Deusto deployment will be established. If you take a look inside, you will see different directories (for databases -db-, web servers -httpd-, logs -logs, files_stored-), and there will be one which contains all the deployment configuration, called core_machine. Inside it, you will see a hierarchy of directories with configuration files that apply to each server.
Starting the WebLab-Deusto instance
The WebLab-Deusto instance at this point is configured, but it is not started. So as to start it, we will use once again the weblab-admin command. As you’ll find out, this is the command that you will use for any management related with the instances. Run the following:
$ weblab-admin start example
Press <enter> or send a sigterm or a sigint to finish
As you can see, the server is running. By pressing enter, the server will stop:
(enter)
Stopping servers...
$
So, let’s start it again:
$ weblab-admin start example
Press <enter> or send a sigterm or a sigint to finish
And, while it is started, let’s use it for the very first time. Open in your web browser the following address: http://localhost:8000/
You will find the log in screen of WebLab-Deusto. On it, log in using admin as username and password as password. You will see that there are some sample laboratories. One of them (dummy) is local, and it does not rely on any hardware equipment. The rest are demo laboratories located in the University of Deusto. By default, these laboratories are created and assigned to the administrators group. They use the federation model of WebLab-Deusto to connect to WebLab-Deusto and use real equipment there.
You can safely play with both types of laboratories. With the dummy laboratory, you will see several output lines in the terminal from which you run WebLab-Deusto.
Managing users and permissions
Ok, so everything is working for the admin user. What about creating a class of 20 students who can access only the dummy, and other class who can access the federated laboratories?
Using the admin user, you’ll see the settings button in the top-right corner. Click on it:

And you will see this:
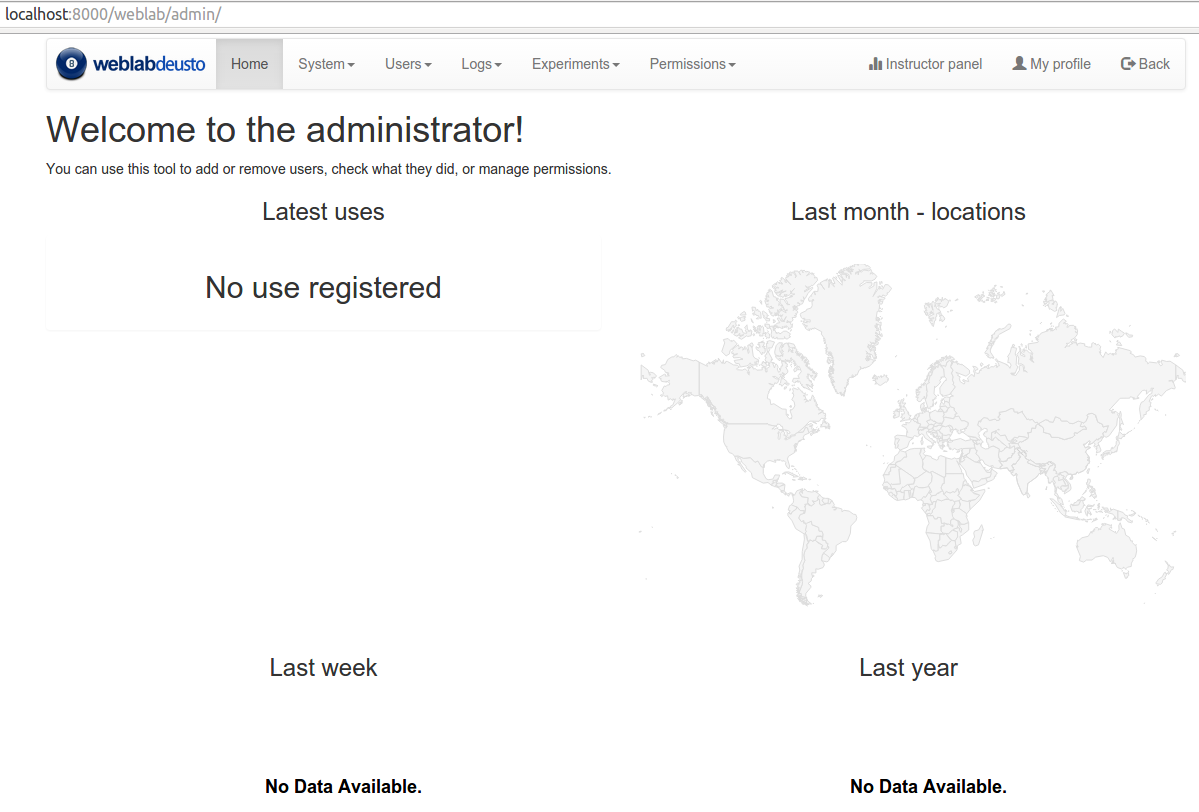
Once in the administration panel, several operations are available. The number of operations is increasing from month to month, so upgrading the system is highly advisable.
The first thing to do is adding a new user. So as to do this, click on “General” and then on “Users”. There you can see the list of users registered in the system. Then, click on “Create” and fill the following fields:
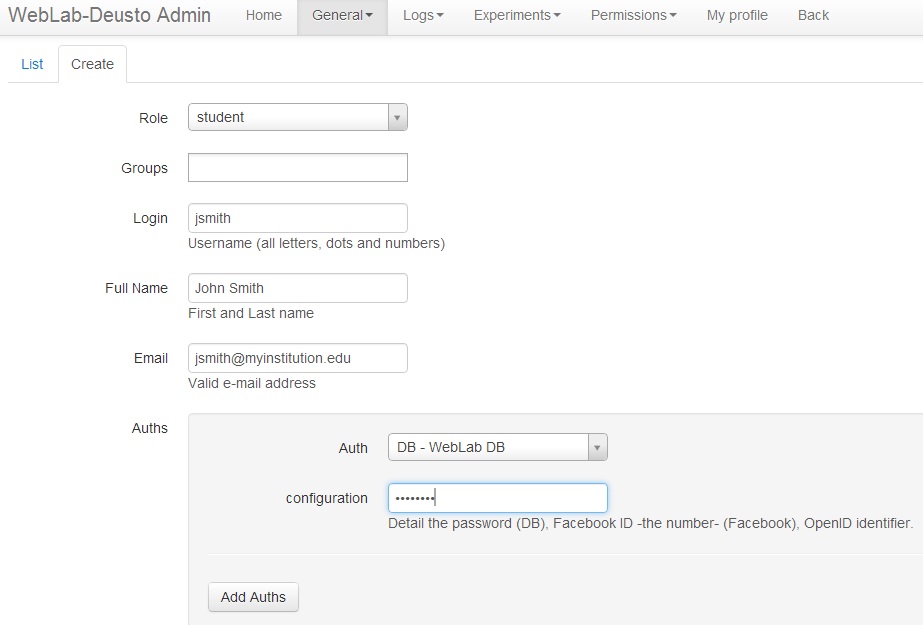
The role “student” is the common one. If you select “administrator”, that user will be able to use the administration panel (and therefore, add or delete other users, experiments, etc.).
Once we have added a user, let’s create a new group called “Physics”. Click on “General” and then on “Groups”. Inside this group, you can click on “Create” and fill the following fields:
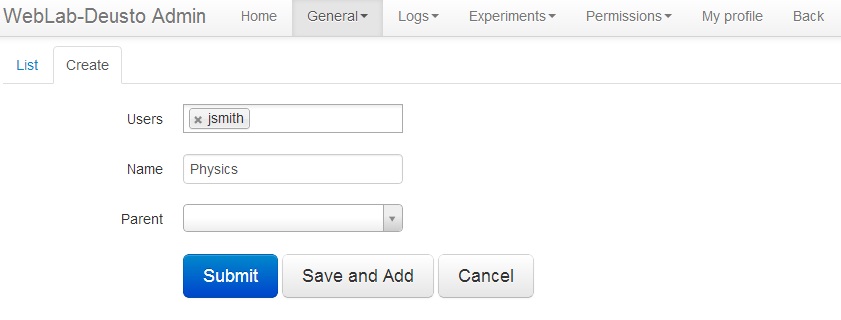
The “Users” field contains all the users in the system. So you can add them directly here, or in the “Groups” field when editing a user.
The next step is to grant permission on a laboratory to this user (or this group). To do this, click on “Permissions”, and then on “Create”. Here you can select what permission to grant (“experiment_allowed” in this case) and to who (a group, a user, or a role).
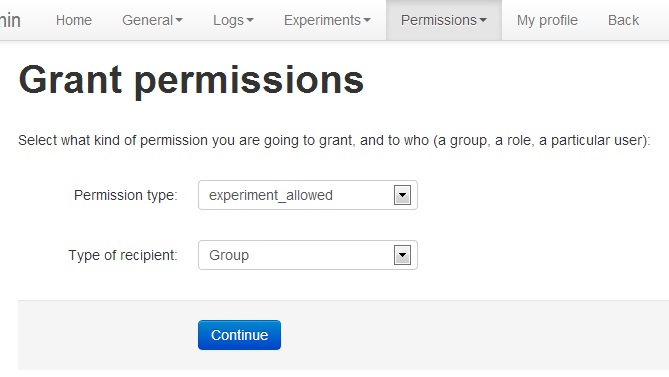
And then you can select the experiment you want to let the user access, for how long (in seconds), what priority he may have (the lower, the faster they advance in the queue), and to which group you are granting this permission.
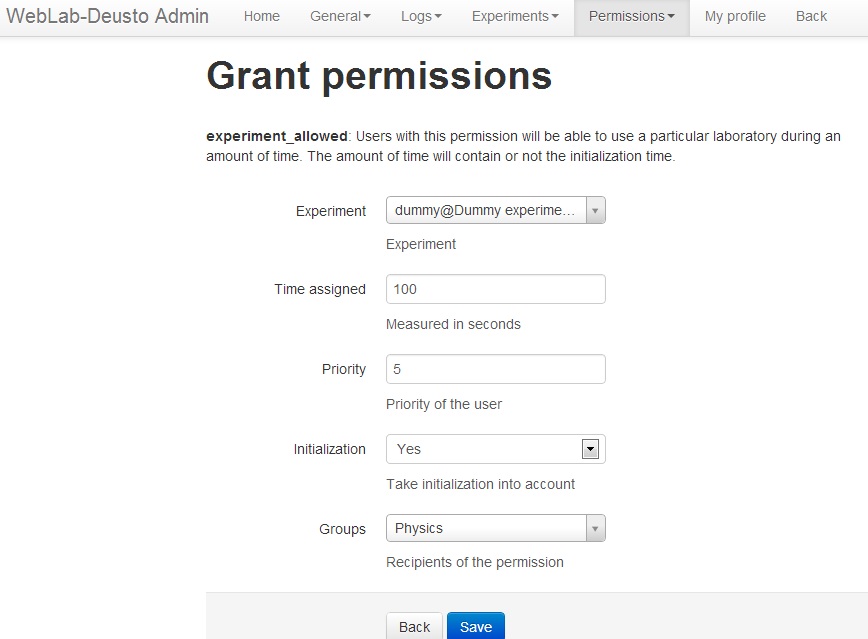
Once this is done, this user (and all the users in that group) can access that laboratory.
Given that adding multiple users one by one might be useful, it is possible to add multiple users at a time. Click on “General”, then on “Add multiple users”.
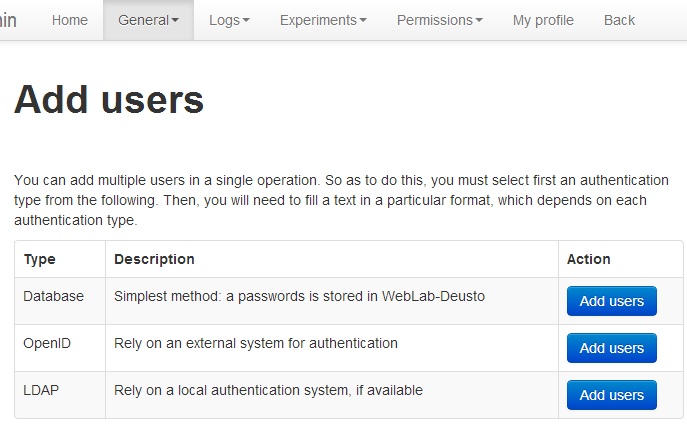
Click on the “Add users” in the row of “Database”. You will be able to add multiple users by writing them in multiple rows separated by commas, using the pattern described. You may even add them to an existing group, or to a new one:
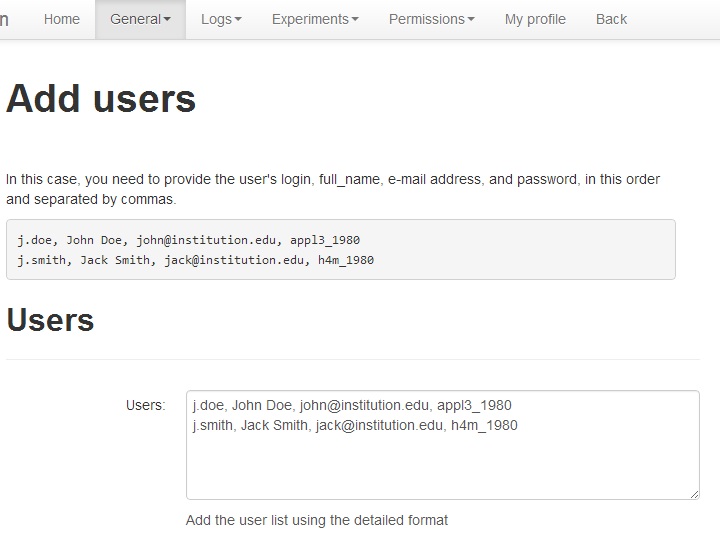
For instance, if you add them to the Physics groups, they will inherit the permissions granted to this group.
Inviting users to register or to join a group
In some cases, you will want to explicitly manage your users, creating their accounts yourself and placing them into specific groups. However, often you will want to give your users the chance to register themselves, or to join a specific group (to get access to certain labs) on their own.
- This is useful, for instance:
- When you don’t want to specify the login, name and e-mail for every user.
- When you want a broad group of people to join, without knowing exactly who belong to that group.
- When you want to publicly invite people to join.
To use the invitations system, you can follow the following steps:
- First, you will need to create a WebLab group for your invitees to join (unless you have that group already). All invitations are linked to a group, which they automatically join after accepting the invitation. That way, they will automatically get access to the experiments you intend, thanks to that group’s privileges.
- Now, you will need to create the Invitation itself. This can be done through the WebLab administrator. Go to the administrator, then to the “Users” menu, then click on “Invitations”. To create the invitation you will need to specify the group to join, the expire date, the max number of people who can accept it, and whether the invitation can be used to register new users. If that last option is disabled, then only existing WebLab-Deusto users will be able to use the invitation to join a group. Users without an account won’t be able to create one.
- Once you have created the invitation, in the list of invitations you will see the URL of each one. Now all that is left is to share the Invitation URL with your prospective students. Depending on the invitation, they will be able to use it to register a new account altogether, or to join the invitation’s group with their existing account.
Tracking users
Now you can start again the WebLab-Deusto instance, and you can use the laboratory with different users. Once you log in the Administration panel, go to “Logs” and you will see who has accessed when:

By using the “Add filter”, you may search by user, date, or similar.
Customizing the deployment
In this section, we have presented a very simple deployment. However, this deployment can be configured. While in the next section, we’ll learn to configure redis, MySQL or Apache, there are some settings that we can modify at this level.
Running:
$ weblab-admin create --help
Displays the full help regarding the create command. A more advanced example would be:
$ weblab-admin create other.example --http-server-port=8001 --start-port=20000 \
--system-identifier='My example' --entity-link='http://www.myuniversity.edu/'  \
--poll-time=300 --admin-user=administrator --admin-name='John Doe'             \
--admin-password=secret --admin-mail='admin@weblab.myuniversity.edu' --logic
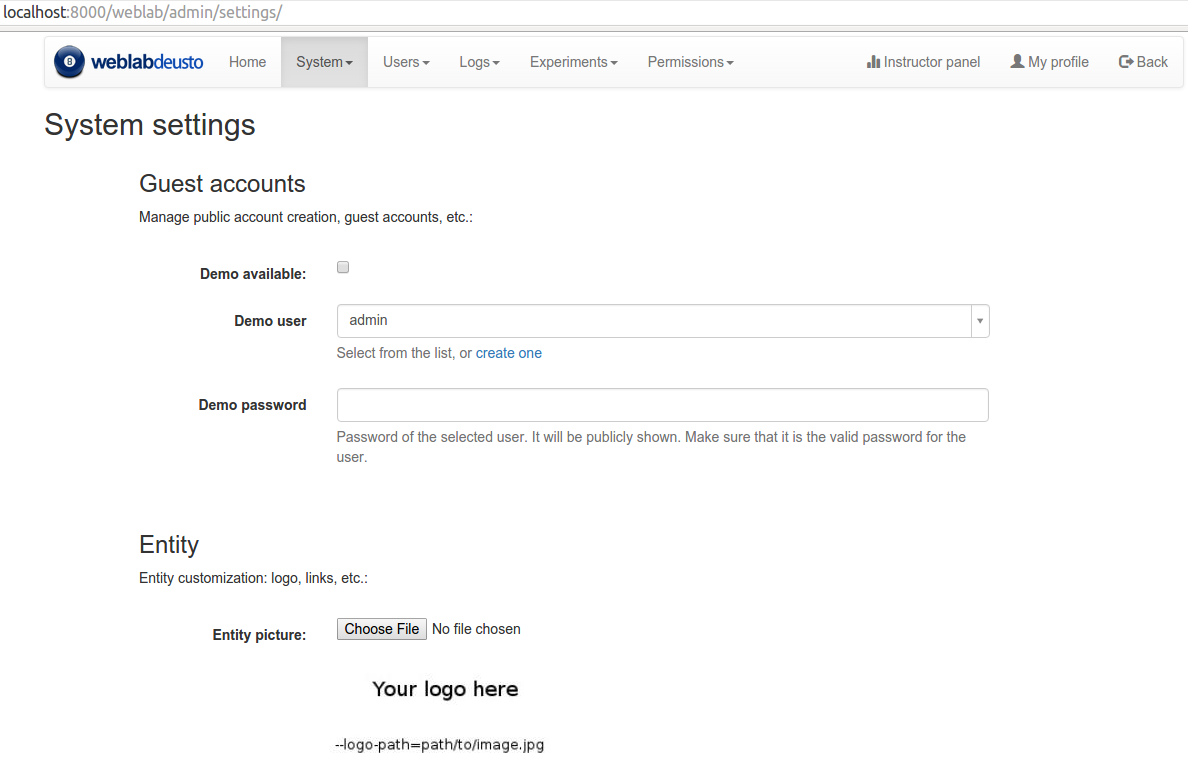
This example will be run in other port (8001), so you can start it at the same time as the other deployment without problems. Just go to http://localhost:8001/ instead, log in with user administrator and password secret, and see how there is another laboratory called logic. Many of the fields can always be changed with the administration panel. For example, in System and then Settings you can add a demo account, change the URL and logo of the school or provide a Google Analytics code.
Moving the deployment to a different directory or reinstalling WebLab-Deusto
Say you have installed WebLab-Deusto in a location and you need to move to a different directory. All the web server configuration files will be pointing with absolute paths to the old directory. The easiest way to override the existing HTTPd configuration and make it point to the proper paths is running:
$ weblab-admin httpd-config-generate sample
Generating HTTPd configuration files... [done]
$
After running this, restarting it and restarting the web server should be enough.
Other examples, such as using Virtual Machines, VISIR, etc., are documented in the next section.
Join the community
Once you have installed WebLab-Deusto (or if you have any trouble installing it), please join our small community:
So we can all exchange experiences, tips, tricks or concerns on how to create, maintain and share better remote laboratories. If you don’t like writing in public, feel free to contact us privately at any point at weblab@deusto.es But exchanging the experience in public can be benefitial for all the members.