Tools
Table of Contents
WebLab Admin
WebLab-Deusto provides a command called weblab-admin for interacting with installations of WebLab-Deusto. You’ll find the latest documentation by running:
$ weblab-admin --help
$ weblab-admin <command> --help
The following is the output of these commands as of June 2016.
Instance creation
Running weblab-admin create --help returns:
Usage: weblab-admin create DIR [options]

Options:
  -h, --help            show this help message and exit
  -f, --force           Overwrite the contents even if the directory already
                        existed.
  -q, --quiet           Do not display any output.
  -v, --verbose         Show more information about the process.
  --not-interactive     Run the script in not interactive mode. Recommended
                        for scripts only.
  --socket-wait=PORT    Wait for a socket connection rather than sigterm/input
  --add-test-data       Populate the database with sample data
  --cores=CORES         Number of core servers.
  --start-port=START_PORTS
                        From which port start counting.
  -i SYSTEM_IDENTIFIER, --system-identifier=SYSTEM_IDENTIFIER
                        A human readable identifier for this system.
  --enable-https        Tell external federated servers that they must use
                        https when connecting here
  --base-url=BASE_URL   Base location, before /weblab/. Example: /deusto.
  --http-server-port=HTTP_SERVER_PORT
                        Enable the builtin HTTP server (so as to not require
                        apache while testing) and listen in that port.
  --entity-link=ENTITY_LINK
                        Link of the host entity (e.g. http://www.deusto.es ).
  --logo-path=IMG_FILE_PATH
                        Path of the entity logo.
  --server-host=SERVER_HOST
                        Host address of this machine. Example: weblab.domain.
  --poll-time=POLL_TIME
                        Time in seconds that will wait before expiring a user
                        session.
  --no-lab              Do not create any laboratory server or experiment
                        server.
  --inline-lab-server   Laboratory server included in the same process as the
                        core server. Only available if a single core is used.
  --lab-copies=LAB_COPIES
                        Each experiment can be managed by a single laboratory
                        server. However, if the number of experiments managed
                        by a single laboratory server is high, it can become a
                        bottleneck. This bottleneck effect can be reduced by
                        balancing the amount of experiments among different
                        copies of the laboratories. By establishing a higher
                        number of laboratories, the generated deployment will
                        have the experiments balanced among them.
  --ignore-locations    Ignore locations. Otherwise, it will tell you to
                        download two files for GeoLocation

  Administrator data:
    Administrator basic data: username, password, etc.

    --admin-user=ADMIN_USER
                        Username for the WebLab-Deusto administrator
    --admin-name=ADMIN_NAME
                        Full name of the administrator
    --admin-password=ADMIN_PASSWORD
                        Administrator password ('password' is the default)
    --admin-mail=ADMIN_MAIL
                        E-mail address of the system administrator.

  Experiments options:
    While most laboratories are specific to a particular equipment, some
    of them are useful anywhere (such as the VM experiment, as long as you
    have a VirtualBox virtual machine that you'd like to deploy, or the
    logic game, which does not require any equipment). Other experiments,
    such as VISIR, have been deployed in many universities. Finally, for
    development purposes, the XML-RPC experiment is particularly useful.

    --xmlrpc-experiment
                        By default, the Experiment Server is located in the
                        same process as the  Laboratory server. However, it is
                        possible to force that the laboratory  uses XML-RPC to
                        contact the Experiment Server. If you want to test a
                        Java, C++, .NET, etc. Experiment Server, you can
                        enable this option, and the system will try to find
                        the Experiment Server in other port
    --xmlrpc-experiment-port=XMLRPC_EXPERIMENT_PORT
                        What port should the Experiment Server use. Useful for
                        development.
    --dummy-experiment-name=DUMMY_NAME
                        There is a testing experiment called 'dummy'. You may
                        change this name (e.g. to dummy1 or whatever) by
                        changing this option.
    --dummy-category-name=DUMMY_CATEGORY_NAME
                        You can change the category name of the dummy
                        experiments. (by default, Dummy experiments).
    --dummy-copies=DUMMY_COPIES
                        You may want to test the load balance among different
                        copies of dummy.
    --dummy-silent      Not show the commands sent to the dummy experiment.
    --visir, --visir-server
                        Add a VISIR server to the deployed system.
    --visir-slots=SLOTS
                        Number of concurrent users of VISIR.
    --visir-experiment-name=EXPERIMENT_NAME
                        Name of the VISIR experiment.
    --visir-base-url=VISIR_BASE_URL
                        URL of the VISIR system (e.g. http://weblab-
                        visir.deusto.es/electronics/ ). It should contain
                        login.php, for instance.
    --visir-measurement-server=MEASUREMENT_SERVER
                        Measurement server. E.g. weblab-visir.deusto.es:8080
    --visir-use-php     VISIR can manage the authentication through a PHP
                        code. This option is slower, but required if that
                        scheme is used.
    --visir-login=USERNAME
                        If the PHP version is used, define which username
                        should be used. Default: guest.
    --visir-password=PASSWORD
                        If the PHP version is used, define which password
                        should be used. Default: guest.
    --logic, --logic-server
                        Add a logic server to the deployed system.
    --vm, --virtual-machine, --vm-server
                        Add a VM server to the deployed system.
    --vm-experiment-name=EXPERIMENT_NAME
                        Name of the VM experiment.
    --vm-storage-dir=STORAGE_DIR
                        Directory where the VirtualBox machines are located.
                        For example: c:\users\lrg\.VirtualBox\Machines
    --vbox-vm-name=VBOX_VM_NAME
                        Name of the Virtual Box machine which this experiment
                        uses. Is often different from the Hard Disk name.
    --vbox-base-snapshot=VBOX_BASE_SNAPSHOT
                        Name of the VirtualBox snapshot to which the system
                        will be reset after every usage. It should be an
                        snapshot of an started machine. Otherwise, it will
                        take too long to start.
    --vm-url=URL        URL which will be provided to users so that they can
                        access the VM through VNC. For instance:
                        vnc://192.168.51.82:5901
    --http-query-user-manager-url=URL
                        URL through which the user manager (which runs on the
                        VM and resets it when needed) can be reached. For
                        instance: http://192.168.51.82:18080
    --vm-estimated-load-time=LOAD_TIME
                        Estimated time which is required for restarting the
                        VM. Does not need to be accurate. It is displayed to
                        the user and is essentially for cosmetic purposes.

  Federation options:
    WebLab-Deusto at the University of Deusto federates a set of
    laboratories. You may put them by default in your WebLab-Deusto
    instance.

    --add-fed-submarine
                        Add the submarine laboratory.
    --add-fed-logic     Add the logic laboratory.
    --add-fed-visir     Add the VISIR laboratory.

  Session options:
    WebLab-Deusto may store sessions in a database, in memory or in
    redis.Choose one system and configure it.

    --session-storage=SESSION_STORAGE
                        Session storage used. Values: sql, redis, memory.
    --session-db-engine=SESSION_DB_ENGINE
                        Select the engine of the sessions database.
    --session-db-host=SESSION_DB_HOST
                        Select the host of the session server, if any.
    --session-db-port=SESSION_DB_PORT
                        Select the port of the session server, if any.
    --session-db-name=SESSION_DB_NAME
                        Select the name of the sessions database.
    --session-db-user=SESSION_DB_USER
                        Select the username to access the sessions database.
    --session-db-passwd=SESSION_DB_PASSWD
                        Select the password to access the sessions database.
    --session-redis-db=SESSION_REDIS_DB
                        Select the redis db on which store the sessions.
    --session-redis-host=SESSION_REDIS_HOST
                        Select the redis server host on which store the
                        sessions.
    --session-redis-port=SESSION_REDIS_PORT
                        Select the redis server port on which store the
                        sessions.

  Database options:
    WebLab-Deusto uses a relational database for storing users,
    permissions, etc.The database must be configured: which engine,
    database name, user and password.

    --db-engine=DB_ENGINE
                        Core database engine to use. Values: mysql, sqlite.
    --db-name=DB_NAME   Core database name.
    --db-host=DB_HOST   Core database host.
    --db-port=DB_PORT   Core database port.
    --db-user=DB_USER   Core database username.
    --db-passwd=DB_PASSWD
                        Core database password.

  Scheduling options:
    These options are related to the scheduling system.  You must select
    if you want to use a database or redis, and configure it.

    --coordination-engine=COORD_ENGINE
                        Coordination engine used. Values: sql, redis.
    --coordination-db-engine=COORD_DB_ENGINE
                        Coordination database engine used, if the coordination
                        is based on a database. Values: mysql, sqlite.
    --coordination-db-name=COORD_DB_NAME
                        Coordination database name used, if the coordination
                        is based on a database.
    --coordination-db-user=COORD_DB_USER
                        Coordination database userused, if the coordination is
                        based on a database.
    --coordination-db-passwd=COORD_DB_PASSWD
                        Coordination database password used, if the
                        coordination is based on a database.
    --coordination-db-host=COORD_DB_HOST
                        Coordination database host used, if the coordination
                        is based on a database.
    --coordination-db-port=COORD_DB_PORT
                        Coordination database port used, if the coordination
                        is based on a database.
    --coordination-redis-db=COORD_REDIS_DB
                        Coordination redis DB used, if the coordination is
                        based on redis.
    --coordination-redis-passwd=COORD_REDIS_PASSWD
                        Coordination redis password used, if the coordination
                        is based on redis.
    --coordination-redis-host=COORD_REDIS_HOST
                        Coordination redis host used, if the coordination is
                        based on redis.
    --coordination-redis-port=COORD_REDIS_PORT
                        Coordination redis port used, if the coordination is
                        based on redis.
Starting an instance
Running weblab-admin start --help returns:
Usage: weblab-admin start DIR [options]

Options:
  -h, --help            show this help message and exit
  -m HOST, --host=HOST, --machine=HOST
                        If there is more than one host in the configuration,
                        which one should be started.
  -l, --list-hosts, --list-machines
                        List hosts.
  -s SCRIPT, --script=SCRIPT
                        If the runner option is not available, which script
                        should be used.
Stopping an instance
The command weblab-admin stop <instance_directory> does not have any option. It stops all the processes of the instance.
Upgrading an instance
The command weblab-admin upgrade <instance_directory> --help returns:
usage: weblab-admin [-h] [-y]

WebLab upgrade tool.

optional arguments:
  -h, --help  show this help message and exit
  -y, --yes   Say yes to everything
Upgrading locations of an instance
The command weblab-admin locations <instance_directory> --help returns:
usage: weblab-admin locations DIR [options]

optional arguments:
  -h, --help        show this help message and exit
  --redownload      Force redownload of databases
  --reset-database  Reset the database, forcing the server to download all the
                    data again
  --reset-cache     Reset the database, forcing the server to download all the
                    data again
Upgrading the web server configurations of an instance
The command weblab-admin httpd-config-generate <instance_directory does not have any option. It just re-generates the web server configuration.
WebLab Bot
A Remote Laboratory is a software system that requires a complex workflow and that will require to face big load of users in certain moments. There are different constraints that have an impact on the latency and performance of WebLab-Deusto:
- Deployment configuration: only one server, multiple servers, storing sessions in database or in memory…
- Deployed system: what machine, operating system, Python or MySQL versions…
- Tens or hundreds of students being queued
- Tens or hundreds of students using experiments
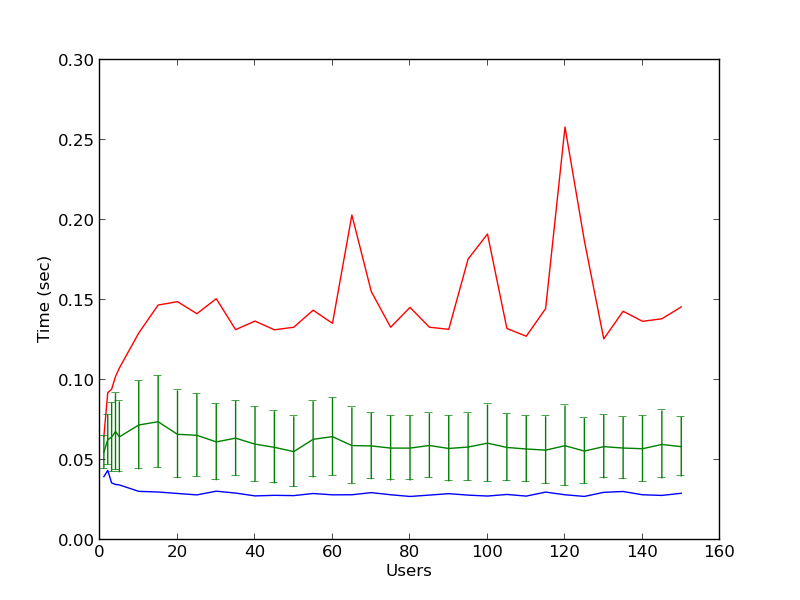
In order to test these variables easily, a students simulator has been implemented, and it is called WebLab Bot. The WebLab Bot tool is used for three purposes:
- Measure the time with each configuration
- Perform stress tests of the system, finding the errors created when developing new features
- Test the system in new operating systems or software versions
So as to run it, you need a configuration file, such as the one available in
tools/Bot/configuration.py.dist.
Copy it to configuration.py and change the required variables (e.g., change
the credentials, URLs, etc.). The consumer/run.py referes to the run.py
file generated whenever you created an environment, such as:
$ weblab-admin create consumer
The number of iterations define how many times the same scenario will be
repeated. The number of concurrent users is defined in the generate_scenarios
method, in the different two for loops. You may add other loops or change
these, but the idea is that in this example, it will be tested with 1 student,
2, 3, 4, 5, 10, 15, 20, 25 …, 140, 145 and 150:
for protocol in cfg_util.get_supported_protocols():
    for number in range(1, 5):
        scenarios.append(
                Scenario(
                    cfg_util.new_bot_users(number, new_standard_bot_user, 0, STEP_DELAY, protocol),
                    protocol, number
                )
            )

    for number in range(5, 151, 5):
        scenarios.append(
                Scenario(
                    cfg_util.new_bot_users(number, new_standard_bot_user, STEP_DELAY * (5 -1), STEP_DELAY, protocol),
                    protocol, number
                )
            )
Additionally, you need to install matplotlib:
# (in Ubuntu, the following requires some packages, such as build-essential, libfreetype6-dev or libpng-dev)
pip install matplotlib
Then, simply call:
weblab-bot.py
This will start the WebLab-Deusto instance, run the proposed scenario, and then stop it, for each iteration and scenario defined. Running it will generate the following output:
********************
CONFIGURATION consumer/run.py
Unique id: D_2013_03_31_T_11_38_17_
********************

New trial. 1 iterations
 iteration 0 .  {'route1': 1} [ 0 exceptions ]
Cleaning results... Sun Mar 31 11:38:28 2013
Storing results... Sun Mar 31 11:38:28 2013
Results stored Sun Mar 31 11:38:28 2013
   -> Scenario: <Scenario category="JSON" identifier="1" />
   -> Results stored in logs/botclient_D_2013_03_31_T_11_38_17__SCEN_0_CONFIG_0.pickle
   -> Serializing results...
   -> Done

[...]

New trial. 1 iterations
 iteration 0 ....  {'route1': 4} [ 0 exceptions ]
Cleaning results... Sun Mar 31 11:39:19 2013
Storing results... Sun Mar 31 11:39:19 2013
Results stored Sun Mar 31 11:39:19 2013
   -> Scenario: <Scenario category="JSON" identifier="4" />
   -> Results stored in logs/botclient_D_2013_03_31_T_11_38_17__SCEN_3_CONFIG_0.pickle
   -> Serializing results...
   -> Done
Writing results to file raw_information_D_2013_03_31_T_11_38_17_.dump... 2013-03-31 11:39:19.866922
Generating graphics...
Executing figures/generate_figures_D_2013_03_31_T_11_38_17_.py... [done]
HTML file available in botclient_D_2013_03_31_T_11_38_17_.html
Finished plotting; Sun Mar 31 11:39:31 2013, 251 millis
Done 2013-03-31 11:39:31.251789
The HTML file that it points out contains all the graphics for each method.
If you don’t want to start the process each time (e.g., you want to test it with an existing WebLab-Deusto instance that you don’t want to stop), then, pass the following argument:
weblab-bot.py --dont-start-processes
As in the case of weblab-admin, in UNIX systems you may also use
weblab-bot (instead of weblab-bot.py).
Experiment Server Tester
Warning
THIS TOOL NEEDS TO BE UPGRADED TO SUPPORT THE NEW APIs
In order to make it easy to test the experiment server under development, WebLab-Deusto provides a tool called ExperimentServerTester (available in tools/ExperimentServerTester). This is a Python application (requires both Python 2.6 and wxPython, both available for GNU/Linux, Microsoft Windows and Mac OS X) that makes it easy to interact with the server as WebLab-Deusto would do it. You can use the provided assistant (pressing on “Send command” will send the command you have written):
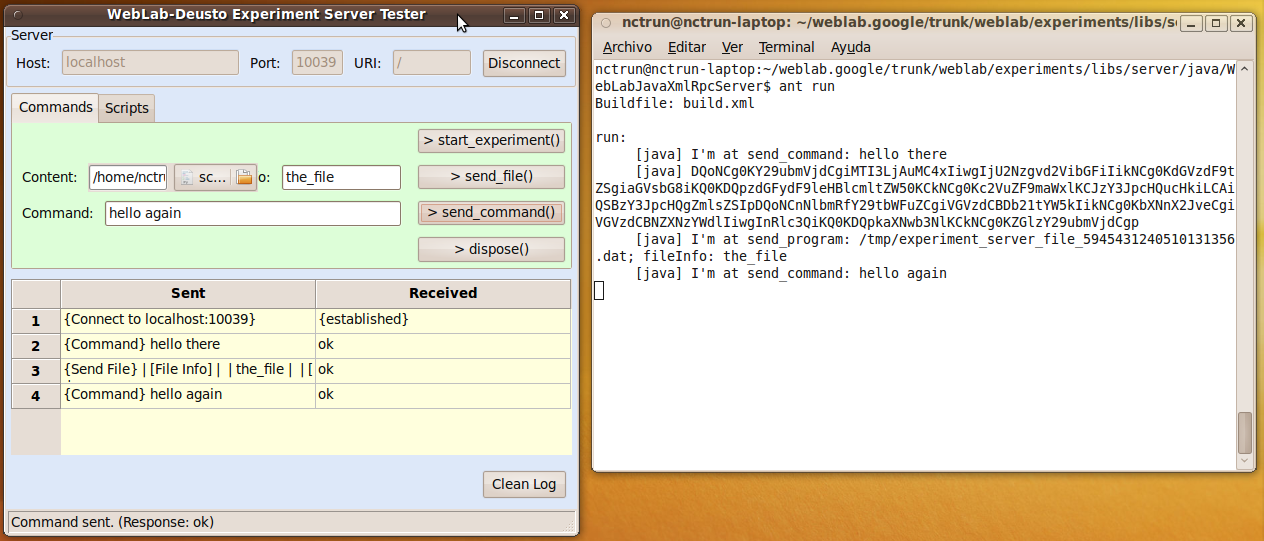
Or you can make a script. This could be a full example of the provided API (in addition to all the Python API):
connect("127.0.0.1", "10039", "/weblab")
test_me("hello")

start_experiment()
send_file("script.py", "A script file")
send_command("Test Command")
msg_box("Test Message", "test")
dispose()

disconnect()
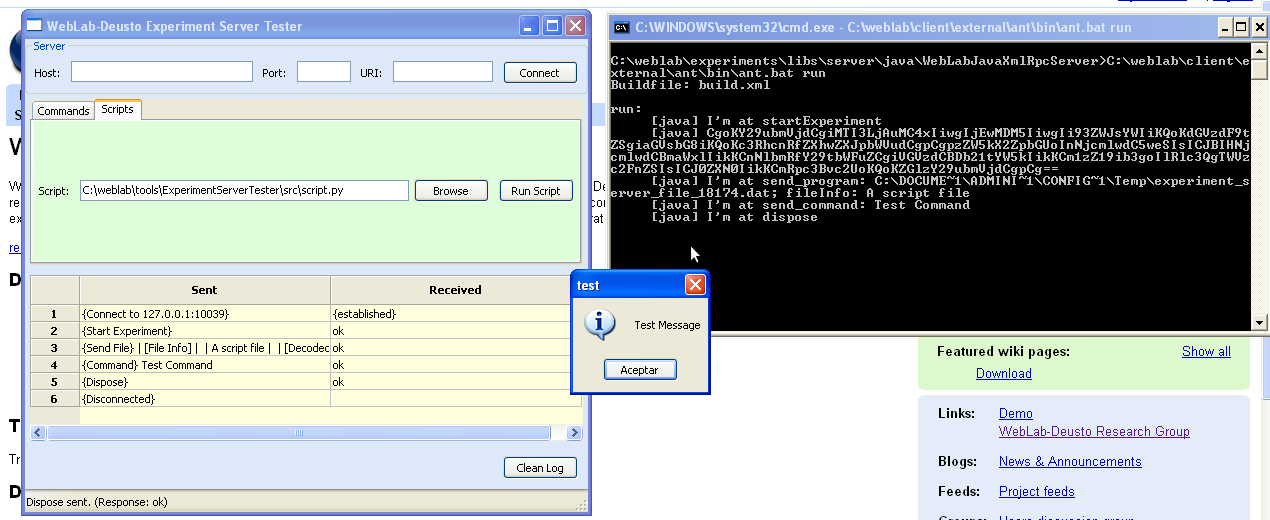
While this tool is still in an experimental status, it can already help the development of experiments.
VISIR Battle Tester
The VISIR Battle Tester (available in tools/VisirBattleTester is an automated tool to evaluate the performance of WebLab-Deusto with VISIR. It simulates multiple concurrent students interacting with a VISIR in a WebLab-Deusto system, testing different measurements and validating that the results are the expected, in certain range.
For example, it may send a command which is a request that it knows that it should return 900, and checks that there is up to a 20% of error margin:
before = time.time()
response = weblab.send_command(reservation_id, Command(visir_commands.visir_request_900 % visir_sessionid))
after = time.time()
result = visir_commands.parse_command_response(response)
ar3 = AssertionResult(900.0, 900.0 * 0.2, result)
if DEBUG and ar3.failed:
    print "[Failed at 3rd]" + str(ar3)
if not IGNORE_ASSERTIONS:
    assertions.append(ar3)
times.append(after - before)
So as to run it, change the credentials and URL in the run.py file and run
it.